3.1 Basic concepts of file management
|
Previous
Chapter 2: Using a computer
|
Next
Chapter 4: File and print management
|

 CHAPTER OVERVIEW
 At the end of this chapter, you should be able to:
- Understand the basic concepts used in file management.
- Organise files and folders on the computer.
- Identify the different file types.
INTRODUCTION
Having an effective computer filing system can make a huge difference in your everyday life. Firstly, it helps to save time, but most importantly, it helps you to be more organised.
In this chapter, we look at what file organisation is, how we can achieve file organisation and the different types of files you can find on your computer. You will also learn about the importance of file management, and how you can organise, delete, restore, move, view and sort files and folders. Furthermore, you will learn about the basic accessories that Windows comes with, as well as how to install a printer.

Take note
Before you can start with this chapter, you must have worked through the chapter on how to use a computer.
UNIT
3.1 Basic concepts of file management
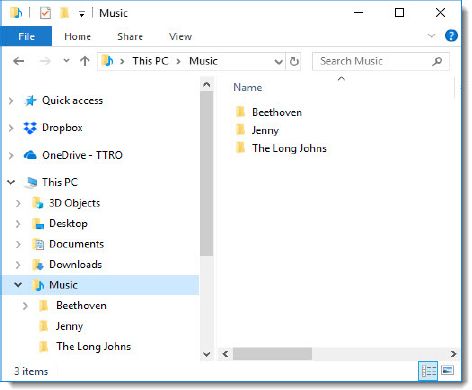
File management on a computer is similar to filing documents in a filing cabinet. A filing cabinet is used to store paper files in cardboard folders. In the same way, we can store files and folders on a computer.
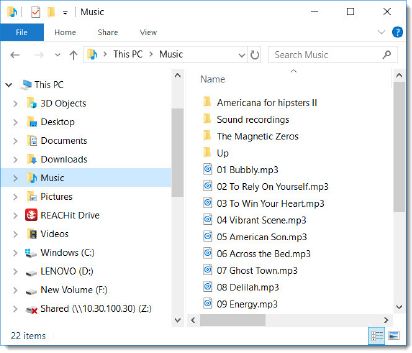
Figure 3.1 shows the This PC folder with the sub-folder Music. This folder contains sub-folders that are organised according to the name of the artist or group. This is to give you an idea of how file management looks on a computer. In Windows, folders are used to organise files.
Folders are stored on a drive in a computer. Data is stored on and retrieved from a disk drive. Each drive will indicate the type of storage medium, for example, whether it is a hard disk, USB drive, CD, DVD, or so on. Figure 3.2 shows an example of the different drives that can be found on a computer.
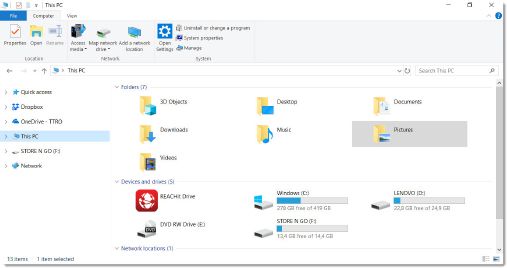
The capital letters and colon indicate what type of disk it is. For example, from Figure 3.2, you can see the following:
- The C: Which is also known as the C-drive, usually refers to the hard disk drive (HDD).
- The D: Which is also known as the D-drive, usually refers to a CD or DVD drive.
- Other letters are also used to indicate storage media, for example, in this case F:, which refers to a removable disk (USB). Storage media, such as DVDs, USBs and hard drives, do not save data to the disks on the computer.
FOLDERS
A Windows operating system organises its drives, folders and files in a hierarchical folder structure. Files are stored on a computer inside folders. Folders are used to organise a computer’s files so that it can be found easier. A folder will contain sub-folders and then files.
In the following example, we will explain a folder by comparing it to a tree. The structure is the shape of a pyramid, where each row of items is linked to the items beneath it. Because of this pyramidal structure, this hierarchical structure is also known as an “inverted tree”.
Figure 3.3 shows an example of an inverted tree.
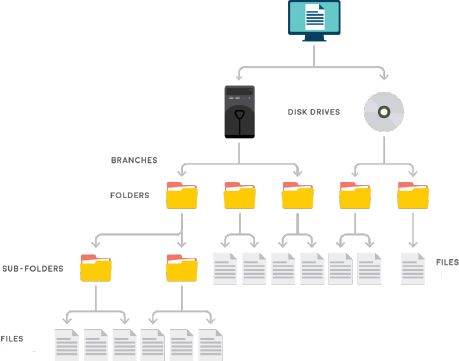
The different drives, such as the different hard drives, CD/DVD drive, USB drives, as well as network drives, are found in the row below the root. Folders linked to the specific drives are then shown in the next row.
Any sub-folders and files found in the folder above are shown in the next row. This pattern continues until the final row only contains files.
The highest level of the tree structure of a drive is, therefore, called the root directory and is stored on the hard-disk drive of a computer. The documents then form a sub-folder of the root directory C-drive, which is written as C:\.
FILE PATH
A file path shows the location of where a file, web page, or other item is located on the computer. The file path shows you to which storage device the file is saved (i.e. the drive letter), in which folder and sub-folders the file is saved, the name of the file and finally, the type of file (given by the file extension).
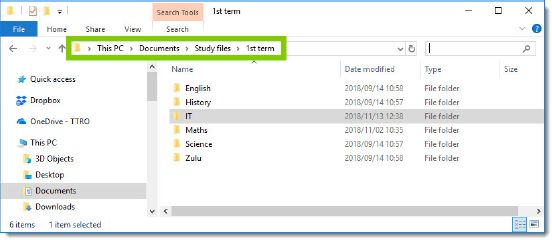
For example, Jane has a music folder where she keeps her songs. Figure 3.4 shows an example of this file path.

As Figure 3.4 shows, each file’s unique file path starts with the storage device drive letter. After the drive letter, you will see the name of the file’s folders and sub-folders. A back slash (\) is used to separate the drive letter, and the different folders and files. Finally, the file path ends with the name and extension of the file.
Windows file names have two parts; the first part is the file name and then a period followed by an extension. A file extension or file name extension is found at the end of a file name and shows what type of file it is in Microsoft Windows. The extension is a three- or four-letter abbreviation that identifies the type of file. For example, in the file name, Moonlight.mp3, the extension is mp3.

Something to know
When using file paths in Windows, you must always use back slashes (and NOT forward slashes). Windows uses back slashes for paths, although everything else seems to use forward slashes.
Later in this chapter, you will learn more about the different file extensions.
FINDING A FILE PATH
To find the file path of a folder, click on the address bar in File explorer.
 Guided Activity 3.1
You can do this as follows:
1. Open the Computer window from the Start menu.
2. Browse to the folder for which you want the file path.
3. Click on the address bar to see the folder’s address.
Guided Activity 3.2
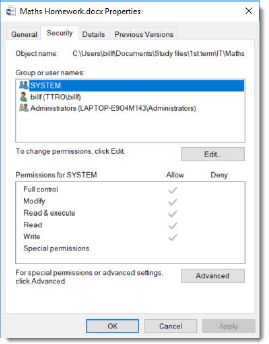
If you want to know what a file’s unique file path is, you can find it using the Properties window.
1. Open the computer window from the Start menu.
2. Look for the file you want the file path for.
3. Right click on the file and select the Properties option.
4. Click on the Security tab.
5. The file path is given at the top of the security tab as the Object name.

FILE MANAGEMENT

 Activity 3.1
1. Define the following terms:
a. File path
b. Disk drive
c. Folders
2. Answer the following questions based on the file path below:
C:\Documents\School\Maths.docx
a. What is shown in the file path above?
b. To what does “C:\” refer?
c. A file name consists of two elements. What are they in this diagram?
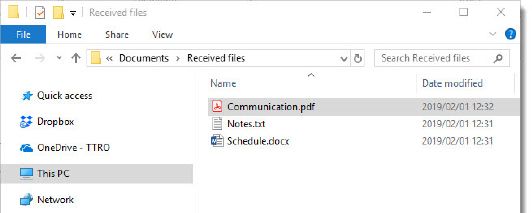
3. Using the figure below, provide the file path to get to the file: Communication.pdf.
ORGANISING FILES AND FOLDERS
Organising files on your computer is an important task, as it can ultimately save you lots of time and effort! For you to find files and folders on the computer, it must be organised properly. It is, therefore, important for you to place files in folders and give them the correct names.
In Microsoft Windows, this can be done in different ways. This section will look at the easiest ways in which files can be copied or moved between folders, renamed and deleted. You will also learn about how to search for files on a computer.
Before you can start organising your computer, you first need to see how the computer is currently organised.
USING A FILE MANAGER (THIS PC)
A file manager is a built-in application that is used to organise files and folders. To open the file manager, double click on the This PC icon. The This PC folder will open up in a new window. From here, you can start working with the files and folders.
Guided Activity 3.3
Practise using the file manager on your computer by following the steps below:
1. Click on the Start menu button in the bottom-left corner of the screen.
2. Once the Start menu opens, type in the word “explorer”. You should see a File explorer option appear in the Start menu.
3. Click on the File explorer option, which will open the file explorer on the computer.
4. Once opened, click on the This PC option in the left panel. Here, it will show you the main folders. From here, you can explore the computer’s organisational system by looking through the folder structure.
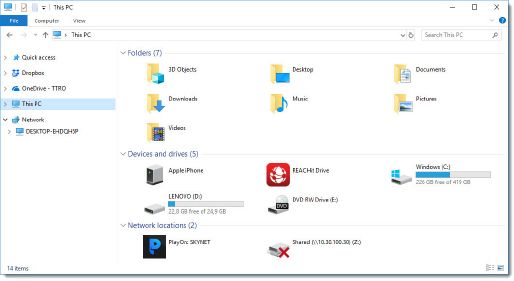
In the This PC screen, the storage devices are indicated by grey and black icons, and include the drive letter in their name. The figure shows that there are four storage devices – i.e. Computer (C:), Data (D:), USB Drive (F:) and Recovery (E:). By double-clicking on any of these storage devices, it will open, and you can browse the files and folders stored in it. If you want to open any files or folders, you should double-click on them.
After you have examined the different files and folders on the computer, you can start organising them.
As you have learned, files are stored on a computer inside directories (called folders in Microsoft Windows). These folders are used to help organise a computer’s files so that files can be found more easily. Each folder can contain any number of files or sub-folders. For example, a music listener might create a Music folder with all her music files in it.

A more organised music listener might have a Music folder as the first folder, and then sub-folders for each artist. It might even have a sub-folder for each style of music and then have folders inside of that for each artist. This would make it much easier to find songs by a specific artist.
HOW TO ORGANISE FILES AND FOLDERS

A similar strategy can be used on all storage devices to make it easier to find important files and folders.
MANAGING FOLDERS AND FILES
An interesting way to organise folders and files is shown in the following YouTube video. This is just to give you an idea of how you can do it. However, in the end, you must use a system that works for you.

CREATING AND NAMING FOLDERS AND FILES
An important part of having an effective file structure is creating folders and sub-folders to organise your files.
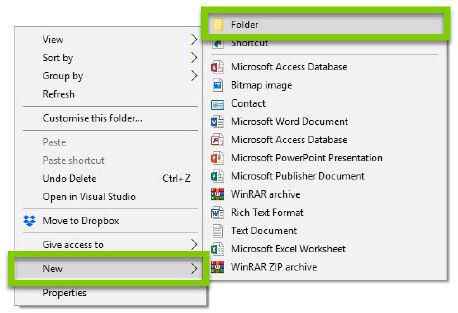
Guided Activity 3.4
To create a new folder:
1. Using the File explorer, go to the location where you want to create a folder.
2. Open the Action menu by either right clicking, or by using the ALT-F shortcut key.
3. Hold the mouse cursor over the New option and select the Folder option.
4. Enter a name for the new folder and press Enter on the keyboard.
The same procedure can be used to create new files. However, instead of selecting the Folder option, the file type you want to create should be selected.
To create a new file:
1. Using the File explorer, go to the folder where you want to create a file, for example, Documents.
2. Right click on an empty section of the folder.
3. Click on New, select the type of file that you want to create.
4. Enter a new name for the file.
5. Press Enter.
FILE NAMING, CONVENTIONS AND PROPERTIES
FILE NAMING AND CONVENTIONS
A file name is used to identify a file on the computer. This is the best method of organising files and folders on the computer. Naming files properly helps you to navigate and locate files and folders easily.
A file-naming convention (FNC) helps keep the computer clutter-free and allows you to do the following:
- Know the contents of a file before you open it
- Navigate through long lists of files for the one that you are looking for
- Store different versions of the same document by naming them according to date
Best practices for naming files:
- Keep file names short, but meaningful.
- Include useful information, such as the name of the project or document on which you are working.
- Include the version number (e.g. v1 or -v1) and the date if there is more than one more version. Dates should always appear as yyyy/mm/dd to organise the files in order.
Things to avoid when naming files:
- Symbol characters, such as “\ / < > | “ ? [ ] ; = + & $ α β”
- Abbreviations that are not easy to understand
- Simple words, such as “draft”, “current” or “document”.
FILE PROPERTIES
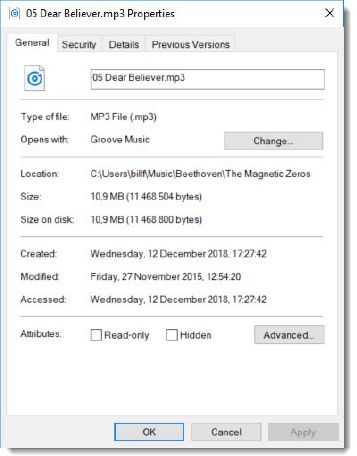
The File properties window shows you a range of information about a file, such as its file type, size, author, title and when it was changed last. The Properties window will also give you information on how you can manipulate the file.
Guided Activity 3.5
To see the properties of a file, right click on the file name and then click on Properties.
1. The Properties dialogue box will give you information about the file, as you can see in the figure below.
Something to know
When giving the new file a name, make sure that you do not accidentally change the file extension. Changing the file extension will prevent Windows from opening the file correctly.
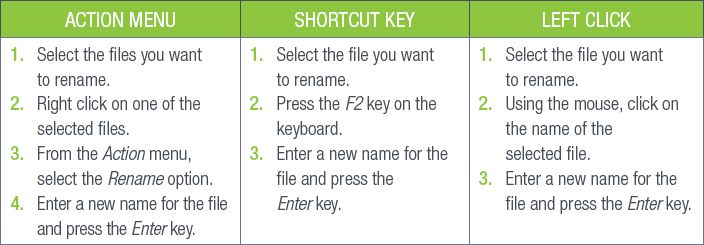
RENAMING FILES
The Rename command allows you to change the name of files. As with Cut and Copy, there are three different ways to rename files.
Table 3.1: How to rename files
When naming files, it is important that you name the files clearly and in an orderly way. The following are pointers to help you rename files and folders in an organised way:
- Avoid using a structure that is too difficult to follow.
- Since files are organised alphabetically, you need to think about the way in which you name files.
- Make sure that you can identify similar files based on the file names.
- Use the dash symbol to separate different items in a file name (for example, the name and date).
Something to know
Applying the keyboarding skills you have learned will help you rename files and folders much quicker.
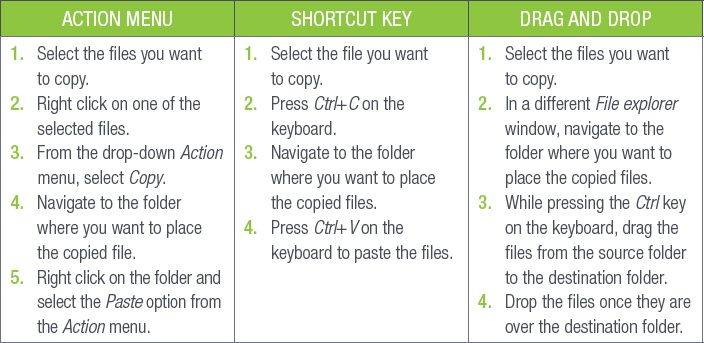
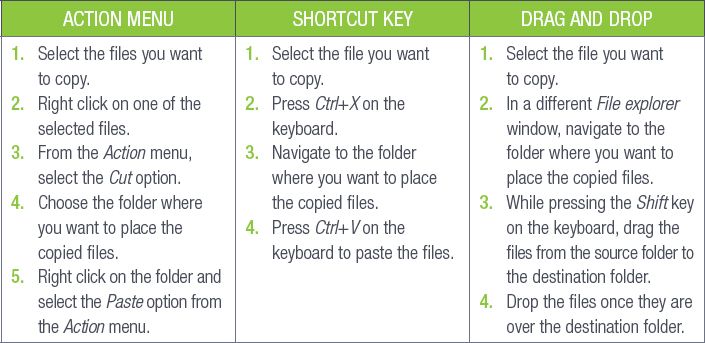
COPYING FILES
When you copy a file, a duplicate of the file is created and stored on the computer’s clipboard. This duplicate file can then be copied onto any storage medium connected to the computer, using the Paste command.
There are three ways that you can copy and paste files.
Something to know
Files are copied when you want to share them, or back them up for safety.
Table 3.2: How to copy and paste files
COPYING AND MOVING FILES
Use the section of the following video to create an animation about showing what it means to copy a file:

MOVING FILES
When moving files, the file or files that you move are copied to a new destination, but then deleted from its original destination. When doing this, you have not created a copy file, but you have moved a file from one folder to another folder.
Something to know
Files are moved when you want to organise them.
To move files, you need to cut and paste them, and NOT copy and paste them.
Table 3.3: How to move files
SEARCHING FOR FILES
If you are struggling to find a file on the computer, you can always search for it. The search function allows you to look for any file that is on the computer.
To search for a file in Windows 10, you can do the following:
1. Next to the Start button, you can type to search for the file you are looking for.
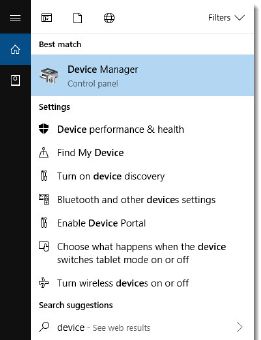
2. In the example above, the user typed in the word “device”. You can see the search results above the search box.
When searching for files,
- Use different search terms: For example, if you are looking for a spreadsheet file, try using a different file name. You could have changed the file name while saving the file.
- Last application: If you used a specific application to open and edit the file, you can click on File > Open > Recent. The file you are looking for might appear in the list of files that you edited recently.
- Move and rename the file: After you have found the file, you can give it a new file name. Then, move it to a folder so that you can find it more easily at a later stage. For example, if it is a new song that you downloaded, move it to the Music folder.
DELETING FILES
The Delete command enables you to remove files from the storage device. This command can be used to either remove files that you do not need anymore, or to make more space on the storage device.
In Microsoft Windows, deleted files are moved to the Recycle Bin. The Recycle Bin is a temporary folder where deleted files are stored until you remove them from the bin. Any files you delete will first be moved to the Recycle Bin before they are permanently deleted.
The following tables show how you can delete files from the computer and how these files can be deleted from the Recycle Bin.
Take note
Do not delete any computer software files, as this could cause the computer to malfunction.
Table 3.4: How to use the Recycle Bin
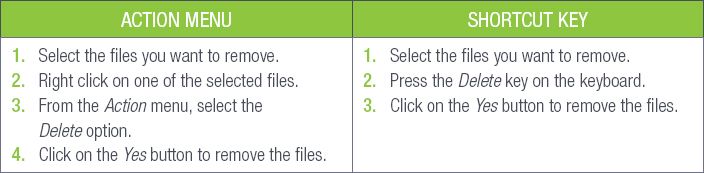
Table 3.5: How to remove files from the computer permanently
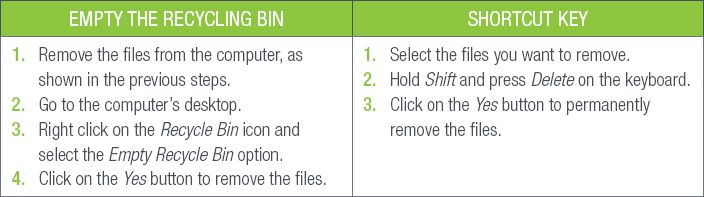
Something to know
Files that are deleted from a flash drive cannot be restored from the Recycle Bin.
RESTORING FILES
If you cannot find a file on the computer, or you have deleted it by mistake, you can still recover the file by restoring it from the Recycle Bin to its previous version.
Something to know
Previous versions are, at times, referred to as shadow copies.
Guided Activity 3.6
To restore files from the Recycle Bin, the following should be done:
1. Open the Recycle Bin by double-clicking on the icon that is usually found on the desktop.
2. Browse through the folder and select the file(s) or folder(s) that you need to restore.
3. Right click on the file or folder and from the Action menu, choose Restore.
4. The Recycle Bin will then restore the deleted file(s) or folder(s) to their original location.
Activity 3.2
1. Which solution in Column B can be used to solve the problem in Column A? Note that more than one action can apply to a problem.
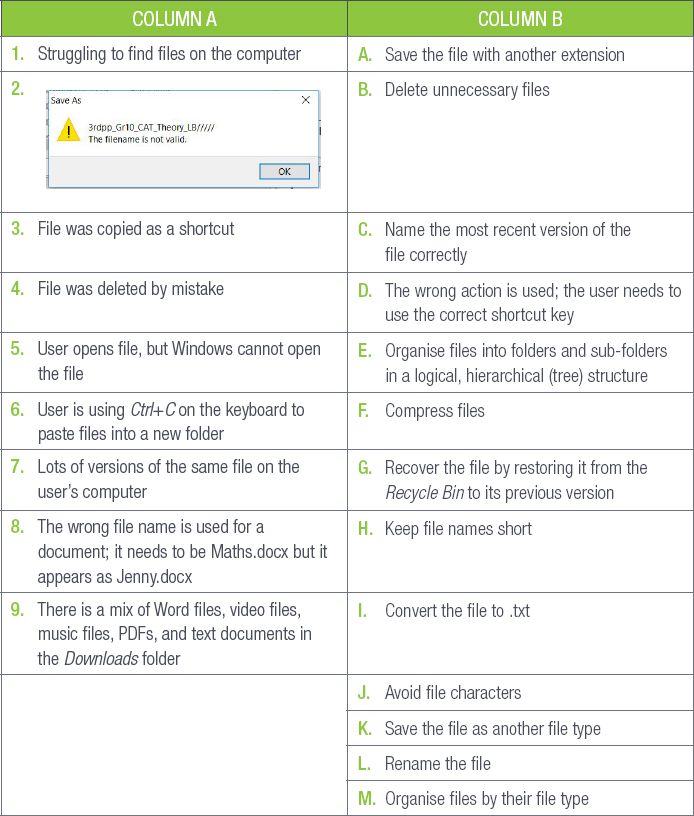
2. Identify the drive letter, folder, sub-folder, file name and extension in the file paths below. Make a copy of the table below in your workbook and fill in your answers under the correct heading in the table:
a. c:\Games\Solitaire\Solitaire.exe
b. e:\Music\Pop\Jenni – Roses.mp3
c. c:\Program Files (x86)\Calculator.exe

UNIT
3.2 File types
Each file has a file extension identifying the type of file and how the computer should interpret it. A .txt file is a simple text document that contains words with no formatting. A .doc file allows for formatted text with different fonts and images.
This section will look at the following file types:
- Text files
- Document files
- Locked document files
- Web pages
- Archives and compressed files
- Presentation files
- Spreadsheet files
- Database files
- Image files
- Animation files
- Video files
- Audio files
- Adobe Acrobat
TEXT FILES
There are two types of text files:
1. .txt (text)
2. .rtf (rich-text format)
Text files are files used to store plain text. Plain text refers to text that has no special formatting, such as fonts, font sizes, images and so on. In Microsoft Windows, text files are identified with the .txt file extension. Notepad is a popular application in Microsoft Windows that is used for opening and creating text files. Figure 3.14 shows an example of a .txt file:

Rich-text format (RTF) files can save more information than text files. This includes different font types, such as BOLD, italic, as well as font colour. RTF files cannot be opened in Microsoft Notepad, but can be opened in Microsoft WordPad. Both these applications are installed with Microsoft Windows for free.
DOCUMENT FILES
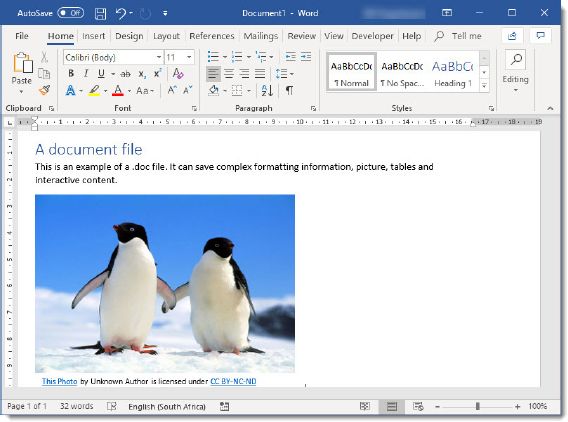
Although document files (.doc, .docx and .odt) are used to store documents. It differs from text files and rich-text files because it can store more complex information such as custom formatting options and styles. Word processors – for example, Microsoft Word, Google Docs and LibreOffice – can be used to create and edit document files.
| DIFFERENT TYPES OF TEXT FILES |
Jabulani is a Grade 12 learner who works almost every day on his computer on various school assignments. He recently learned that, although two different files may look the same when not formatted, for example a .txt file and a .doc file, the data actually differs. This means that he cannot just change the file type of one file to another and expect the document to open. However, computer applications have improved quite significantly in that applications, such as Microsoft Word or LibreOffice, can convert one file type to another. |
Example 3.1
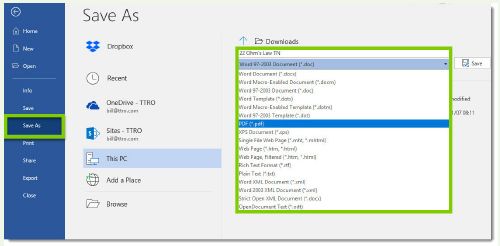
To save the file in a different file format using the Save As function, Jabulani does the following:
1. By clicking on the Save As button, a dialogue box opens. This allows him to select the type of file he wants to save his file as, for example PDF, plain text, web page and so on.
The application then makes sure that the raw data is saved in the correct way for that file format. An example of this dialogue box is shown in Figure 3.16 on the next page.
LOCKED DOCUMENT FILES
Locked documents are documents with content that is difficult to change, or modify once it has been created. Locked documents are generally used in situations where you want to use the file in the format in which it was saved. Examples of locked document files would be contracts, formal letters and shop catalogues. The two most common locked document formats are the .pdf (portable document format) and .epub (E-PUB) file formats.
WEB PAGES
A web page is a computer file that relates to websites and web servers. Web pages include information, such as the colours of text, backgrounds and images. It also includes links to images and other types of multimedia.
The two most common extensions for web pages are:
1. .html
2. .htm
The only difference between the two is that .htm is used as an alternate to .html by a few web servers that do not accept four-character extensions. Both extensions can be used on most web servers.
ARCHIVES AND COMPRESSED FILES
Archives are types of files that can combine and compress multiple different files into one file. For example, if you need to send 50 files in an email to a group member, it will be much easier for you to combine and compress the files into a single .zip file, before sending the .zip file through email. This will make it so much easier for the other person to download the file. The .zip file will also be smaller since all the files are compressed into one file, making it easier to send and download. After receiving the files, it can be decompressed and accessed normally. The three main file extensions for archives are:
1. .zip
2 .rar
3 .7z
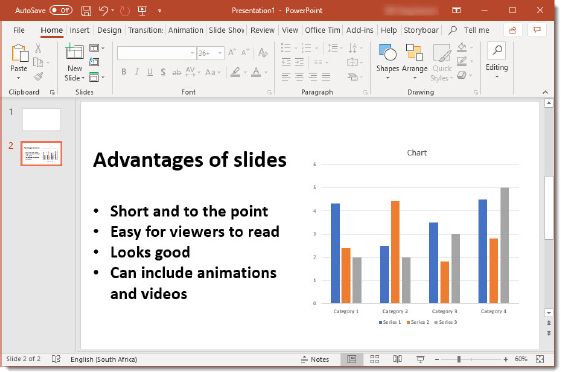
PRESENTATION FILES
A presentation file stores information using slides that can be shown consecutively. Presentation files are used by teachers, businesses and learners where the speaker discusses the topic using the content of the slides. Slides are short, they can contain pictures and animations, and are generally attractive. The three main file extensions for presentations are:
1. .ppt
2. .pptx
3. .odp
SPREADSHEET FILES
A spreadsheet file is a file that stores information in a large table. Companies use spreadsheets when they need to analyse large amounts of data, or do calculations. It is also used to show data, such as checklists and class lists. The three main file extensions for spreadsheets are:
1. .xls
2. .xlsx
3. .ods
Something to know
Excel spreadsheets can have many sheets. Each sheet is a separate page that has its own data.
The spreadsheet file gets its .xls (and .xlsx) extension from the most popular spreadsheet software – i.e. Microsoft Excel. Figure 3.18 is an example of someone’s academic schedule.

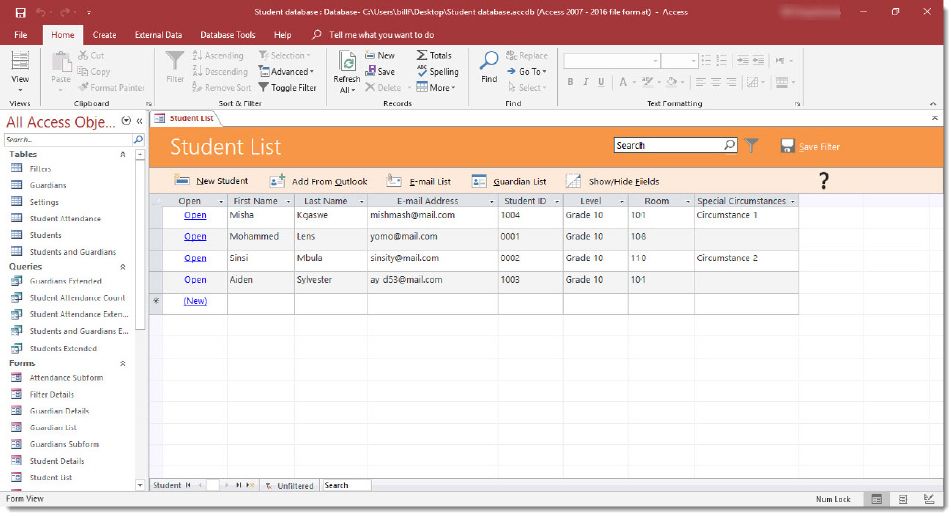
DATABASE FILES
Databases are similar to spreadsheets, except that the sheets, called tables, are all connected to each other. For example, your school might have a database for each grade with the full names of the learners, names of their parents, their contact details, addresses and the amount of school fees paid. Even though these items are listed in different tables, they are still linked together. Because of this, at the end of the month when the school needs to send out fee statements, the database software can create a statement where your name and surname, parents’ contact details and fees owed are all displayed on the same page.
Most programmers use databases to store important data for their software.
IMAGE FILES
There are five main formats used to store graphics:
1. .bmp (bitmap image)
2. .gif (Graphics Interchange Format)
3. .jpg or .jpeg (Joint Photographic Experts Group)
4. .png (portable network graphics)
5. .tiff (tagged image file format)
These image formats are used for cameras, scanning and printing. Most of these file formats need not be compressed and are, therefore, ideal for printing and web graphics. Photos taken by a camera, or pictures created using software, for example, Microsoft Paint or Adobe Photoshop, are often saved in one of these formats.
ANIMATION FILES
Animation files are files that interpret moving images. The two most common animation file formats are:
1. .gif
2. .swf (Small Web Format Flash)
Although both these formats create animations, they do so in two different ways. GIF animations show normal GIF images one after another to create an animation; SWF files use programming to move shapes on the screen, creating an animation.
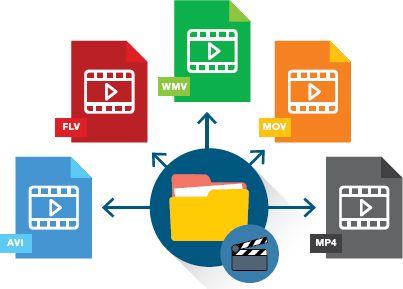
VIDEO FILES
A video file format is used to store digital video data on a computer. Video file formats are usually compressed to reduce the file size. Video files are made up of a “container” and a “codec”. A codec is used to compress and decompress the video where the video files are too big, causing the video not to play, or be downloaded. Examples of codecs include FFMpeg, DivX, XviD and x264.
A container is a set of files that stores information about the digital file. For example, a container in a video file would be a combination of both audio and video in a single file so that the file can play both audio and video at the same time. Some common types of containers would be AVI, FLV, WMV and MP4.
Something to know
The opportunity to create videos on PCs and mobile devices are endless. MP4 is one of the most common file formats used. It uses a separate compression for audio (m4a) and video (m4v), and is mainly used for sharing videos over the Web. MP4s are generally small in size; however, they have a high quality even after being compressed. MP4 files are popular, because they are compatible with both online and mobile browsers.
SOUND FILES
Sound (audio) files are similar to video files, as they are compressed before they are stored on a computer. They are used to store audio files, such as music. Because of the popularity of using computers to store music and videos, the .mpeg and .mp3 file types have become very popular in recent years. Common audio file formats consist of the following:
- .aac (Advanced Audio Coding)
- .flac (Free Lossless Audio Codec)
- .mp3 (Moving Picture Experts Group Layer 3 audio)
- .wma (Microsoft Windows Media Audio).
PORTABLE DOCUMENT FORMAT (PDF)
Adobe Acrobat is an application developed by Adobe Systems where you can view, create, print and manage files in a portable document format (PDF). PDFs are a very good file format for saving books, or published documents that can be easily sent to another user through email, etc.
CONVERTING A DOCUMENT TO A PDF
You can convert a document to a PDF by doing the following:
1. Click on the file that you want to be converted into PDF format.
2. Click on the File tab and choose Save As.
3. Type in the file name.
4. Using the drop-down menu, click on the PDF under the Save As type.
5. Click Save and the document will be saved in a PDF format.
Activity 3.3
1. Complete this activity by following these steps:
a. Create a sub-folder in My Documents. Name the new sub-folder: CAT Grade10.
b. Open the Word-processing application. Copy and paste any picture from the computer into the document.
c. Save the file with the file name: Practice in My Documents.
d. Move the Practice.docx to the folder: CAT Grade10
e. Create a PDF of the Practice.docx file. Save the file in the same location.
f. Rename the PDF file to Practice_new.
g. Delete the file Practice.docx in the CAT Grade10 folder.
2. Answer the following questions about the diagram below.
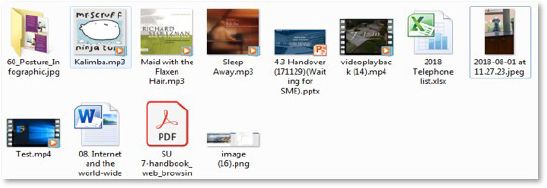
a. How many audio files are there?
b. What type of file is “08.Internet and the world-wide”? What application can be used to open this file?
c. “Image (16).png” can be opened with Adobe Acrobat Reader. Is this statement true? If not, provide the correct answer.
d. What type of program can be used to open “4.3 Handover (171129) (Waiting for SME).pptx”?
e. What is the name of the file that Excel can open up from the diagram above?
REVISION ACTIVITY
1. Each time Sipho saves a file, he saves it to the desktop of the computer. His desktop is very cluttered and he has trouble finding the files that he needs. Advise Sipho on a more effective way to organise his files. (4)
2. Which of the following is NOT a file extension used for graphics files?
A. .bmp
B. .gif
C. .toff
D. .jpeg (1)
3. Fred has created a folder called “Grade 10 PAT” on a school computer to save all his PAT files. He checks on the file properties and finds that the location of the folder is c:\users\ fred\documents\Grade 10\Grade 10 PAT. Use the diagram to answer the questions below:
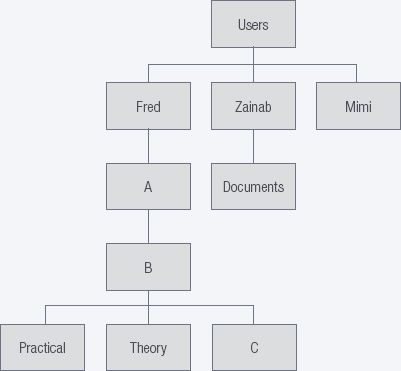
a. Write down the folder names of folders A, B and C. (3)
b. How many users have folders on this computer? (1)
2. Match the file extension in Column A with the associated file type in column B. Write down only the letter of the file type (Column B) next to the number of the file extension (Column A), e.g. 1C.
(Note: It is possible that the application from Column B may be used more than once.)
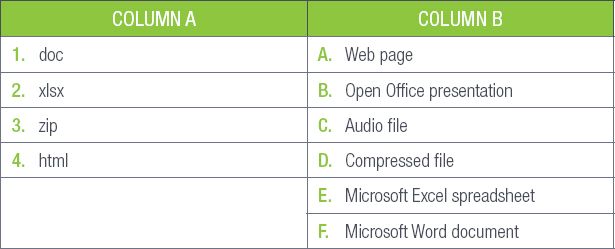
(4)
3. Which shortcut key can you use to carry out the following actions?
a. Rename a file (1)
b. Copy a folder (1)
c. Paste a document onto the desktop (1)
TOTAL: [16]
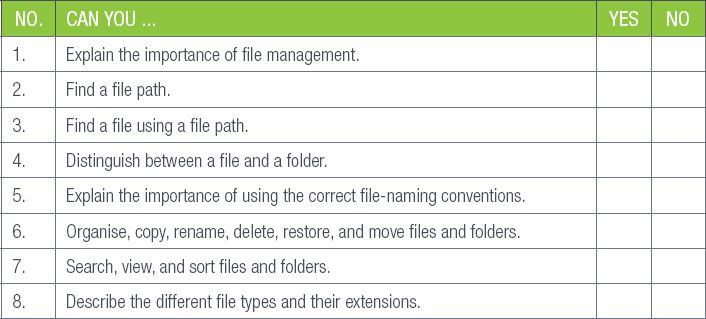
AT THE END OF THE CHAPTER
Use the checklist to make sure that you worked through the following and that you understand it.
|
Previous
Chapter 2: Using a computer
|
Table of Contents |
Next
Chapter 4: File and print management
|