Would hand sorting also be a practical way to sort out the mixture of rice and lentil beans in the picture below?
Yes, as long as there are not too many of them to sort.
|
Previous
Chapter 6: Properties of materials
|
Next
Chapter 8: Acids, bases and neutral substances
|
Chapter overview
2 weeks
'Mixtures' was first introduced in Gr. 6, so learners should already be familiar with these concepts. Learners would have also looked at some of the physical methods of separating different types of mixtures (including hand sorting, sieving, filtration), and this year we will explore some additional methods in more detail (including distillation and chromatography).
2.1 Mixtures (1 hour)
|
Tasks |
Skills |
Recommendation |
|
Activity: Types of mixtures |
Sorting and classifying, communicating, group discussions |
Suggested |
2.2 Methods of physical separation (4 hours)
|
Tasks |
Skills |
Recommendation |
|
Activity: Thinking about hand sorting |
Sorting and classifying, comparing |
Suggested |
|
Activity: Thinking about sieving and filtering |
Sorting and classifying, comparing |
Suggested |
|
Activity: Thinking about magnetic separation |
Sorting and classifying, comparing |
Suggested |
|
Activity: What if we want to keep both the water and the salt? |
Demonstrating distillation |
CAPS suggested |
|
Activity: How can we separate two liquids with different boiling points? |
Demonstrating distillation using Liebig condenser |
Optional, extension |
|
Investigation: Is black ink really black? |
Separating ink by chromatography, hypothesising, doing investigation, observing, recording information, comparing, interpreting information, |
CAPS suggested |
|
Activity: Separating a complex mixture |
Designing and explaining, planning investigation, sorting and classifying, comparing, writing, |
CAPS suggested |
2.3 Sorting and recycling materials (1 hour)
|
Tasks |
Skills |
Recommendation |
|
Activity: What happens when we throw things away? |
Communicating, group discussions, writing, identifying problems and issues, raising questions |
Suggested |
|
Activity: Careers research task |
Discussing, communicating |
Optional |
In the first section of this chapter, learners will learn how to identify mixtures. One of the central ideas in this section is that the components in a mixture are not chemically joined. They still exist as separate compounds that have not reacted with each other in any way. For that reason, mixtures can be separated using physical methods. Physical methods can not be used to separate elements that are chemically joined.
In order to make this section more interesting you could provide small samples of each of the mixtures discussed and ask learners to draw them, paying close attention to any features that a particular mixture may have. When they are faced with a solution (water and sugar, for instance) they might notice that there are no visible features to draw. This will help establish in their minds that solutions are mixtures where the substances are so intimately mixed (literally on the level of individual particles) that we cannot make out separate substances anymore.
What does it mean to mix something? Can you mime an explanation (that means you have to explain without saying a single word!)
Get your learners to act out the word 'mix'. Learners might make stirring motions with their arms. This exercise may seem trivial but their attention will immediately be focussed (and their learning enhanced) if they are engaged in this way. Using gestures that require learners to move their bodies has been shown to enhance learning even at university level!
Is it possible to mix water? Discuss this with your class.
Some learners may say no, you need two or more things mixed together to have a mixture. Other learners may answer that it is possible to mix hot water with cold water. Point out that the end result would just be water, and not really a mixture of hot and cold water; once mixed, the water would have the same temperature throughout.
One substance alone cannot be a mixture. A mixture is made up of two or more different substances.
A mixture can contain solids, liquids and/or gases. The components in a mixture are not chemically joined; they are just mixed. That means we do not need to use chemical reactions to separate them. Mixtures can be separated using physical methods alone and that is what this chapter is all about: how to separate mixtures.
There are many different kinds of mixtures. Before we learn how to separate them, it is worth looking at all the different kinds of mixtures briefly.
This is a revision of the types of mixtures that one can get, which has been done in Gr. 6 Matter and Materials. If you feel your learners have already grasped this, you can go through it briefly by just looking at the different pictures provided and ask learners what types of mixtures they are.
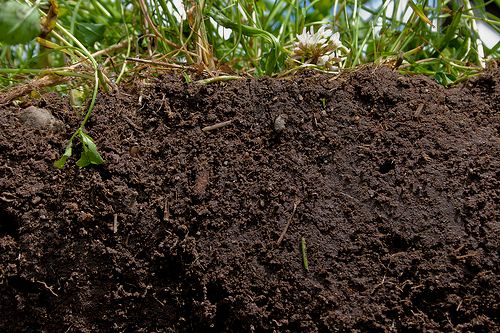
Can you think of an example of a mixture of a solid and a solid? Soil is an example of a mixture of solids. What are the substances found in soil?
Soil can contain clay, sand and small pebbles. Soil can also contain bits of plant matter. Clay and dust particles are very small, and sand particles are larger. Pebbles are even larger.
What happens when clay or sand is mixed with water? Would you be able to see through a mixture of clay and water? The mixture of clay or sand with water is muddy. The small clay particles become suspended in the water. This kind of mixture is called a suspension. Suspensions are opaque; that means they are cloudy and we cannot see through them very well.
What happens when sugar is mixed with water? Does the mixture become muddy? Why not? The sugar dissolves in the water and the mixture is called a solution. Solutions are clear; that means we can see through them.
Keep in mind that some mixtures that we expect to be solutions end up being suspensions. A good example is table salt and water that could end up looking cloudy because of the starch (free-flowing agent). In this case it would be better to use pure sea salt. (You could also use this apparent paradox as the basis of an extension activity about what appearances allow us to infer in certain situations.)

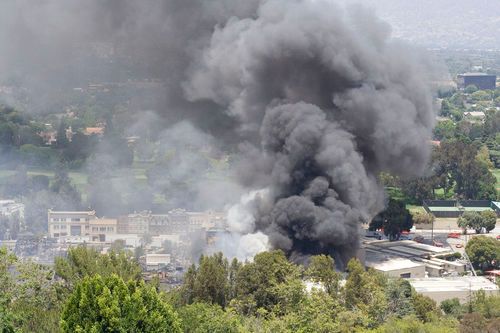
Have you ever seen smoke from a fire? What is the smoke made of? Do you think it is a mixture?
Smoke is actually made of tiny solid lumps of soot and ash and dust that mix with the air (which is a gas) and water vapour (also a gas). That makes smoke a mixture of one or more solids and gases.
Milk is not a single substance, but actually a mixture of two liquids! The one liquid component in milk is water, and the other is fatty oil. The reason milk is opaque is that tiny droplets of the oil is suspended in the water. Can you remember what a mixture is called when a solid is suspended in liquid?
We use milk as an example of a suspension, however, milk is actually more complex since it also contains solutes. It is a great example of a mixture that has both solution and suspension (emulsion) components. Flour or maizena mixed with water also makes a good suspension which settles after some time. This is also a good opportunity to revise the terms solute, solvent and solution, namely the solute (for example sugar) is the substance that is dissolved in the solvent (for example water) to form a solution (for example sugar water).
When some liquids are suspended in liquid, we call the mixture an emulsion. Like suspensions, emulsions tend to be opaque.
Are all liquid-liquid mixtures emulsions? (One way to recognise an emulsion is that it is opaque). Are all liquid-liquid mixtures opaque? Can you think of a liquid-liquid mixture that is not an emulsion? Discuss this with your class and give an answer below.
Firstly, no, not all liquid-liquid mixtures are opaque. Secondly, most solutions that learners will be able to think of are essentially solid-liquid mixtures at the fundamental level. It is good enough for learners at this level to offer examples of liquid-liquid mixtures such as 'a mixture of apple juice and water'.
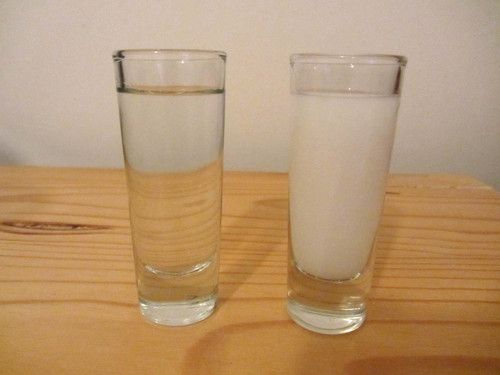
A better example of a liquid-liquid solution is vinegar, which is a mixture of ethanoic acid (acetic acid) - a liquid at room temperature - and water. This example might be a sensible inclusion since it would serve as early introduction to households acids that will feature prominently in the next chapter (Acids and Bases). If learners are given a vinegar sample to draw, it would be better to provide a sample of white vinegar, since it contains less solid matter. Once again they will be confronted with the realisation that the solution does not have visible features. Another opportunity to establish that solutions are mixtures where the substances are so intimately mixed that we cannot make out separate substances anymore.
A mixture of vinegar and water is clear, and that is a clue that the mixture is a solution.
Solutions are special kinds of mixtures in which the particles are so well mixed that they are not separated from each other. We cannot make out separate substances anymore - everything looks the same when we look with the naked eye.
The particle model of matter will only be dealt with in detail in Gr. 8, but the following kinds of visual representations may aid understanding of abstract concepts. You can draw these on the board with different colours. Learners were exposed to similar images in Gr. 6. However, it is not critical at this stage and you do not need to go into detail. Solutions look glassy/translucent, and the solid particles cannot be seen. The substances cannot be separated by filtration (dealt with later in this chapter).


In a suspension, one of the substance's particles are always clumped together. Sometimes one can even see little globs of oil (in the case of an emulsion) or little lumps of solid (in the case of a suspension) suspended in the liquid.
We learnt in Gr. 6 Matter and Materials that the particles of gases are far apart. This means that gases can mix very easily, because it is easy for their particles to move in amongst each other. The air we breathe is not a single gas but actually a mixture of gases! Do you know what the two most abundant components are?
Nitrogen gas and oxygen gas. Learners may say oxygen and carbon dioxide; nitrogen is actually the main component of air (roughly 80%) followed by oxygen (roughly 18%). Carbon dioxide is present in much smaller quantity.
Do you remember that we discussed boiling in the previous chapter (Properties of Materials)? What happens to a liquid when it boils?
The liquid turns to a gas.
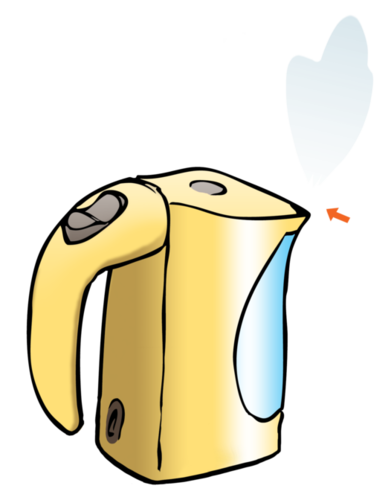
Can you see the water vapour in the following picture of a boiling kettle? Point to it with your finger. Discuss this with your teacher and classmates and when you have agreed on an answer, draw an arrow onto the picture to indicate the water vapour.

A suggestions is to do a demonstration of this in class if you can get a kettle and plug it in to show learners the colourless steam at the spout of the kettle. Learners may point to the cloud in front of the kettle. This is not actually water vapour, which would be invisible to the human eye. The cloud forms when the water vapour cools down sufficiently to condense into micro-droplets that are visible to the human eye.
We will only see the water when it starts to condense. When the water particles condense, they become liquid water again. That means the particles start clinging together in tiny micro-droplets, which grow into larger droplets when they come together. The small cloud of in front of the kettle is actually a cloud of micro-droplets of liquid water suspended in air. This is an example of a liquid suspended in a gas.
The image below indicates where the arrow should be drawn:
Can we see most gases? Why do you think so?
Most gases are colourless and cannot be seen. We cannot see individual particles as they are too small. However, some gases (such as Chlorine and Fluorine) can be seen because they are coloured.
Clouds and fog or mist are all examples of tiny water droplets suspended in air.
An artists, Berndnaut Smilde, uses a fog machine to make small clouds inside a room which only last a few seconds. A wonderful example of science as art! http://www.berndnaut.nl/works.htm
We have learnt that mixtures can be made of substances in the same state or in different states. The following activity will help us apply our new knowledge about mixtures to more examples.
INSTRUCTIONS:
Mixtures:
For instance, sugar dissolved in water would go in the middle block of the bottom row, to show that it is a solid (sugar) mixed with a liquid (water).

Gas-gas mixtures: Air
Gas-liquid mixtures: spray deodorant and air freshener
Gas-solid mixtures: smoke, dust cloud and foam plastic
Liquid-liquid mixtures: Clear fruit juice, hair oil
Solid-liquid mixtures: Salty water, paint (an emulsion/suspension of solid pigments particles in water or oil), cloudy apple juice (tiny bits of pulp are solid, and suspended in the juice)
Solid-solid mixtures: Alloys, soil
Why do we make mixtures? Mixtures have many uses: perhaps we are mixing ingredients to bake a cake, or mixing metals to make a really strong alloy.
Many things around us occur naturally as mixtures: salty sea water, moist air, soil, compost, rocks (mixture of minerals) to name a few. Many mixtures are man made, for instance; Coca Cola, paint, salad dressing and so forth.
You can ask your learners what we use paint for. Paint is used to cover walls and other surfaces. Sometimes we want to protect these surfaces against water or wind (for instance when we are painting an outside wall or roof) and sometimes we just want to make them look attractive (for instance when we paint an inside wall, or when we create a beautiful artwork). The water or oil in the paint helps us to spread the pigments more evenly over the surface that we want to cover and binds the pigments tightly so that the paint forms a protective layer.
Mixtures are very useful. However, sometimes we need to separate mixtures into their components. Remember that the substances in a mixture have not combined chemically. They have not turned into new substances, but are still the same substances as before - they have just been physically combined. That is why we can use physical methods to separate them again.
Now that we know about the different kinds of mixtures that are possible, we are going to learn about some ways of separating them.
As an introduction to this you can ask learners about why they think we would want to separate mixtures. For example, imagine that our drinking water comes from a well in the ground and it is muddy. Muddy water is not good to drink. We would want separate the water from the solid material (sand or clay) before using it! Once separated, we would keep the water to drink and throw the sand away. Ask learners if they can think of a way to separate the water from the sand? Learners may suggest filtration (filtering) as a method for separating the sand and water.
Suppose you were given a basket of apples and oranges. How would you sort them? You would probably pick out all the oranges from the apples by hand. The same method may not be suitable for all mixtures. You would probably not consider sorting sugar and sand grains by hand. Why not?
Sugar and sand grains are too small to be sorted by hand, and they look very much the same. It would not be practical to sort them in this way.
Let us look at some of the most commonly used methods of physical separation.
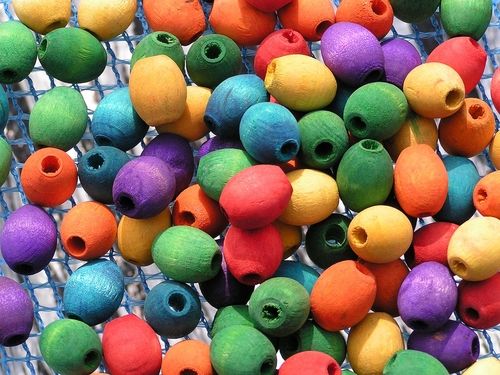
How would you separate the mixture of beads in the picture below into the different colours?
The most practical method would probably be to hand sort them into different colours.
Sometimes people create machines to perform tasks for them, like this Skittles sorting machine.
The video about the Skittles sorting machine is merely for entertainment, but it could be used to introduce discussions on fun 'explorations' and hobbies that challenge us as a starting block for innovation and useful applications of technology.
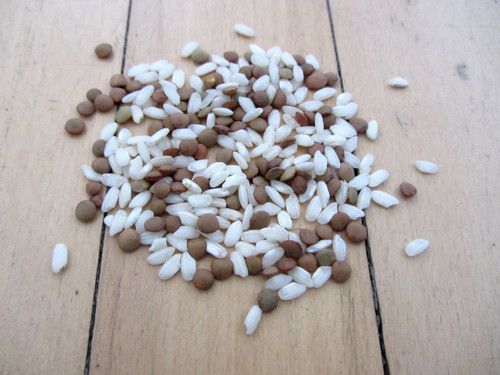
Would hand sorting also be a practical way to sort out the mixture of rice and lentil beans in the picture below?
Yes, as long as there are not too many of them to sort.
Would hand sorting be a practical way to sort the pebbles out of a large pile of sand?
Probably not. It would take way too long!
Besides what we discussed in the chapter, think of at least three other examples of mixtures that could be hand sorted.
Learner-dependent answer. Suggestions may include:
When is hand sorting a good method for separating the components in a mixture?
When the 'particles' in the mixture are relatively large and when there are not too many of them to sort.
Can you think of a practical way to sort stones or pebbles from sand? Do you think picking the pebbles out by hand would work?
It probably is not a good idea to hand sort as it would take too long.
When we have large quantities of materials to sort and the different particles have different sizes, we can sieve the mixture. The smaller particles will fall through the openings in the sieve, while the larger particles stay behind.
When the particles in a mixture are too small to be caught by a sieve and when the components of the mixture are in different states, we can separate them by filtration using a filter.
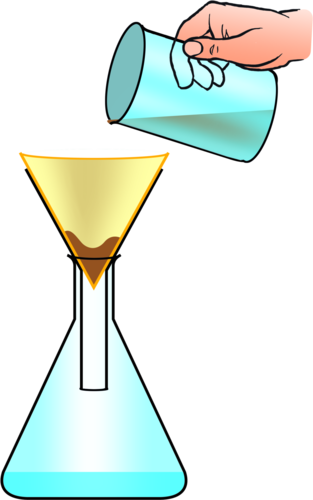
Learners did an exercise in Chapter 6 of Matter and Materials in Gr. 6 on cleaning muddy water. The chapter entitled 'Processes to purify water' required learners to design, make and evaluate their own filter. You can demonstrate the process again to refresh their memories. To set up a filter (as shown below), place a folded piece of filter paper in a funnel and place the funnel into a flask. Then, pour a mixture of muddy water into the filter and let the learners observe that clean water passes through the filter, whilst the mud/sand/clay remains behind.
What type of mixture is the muddy water in the glass an example of?
It is a mixture of solid and liquid, it is a suspension. You can get learners to label the suspension, the filtrate and the residue on this diagram.
The clear liquid that has passed through the filter paper is called thefiltrate and the particles that are left behind on the filter paper is called the residue
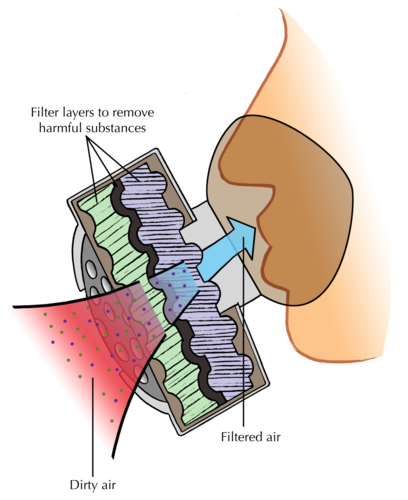
Have you ever noticed how, when people have to work in dusty or smoky environments, they wear dust masks or smoke masks? Why do you think that is necessary?
Inhaling dust or smoke is harmful to our lungs. The masks help to clean the air before it enters the respiratory tract.

The diagram below shows how a gas mask works. Layers of very fine filters trap harmful substances and dust or smoke particles, so that only clean air is let through.
Besides what we discussed in the chapter, think of at least three other mixtures that could be sieved, and write them in the space below.
Learner-dependent answer. Suggestions may include:
Sieving flour to remove lumps, husks and other large bits
Pouring tea through a sieve to catch the tea leaves (this is a crude way of filtering)
Rinsing sand or soil from spinach leaves before we cook them
Filtering leaves out of a swimming pool (we call it filtering, but what we are actually doing is sieving the leaves out of the water)
When is sieving a good method for separating the components in a mixture?
When the components of the mixture have different sizes and there are many of them to sort.
Nowadays most people use tea bags to make tea, but there was a time when people brewed tea from leaves and then poured the tea through a sieve into the cup. Why do you think they did this?
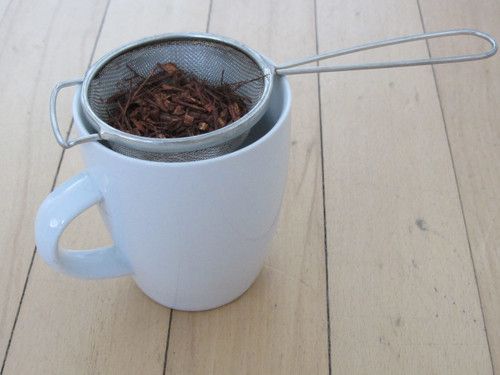
To remove the tea leaves from the tea before drinking it.
Sometimes the particles that we want to remove from a mixture are so small that they will pass easily through a sieve (think of the example of the muddy water from before). Can you think of a way to overcome this?
Learners may realise that they need to make the openings in the sieve smaller if they want to catch smaller particles.
Besides what we discussed in the chapter, think of at least three other mixtures that could be filtered, and list them below.
Learner-dependent answer. Suggestions may include:
Filtering coffee grounds through a coffee filter or in a plunger
The vacuum cleaner has a filter for trapping dust particles inside the machine and letting clean air through. That is how it removes dust particles from the carpet and furniture.
Air conditioners contain filters to filter out dust before the air from outside enters a building.
When is filtering a good method for separating the components in a mixture?
When the 'particles' in the mixture are very small, and in different states.
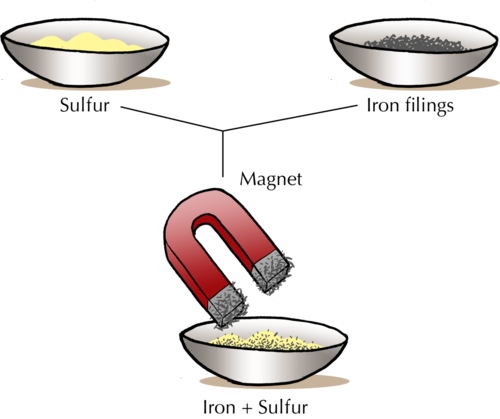
Can you remember the activity from Gr. 6 when Tom used magnetism to separate different kinds of metals at his uncle's junk yard? The magnetic properties of the metals allowed them to be separated in this way.
You could demonstrate how, or let the learners try, to separate a mixture of sand and iron filings by using a magnet. It might help to place the magnet in a small plastic bag so the iron filings are attracted to the magnet, but do not stick to it.
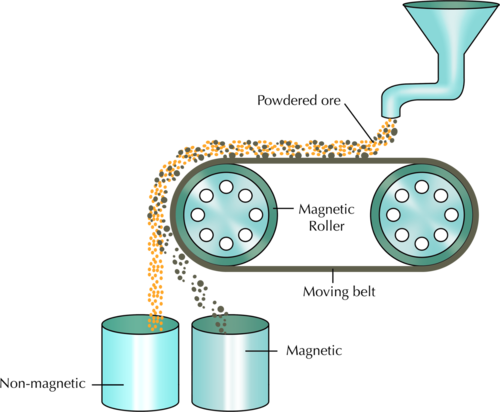
The following diagram shows how magnetic separation can be used to separate a mixture of components. In the example, mineral ore that contains two compounds (one magnetic, and the other non-magnetic) is being separated. The ore grains are fed onto a revolving belt. The roller on the end of the belt is magnetic. This means that all the magnetic grains in the ore will stick to the belt when it goes around the roller, while the non-magnetic grains will fall off the end. As soon as the magnetic grains move past the magnetic roller, they will also fall down.

In the above diagram, what colour are the non-magnetic grains and into which container do they fall? Label this on the diagram. What colour are the magnetic grains and which container do they fall into?
The non-magnetic grains are yellow-orange and fall into the container on the left. the magnetic grains are grey-brown and fall into the container on the right. The diagram should be labelled as follows:
Besides what we discussed in the chapter, can you think of two other mixtures that could be separated magnetically? Write them in the space provided.
Learner-dependent answer. Suggestions may include:
Removing iron filings (magnetic) from sand or sugar (non-magnetic).
Separating aluminium cans (non-magnetic) from steel cans (magnetic).
When is magnetic separation suitable for separating the components in a mixture?
When the components in the mixture have different magnetic properties, in other words when one or more components in the mixture is magnetic and the others are non-magnetic.
How can we separate the components in a solution? Let's find out.
The substances in a solution are mixed on the level of individual particles. In a sugar and water solution, the sugar particles and the water particles are mixed so well that we could not distinguish them with the naked eye. You might think that mixtures that are so 'well-mixed' are impossible to separate! But as we shall soon see, this is not true.
In ancient cultures, grain and chaff was separated by a process called winnowing. They would throw the mixture into the air and the wind would blow away the lighter chaff, but not the heavier grain.
Demonstrate this in a lesson by dissolving some salt in water in front of the class at the beginning of the lesson. Make sure they take note of the clear solution. Then pour a little into a shallow aluminium pan, like those used for baking. Place this out in a sunny spot for the duration of the lesson and allow the water to evaporate. The rate of evaporation will depend on how hot and humid it is on the day you do this. At the end of the lesson, collect the pan and show the dried salt that is left behind, just as in a salt pan. You might have to leave it out until the end of the day, depending in how hot it is.
Do you know where most of the salt that we use in South Africa comes from? South Africa gets it salt from inland salt pans, coastal salt pans and seawater. A salt pan is a shallow dam in the ground where salt water evaporates to leave a layer of dry salt.
When sea water is allowed to stand in shallow pans, the water gets heated by sunlight and slowly turns into water vapour, through evaporation. Once the water has evaporated completely, the solid salt is left behind.
Do you think this is a good method for separating salt from water? Do you think it would work for a sugar and water solution?
Yes, it would.
If you have time to do this in class, you can demonstrate this practically. Get learners to taste the salt water before boiling and then getting them to taste the condensed water afterwards. This way they will realise that only the water has evaporated and the salt has remained behind in the kettle. You could put the ice in a small plastic bag to ensure that the ice does not slip off the plate, but the plate is still cold enough for water vapour to condense. Keeping the ice in a plastic bag will also ensure that the melting ice does not drip into the beaker collecting condensed water. You can also use a beaker or glass of salt solution over a bunsen burner and use a cold piece of glass or mirror to condense the water and collect it in another beaker.
QUESTIONS:
Do you think separation by evaporation would be a good method to separate a salt-water-solution if you wanted to keep both the salt and the water? Why do you say so?
Evaporation by itself is not a good method of separation if you want to keep both the salt and the water. Once the water evaporates, it is lost.

In the picture, the salt-water solution is heated in a kettle, and a metal plate (with some ice inside to keep its outer surface cold) is held in the water vapour that is escaping from the spout of the kettle. The water vapour cools when it touches the cold metal plate and condenses. It then runs off the plate and into the collection beaker. The salt is left behind in the kettle once all the water has evaporated. But, you still have the water in the beaker.
What is happening in the kettle?
Salt water is boiling.
Can you say what change in state is happening inside the kettle? What is the process called?
Liquid water is changing to water vapour. The process is evaporation.
What change of state is occurring on the cold surface of the metal plate? What is the process called? (Hint: the change of state from gas to liquid was covered in the previous chapter, under Physical properties of materials.)
Water vapour is changing to liquid water. The process is called condensation.
Does the salt evaporate with the water? How would you find out?
No. You can taste that the water is salty before evaporation, and not salty after condensation. If you boil the water until all of it has evaporated, you can see salt crystals form.
What can you tell about the purity of the water after it has evaporated and condensed?
It does not taste salty after evaporation/condensation so we assume that it is pure, but it may have other things in it which we can't taste.
Some things we can't detect or taste, for example, if we were using sea water.
The water that is lost through evaporation can be condensed on a cold surface. The cold metal plate will do the job, but it would be difficult to recover all the condensed water, because it will be dripping off the surface of the plate in many different places. Scientists have a solution for that problem: they use a special technique to separate mixtures like these without losing any of the components. The technique is called distillation.
If you have the equipment to set up this distillation process, then you can demonstrate it in class. Otherwise there are alternative materials and equipment that you can use. For example, if you do not have a Liebig condenser, you can use a piece of copper pipe. Here are two links which explain how to build your own distillation equipment: http://www.instructables.com/id/Build-a-Lab-Quality-Distillation-Apparatus/ and http://nukegingrich.files.wordpress.com/2009/06/diy-still.pdf. Another suggestion is to get learners to also do the research to see how to make their own distillation apparatus, specifically looking at materials which are easy and cheaper to come by. You do not have to have laboratory equipment to demonstrate many science experiments - many can just be done by thinking of the materials which you use in everyday life and making a plan! This also makes science more accessible to everyone.
Distillation is the separation of one substance from another by evaporation followed by condensation. The apparatus used in this technique is called a still.

Suppose we want to separate the water and salt in seawater. We would place the seawater in the round flask on the left of the picture (in the distillation flask). We would then boil the seawater to produce water vapour, or steam. The salt would not evaporate with the water, because only the water evaporates. The water vapour rises through the top of the flask and passes into the Liebig condenser.
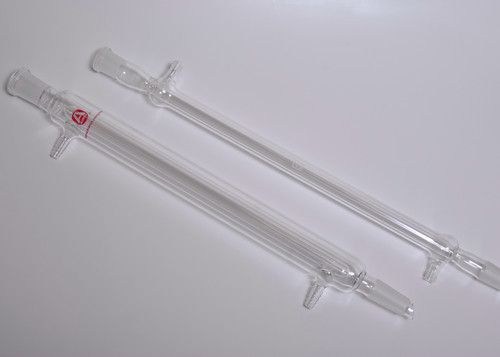
The Liebig condenser consists of a glass tube within a larger glass tube. The condenser is designed in such a way that cold water can flow through the space between the tubes. This cools the surface of the inner tube. The water vapour condenses against this cold surface and flows into the receiving flask. Since the salt has not evaporated, it stays behind in the distillation flask.
A video describing how a solar still can desalinate (take salt out of) water.
The solar still video is short but provides an interesting topic for discussions: applications of separating methods; inventions; advantages and disadvantages; you could even discuss open-source projects and sharing information. The Italian inventor of the Eliodomestico solar still designed it with developing countries in mind. It is relatively cheap, easy to assemble, and requires no electricity. It is described as an eco-distiller that runs on solar power. All you need to do is pour in 5 litres of salty or impure water, tighten the cap, and leave it out in the sun. By the end of a day it can provide bacteria-free, salt-free water that is suitable for drinking. It is also an open-source project which means that anybody can use the design and replicate, modify or upgrade it, but not sell it for profit.
Distillation is also the best way to separate two liquids that have different boiling points, like water and ethanol for example. Let us have a look.
This is an optional activity, or else it could be done as a homework task. It is an extension of what learners would have learnt about using distillation.
QUESTIONS:
Can you remember the temperature at which water boils? Write it down below.
100°C
What is this temperature called?
The boiling point of water.
Ethanol boils at a temperature lower than the boiling point of water, namely 78°C. Suppose you mix some water and some ethanol. The mixture is at room temperature to begin with. Now suppose you start heating the mixture. What temperature would be reached first: 78°C or 100°C?
78°C
What do you think will happen when the mixture reaches a temperature of 78°C? Do you think the ethanol will start to boil?
Learners could be reminded that the ethanol is still ethanol, it has not been changed in the process of mixing, so it will most certainly start to boil at 78°C.
Will the water boil at the same time?
No. Water only starts to boil at 100°C. As long as the temperature is below 100°C, the water will not boil.
These questions are identical to the ones posed in the original activity. They were included in the original activity to serve as introduction for the concept of distillation.
We can use the same distillation method that we used for separating seawater, to separate the two liquids. The principle is exactly the same, except that we will distill the mixture more than once. Here is how it works:
The mixture of the two liquids is placed in the distillation flask and heated to the lowest boiling point. In the case of an ethanol/water mixture, that temperature would be the boiling point of ethanol, namely 78°C. All of the liquid with that boiling point will evaporate, condense in the Liebig condenser, and pass into the receiving flask. The liquid with the higher boiling point will remain in the distillation flask. Suppose it contains a third substance that we want to separate. How would you do this?
We replace the receiving flask with a clean one and heat the distillation flask again, but this time to the boiling point of the second liquid. The second liquid will evaporate, condense in the cooler and flow into the clean receiving flask, leaving the final component in the mixture in the distillation flask.
Crude oil is separated into different components using distillation. The components are evaporated, starting with lighter fuel (which has the lowest boiling point), then jet fuel, then petroleum, then motor car oil, until only tar is left. We call the separated components fractions, and the process, fractional distillation.
Find out more about the distillation of crude oil in this video
The video about distillation of crude oil may be a bit too advanced, but it summarises the process of fractional distillation quite well and mentions relevant, real-world examples of products that are produced. Take note that the video repeatedly mentions 'hydrocarbons'. You can put the learners at ease and tell them it is not important for them to know what this means yet. The periodic table is only dealt with in Chapter 4, but you could help the learners 'decipher' that the crude oil contains a lot of hydrogen particles and carbon particles put together in different combinations (ratios). Each of the fractions that are eventually collected contain one kind of hydrocarbon combination.
There is one more separation technique for us to explore. Have you noticed how ink on paper will sometimes 'run' when it gets wet?
Most inks are a mixture of different pigments, blended to give them just the right colour. A pigment is a chemical that gives colour to materials. When a mixture contains colourful compounds, it is often possible to separate the different components using a separating method called chromatography. Let's have a look at this next.
Chromatography comes from from the Greek words chroma (meaning 'colour') and graph (meaning 'to write').
Chromatography is a method for separating coloured substances into individual pigments. We are going to explore this in the next investigation.
Pen colour science.
AIM: To separate the pigment components in ink using different liquids.
This is a fun activity that can be done quickly. If the class is divided into small groups and each group gets a different black marker to experiment with, the chromatograms can be stuck up on the wall afterwards for everyone to see and compare. By looking for matching chromatograms, learners can say which group had the same brand of marker, or which markers are filled with the same ink. If the ink from a certain marker will not separate in one liquid, try using another liquid in the beaker.
You could even build a story around the investigation: Stage a murder mystery in which the murderer can be identified by his (or her) black pen. Use three or four black or blue pens of different brands, and produce the unique chromatograms associated with each brand. The inks may look the same when used for writing, but they will behave differently when they are analysed by chromatography.
HYPOTHESIS:
What do you propose the answer to our investigative question is? This is your hypothesis.
Learner-dependent answer. A hypothesis could be 'Black ink is made up of different coloured pigments.'
MATERIALS AND APPARATUS:
Laboratory Whatman filter paper no. 1 is ideal for chromatography. Alternatively, you can use coffee filters, watercolour paper or strips of paper towel. Even ordinary copy paper works, but more slowly and often this makes the colours separate better. For softer papers you may need longer strips of paper and taller containers, since the liquid is carried up the paper much faster.
A solvent is a substance that dissolves a solute, resulting in a solution. A solvent is usually a liquid, but can also be a solid or a gas.
Possible hazards:
Safe laboratory practice is extremely important. Take a moment to discuss risks, precautions and safety with learners. Discuss the fact that scientists often need to handle dangerous substances and/or equipment to be able to make observations.
When working with ammonia, take care to work in a fume hood or in a well-ventilated space. Leave the door and windows open, so that the fumes do not linger. Similarly, substances containing alcohol should be used in a well-ventilated space, but these are also flammable, so avoid using them in the presence of open flames.
It is always advisable to wear latex/nitrile gloves (available from pharmacies) to prevent the absorption of hazardous substances through your skin. Wear safety goggles to protect your eyes from harmful chemicals. Always have clean water nearby to rinse your eyes or wash your hands if chemicals do splash or spill.
Careful laboratory practice will not only ensure your own safety, it will also set a good example to learners.
METHOD:
To make a strip chromatogram
Allow the liquid to soak up into the paper, rising through the inked line.

You can also use a clothes peg to hold the strip in place while drying.
To make a circular chromatogram
Add another drop of water every minute or so to make the chromatogram spread toward the edges of the paper disk.

OBSERVATIONS:
Do the two chromatograms look the same or different? If they look different, and you have used the same pen, why do you think that is?
Learner-dependent answer
Which colour pigments were you able to observe?
Learner-dependent answer
Draw pictures of your chromatograms in the space below.
Learner-dependent answer
CONCLUSION:
What can you conclude about the pigments that make up black ink?
Learners should note that black ink is actually made up of a number of different coloured pigments.
A closer look at how this works:
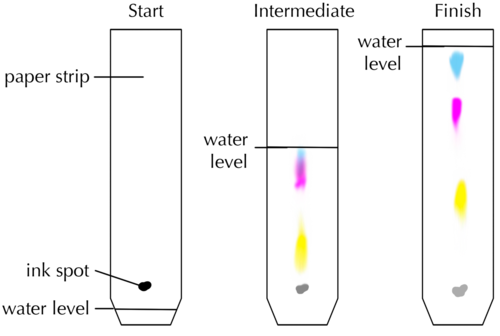
In paper chromatography, liquid is drawn through the paper fibers. But, why do the pigments in the ink separate into bands of different colours?
The pigments in the ink are carried along by the liquid, but because they are different compounds, they get carried upward at different speeds. This causes them to appear as bands of different colours on the chromatogram.
Look at the picture of the chromatogram below.
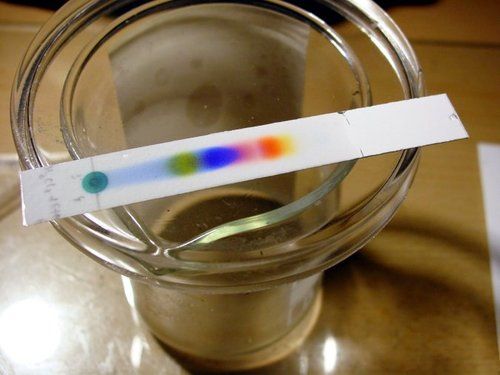
Which colour pigment is moving up the paper at the fastest speed? Why do you say so?
The yellow pigment is moving the fastest because it has travelled the longest distance.
Which colour pigment is moving up the paper at the slowest speed?
The green pigment is moving the slowest because it has travelled the shortest distance.
Why are the different pigments carried at different speeds?
Pigments migrate at different speeds because of differences in their properties: large pigment particles tend to move more slowly. Furthermore, particles that dissolve well in the liquid will tend to stay in the liquid and be carried to the top quickly, while particles that bind well to the paper will tend to move more slowly.
Is black really black? (video)
Now that we have learnt about some of the different ways in which mixtures can be separated, we are going to apply what we know to separate a mixture made of many components.
Some schools also use combo plates for the various practical tasks in Matter and Materials. This is encouraged and the activities in these workbooks can be adjusted slightly to work with whichever equipment and apparatus you have available to you in your school.
Also, if learners find the flow chart too complex at this stage, you can alternatively get them to write out the steps they would follow to separate all the materials in the mixture and why they have chosen each method of separation.
Imagine you are a member of a team of scientists working together in a laboratory. Your team has been given an important job. You have been given a beaker that contains a mixture of substances to separate.
The mixture contains the following components:
Your job is to design a procedure for separating the mixture into its individual components. How would you do that? Your procedure should be summarised in the form of a flow chart.
Before you start, imagine what the mixture would look like. Draw a picture of the a clear container and the different contents in the mixture in the space.
This may be a difficult task for the learners to accomplish, but it is very important for the learners to be able to visualise the mixture before they start to plan the experiment. If they do not, the ideas will remain abstract and the learners may have difficulty sequencing the different separation steps correctly. You could guide them by asking the following questions. Alternately, you could prepare the mixture for them to look at it before drawing it:
To help you design your procedure, here are a few guiding questions and a template for your flow chart:
What is the physical state (solid, liquid or gas) of each of the components in the mixture? Fill these into the table.
|
Component (substance) |
State (solid liquid or gas) |
Dissolved or undissolved? |
|
Component (substance) |
State (solid liquid or gas) |
Dissolved or undissolved? |
|
Iron |
solid |
undissolved |
|
Sand |
solid |
undissolved |
|
Salt |
solid |
dissolved |
|
Ethanol |
liquid |
dissolved (in solution with the water and salt) |
|
Water |
liquid |
dissolved (in solution with the ethanol and salt) |
Name the solids that will not dissolve in the mixture. These are the undissolved solids.
The sand and iron filings are undissolved.
Salt is the only dissolved solid.
Learners should write FILTRATION in block 1.
Learners should write SAND and IRON FILINGS in block 2.
Learners should write SALT, ETHANOL and WATER in block 3.
Learners should write MAGNETIC SEPARATION in block 4.
Learners should write IRON FILINGS in block 6 and SAND in block 7.
Learners should write DISTILLATION in block 5.
Learners should write ETHANOL in block 8.
Learners should write WATER and SALT in block 9.
Learners should write DISTILLATION in block 10.
Learners should write WATER in block 11 and SALT in block 12.

Completed flowchart should look as follows:

So far, we have been discussing materials, their properties, how to mix them and how to separate them if they are mixed. The final section of this chapter deals with waste materials and what we can do to reduce their impact on the environment.
Summary of separating mixtures in short slideshows http://www.bbc.co.uk/bitesize/ks3/science/chemical_material_behaviour/compounds_mixtures/revision/9/
Over time, some of our things get old and break and we need to throw them away. When we buy food or other items, the packaging used for wrapping these items is also thrown away. But what does 'away' mean? Does it mean these waste items just disappear? Where do you think our rubbish goes once we 'throw it away'?
Allow learners to discuss this for a while. Some may know that rubbish eventually ends up on a rubbish dump somewhere, and this is a good starting point for the next activity that will require learners to think about the implications of dumping.
Have you ever heard of the Great Pacific Garbage Patch? Millions of tonnes of plastic waste end up in the ocean, and stay there.
INSTRUCTIONS:
QUESTIONS:
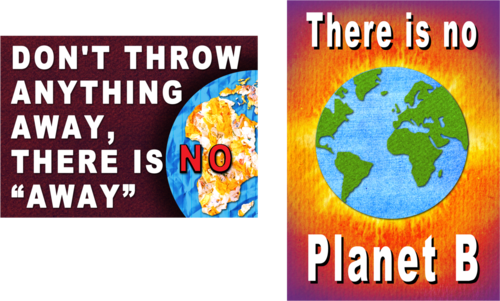
'There is no away' and 'There is no Planet B' refers to the same issue, namely that everything that we throw away remains part of our environment. We should be thinking of ways to reintegrate our waste by making it part of the environment in ways that will not harm the environment; reusing, recycling and repurposing waste items and materials in creative and innovative ways. 'There is no Planet B' is also a play on words that refers to the well-known notion of a 'Plan B' that can be reverted to if the original plan (plan A) fails.
Write a paragraph to explain the messages on the posters. What do you think they mean?
Learner-dependent answer
Do you think it is possible to stop throwing things away altogether?
Many things can be reused or recycled. Many of the waste that is not recyclable can be turned into compost for the garden. Learners may have interesting opinions about this question, and hopefully it will get them thinking about creative ways of reusing and repurposing waste.
Can you suggest ways to reduce the amount of trash that is thrown away in your home?
Learner-dependent answer. Learners should generate suggestions centred on reusing, recycling and repurposing.
An optional additional activity for this section is to get learners to assess how poor waste management techniques impact the environment.
For this activity, learners must use materials that would ordinarily go into the rubbish bin in your home (cereal boxes, cardboard, plastic wrappers etc) to make a poster that will create awareness for the environmental problem that concerns them the most. The poster should also contain suggestions for solving the problem. Here are a few ideas, but they only need to choose one:
Once learners have created their posters, you can stick them up around the classroom and they can also do a short report back to the class. There is also potential to do this activity as a group.
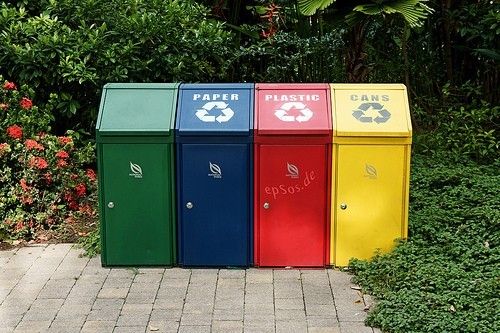
In some suburbs, recycling is actively encouraged and special transparent recycling bags are provided for this purpose. Do you have recycling in your community? Is the recyclable waste collected from your home or do you have to drop it off at a container or a depot? Did you know that some people even make money selling recyclable waste that they collect?
Do you know which materials from household waste can be recycled? What are the four main categories?
Ask your learners this question before moving on to the next section where this will be discussed. The answers are:
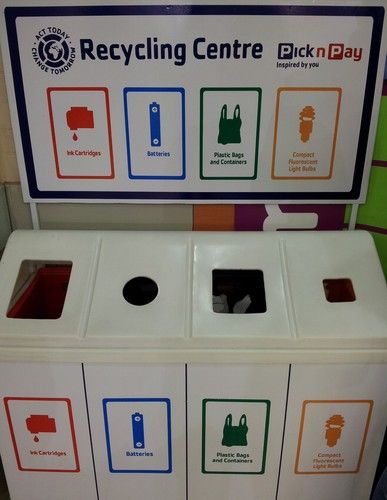
Items that have to be disposed of with care and not dumped in regular trash, include batteries, and fluorescent light bulbs.
Here is an additional, optional activity, which you could get learners to do as a homework task.
Activity: Other things we throw away
In this short activity, we are going to think about creative ways of dealing with household waste items that are not in the 4 categories discussed above. For each item in the table, some recycling ideas have been given.
Can you think of other ideas to add to the table? Discuss this in a group and write them into the table.
|
Item |
Recycling ideas |
|
Garden waste and other organic waste such as vegetable peelings and foods that have spoiled. |
|
|
Old clothes and other textile items; old shoes. |
|
|
Old and expired medicine |
|
Invite a chemist/scientist: Do you know someone who is a chemist or a chemical engineer? Perhaps you live near a university? If you do, you could invite a chemist to come to your school and talk to your class about the work that chemists do. Alternatively, you could visit the chemist at their workplace and ask them to show you around. You can get learners to prepare a few questions beforehand; for instance, you could ask them about their work, their training and what they think are the qualities needed if one wanted to become a chemist. Just remember to make an appointment first!
This activity could be turned into a small group project and learners could be required to write a short report on the information they have gathered.
Do you know what chemists do? Let's discover the possibilities of chemistry!
Chemists study various chemical elements and compounds, their properties and how they react with each other. We will learn about elements and compounds in the next chapter. Chemists are also responsible for developing new materials with specific properties; such as new medicines; innovative materials for building buildings and other structures; materials that could be used for making fuels from renewable sources and many others.
If you study chemistry after you have finished school, you can work as a researcher, a laboratory technician, a science teacher and many other important and stimulating jobs! Be curious and discover the possibilities! Science can help us solve problems in the world around us.
This is not for assessment purposes and is aimed at getting learners to start thinking about the possibilities for their futures. The emphasis should be on discovering the possibilities that science, technology maths and engineering give us, not just work opportunities, but using them to solve problems in the world.
A useful site to find out more about some chemistry-related careers. http://portal.acs.org/portal/acs/corg/content?_nfpb=true&_pageLabel=PP_SUPERARTICLE&node_id=1188&use_sec=false&sec_url_var=region1&__uuid=964e0712-eaa0-4f2a-a03d-689d0a3cd62c
INSTRUCTIONS:
Some careers involving chemistry:
Your descriptions of the career you are interested in:
Concept map
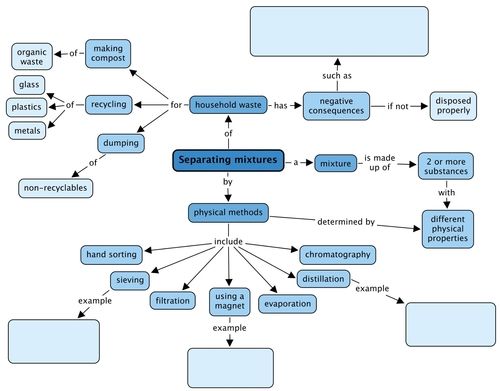
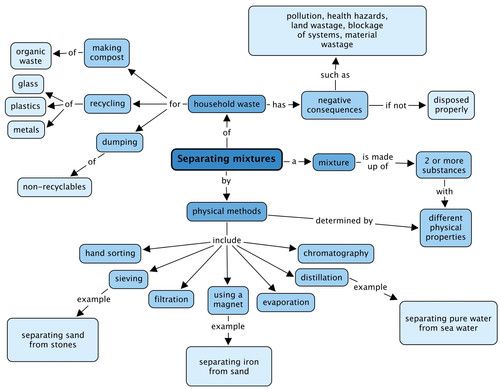
We looked at physical methods to separate mixtures and these are shown in the concept map. Give an example of the types of mixtures you could separate using three of these methods. What negative consequences does human waste have on the environment? Fill these in the concept map.
Teacher's version
Two important words have been left out of the following paragraph. The missing words are chemical and physical. Rewrite the sentences and fill in the missing words in the paragraph by placing each one in the correct position:
The components in a mixture have not undergone any _____ changes. They still have the same properties they had before they were mixed. That is why mixtures can be separated using _____ methods. [1 mark]
The components in a mixture have not undergone any chemical changes. They still have the same properties they had before they were mixed. That is why mixtures can be separated using physical methods.
Learner's answer should contain the following elements:
A vacuum cleaner creates a suspension of dust in air as it sucks up the dust on the floor. Clean air comes out of the vacuum cleaner. How does the vacuum cleaner separate the dust from the air? [2 marks]
The vacuum cleaner has a fine filter in it which traps the dust particles. The clean air is able to get through the filter, but the dust is left behind. Some more modern vacuum cleaners also filter the air through water which cleans the air even further. Some very fine dust particles may be able to get through the fine filter, but if the air is passed through water, then even very fine particles are trapped.
Write a short paragraph (3 sentences) to explain how salt is produced from seawater. [3 marks]
Learner's answer should contain the following elements:
Choose the correct word to complete the sentence from the following list: colours; boiling points, tastes. Write the word below.
Suppose we want to separate two liquids using distillation as separation method. This will only be possible if the two liquids have different... [1 mark]
boiling points
How many different pigments does the black ink consist of? Explain your answer. [1 mark]
Three different colour bands mean there are (at least) three different pigments in the ink.
Which pigment is moving up the paper at the fastest speed? Arrange the pigments in order of increasing speed of movement. [2 marks]
The blue pigment moves the fastest. Arranged in order of increasing speed (from slowest to fastest moving pigment): yellow, then pink, then blue.
The table below contains a list of mixtures. In the right hand column, next to each mixture, write the best method for separating the mixture into its components. [8 marks]
|
Mixture |
Separation method |
|
Salt and water |
|
|
Sand and iron filings |
|
|
Sand and water |
|
|
Colour pigments in ink |
|
|
Stones and sand |
|
|
Ethanol and water |
|
|
Oranges and apples |
|
|
Sugar and iron filings |
|
Mixture |
Separation method |
|
Salt and water |
Distillation or evaporation |
|
Sand and iron filings |
Magnetic separation |
|
Sand and water |
Filtration |
|
Colour pigments in ink |
Chromatography |
|
Stones and sand |
Sieving |
|
Ethanol and water |
Distillation |
|
Oranges and apples |
Hand sorting |
|
Sugar and iron filings |
Magnetic separation |
Name the 4 classes of materials that can be recycled. [4 marks]
Glass, metal, plastic, paper.
Write a sentence to say how you would dispose of each of the following non-recyclable materials: vegetable peels; old running shoes; expired medicine. [3 marks]
Vegetable peels can be buried in the garden or turned into compost.
Old running shoes can be donated to someone who needs them, or to a shelter.
Expired medicine should be taken to the pharmacy.
TOTAL: 27 marks
|
Previous
Chapter 6: Properties of materials
|
Table of Contents |
Next
Chapter 8: Acids, bases and neutral substances
|