What do you wish to establish by conducting this investigation?
Learner-dependent answer
|
Next
Chapter 2: Interactions and interdependence within the environment
|
Chapter overview
2 weeks
This chapter provides learners with an introduction to, and revision of, the concepts in photosynthesis and respiration in preparation for a study of the ecosystem. Learners have already looked at photosynthesis and respiration in previous grades. They know that respiration is one of the seven life processes of living things. They have also been introduced to photosynthesis in the context of green plants and food chains in Gr. 5 and 6. The emphasis in this chapter is on the use of energy and on how radiant (light) energy is transferred to chemical potential energy and later released during respiration. This concept is developed within the scope of the CAPS prescriptions and will be used as a scaffold to explain the transfer of energy in the ecosystem in the subsequent chapter. As an introduction teachers may want to watch or show the following video to the class:
These tables and how to use them are explained in the Teachers' Guide Overview at the front of the book. We have also explained how to use the bit.ly links to websites and videos in the front of the book.
1.1 Photosynthesis (3.5 hours)
|
Tasks |
Skills |
Recommendation |
|
Activity: The seven life processes |
Remembering, describing, writing |
Optional (Revision) |
|
Activity: Requirements and products of photosynthesis |
Summarising, describing, writing |
CAPS suggested |
|
Investigation: Which leaves photosynthesise? (Test for the presence of starch) |
Hypothesising, investigating, observing, measuring, analysing, writing, group work |
CAPS suggested |
|
Investigation: Why do bananas become sweeter as they ripen? |
Hypothesising, investigating, observing, measuring, recording, analysing, writing, group work |
Optional |
1.2 Respiration (2.5 hours)
|
Tasks |
Skills |
Recommendation |
|
Activity: Does our breath contain carbon dioxide? (Test for the presence of carbon dioxide using limewater) |
Investigating, observing, measuring, recording, analysing, writing, group work |
CAPS suggested |
|
Activity: Requirements and products of respiration |
Describing, writing |
CAPS suggested |
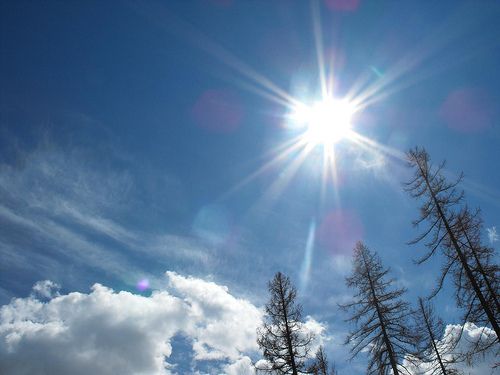
Energy is needed to sustain life and without it nothing would be able to live on Earth. Our most important source of energy is the Sun. In this chapter we are going to investigate the processes involved in transferring the Sun's energy to our bodies to allow us to read this text! These two important processes are photosynthesis and respiration.
This website has many interesting articles about science and science related jobs. They have been classified according to topics and also provide tips on how to incorporate the articles into your classroom. If you are interested in incorporating real world science into your classroom, this is one website to start looking at: http://www.sciencenewsforkids.org/news-in-the-classroom/
All the New words listed in the boxes in the margin are defined in the glossary at the end of this strand.
All life on Earth depends on energy to sustain the seven life processes.
INSTRUCTIONS:
M
R
S
G
R
E
N
The seven life processes are: movement (moving), reproduction (reproducing), sense the environment (sensing), growth (growing), respiration, excretion (excreting), nutrition (feeding).
The form of energy that the Sun produces is called radiant energy. Although the Sun provides us with both light and warmth, plants only use the light energy from the Sun to photosynthesise.
Most organisms cannot directly use the energy from the sun to perform the seven life processes. For example, a reptile can lie in the Sun to warm up from the heat energy, but this does not provide the necessary energy for that animal to move, reproduce or excrete waste.
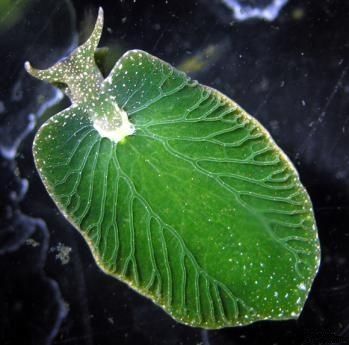
Except for a few sea slugs, plants are the only organisms on Earth that can absorb the Sun's radiant energy and convert it into food for themselves and for other living organisms.
The Visit boxes in the margins contain links to interesting websites and videos. Simply type the link exactly as it is into the address bar in your browser.
What is potential energy? Do you remember that we spoke about energy for movement (kinetic energy) and energy that is stored (potential energy) in Energy and Change in Gr. 6 and 7? What are some things that have kinetic energy and some that have potential energy? Remember to take down some notes in the margins of your workbook as you discuss things in class.
Ask your learners this as a revision of what they did in previous grades. Some objects with kinetic energy are a moving car, a bouncing ball, a leaf blowing, a fan blowing, etc. Some objects with potential energy are a book on the table (it has gravitational potential energy as it can fall down to the ground), a bouncing ball when it is at the top of its bounce as it can also fall back down, a batteries, fossil fuels have and food have potential energy.
All living organisms can use energy in the form of chemical potential energy for the life processes. This is the energy that is stored in the food that organisms eat. Plants are able to capture the radiant energy from the Sun and transfer it to chemical potential (stored) energy for other organisms to use. They do this through the process of photosynthesis. All organisms release the stored potential energy from the food that they eat to support their life processes. This process is called respiration.
Find out why plants that photosynthesise are green.
Photosynthesis takes place in small structures called chloroplasts, which are inside the cells of the leaves and stems of green plants. Inside the chloroplasts are green pigments called chlorophyll.This is what gives plants their green colour. Photosynthesis is the process in which chlorophyll molecules absorb the radiant energy from the sun and transfers it into chemical potential energy. The only function of chlorophyll is to trap the sunlight energy; chlorophyll is not produced or used up during photosynthesis.
Chloroplasts are a type of organelle found only in plant cells. A cell is the basic unit of all living things. We will learn more about the structure and functioning of cells next year in Gr. 9.
Chloroplasts are only present in plants. However some sea slugs have learnt to absorb the chloroplasts from the green algae that they eat into their bodies and can actually photosynthesise themselves!
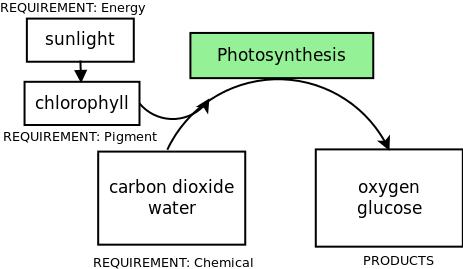
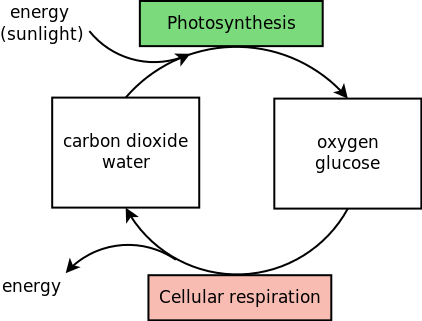
Photosynthesis has other requirements besides light energy from the Sun. What are these? Look at the following diagram which summarises the process of photosynthesis.
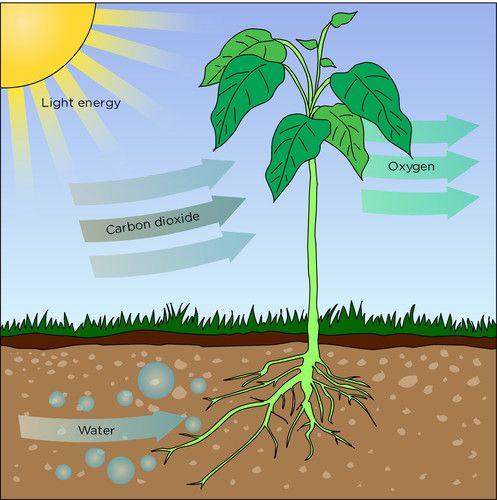
Plants use radiant energy from the Sun in a series of chemical reactions to change carbon dioxide from the air and water from the soil into glucose. The process releases oxygen.
INSTRUCTIONS:
The learner's diagram should look as follows:
The process of photosynthesis can be presented in the form of an equation:

What happens to the glucose that plants produce during photosynthesis?
The glucose that a plant produces when it photosynthesises is the food for the plant. The plant can use this glucose directly, and release the energy during its own respiration or it can store the glucose or convert it into other chemical compounds.
Glucose is soluble in water. As we learnt in Matter and Materials in Gr. 6, this means that glucose can dissolve in water. This is useful to the plant as it means it can transport the glucose in water to where it is needed elsewhere in the plant. However, in order to store large amounts of glucose, plants need to convert it into compounds which are insoluble in water. Therefore the plant converts glucose into starch, which is insoluble in water. Why do you think the plant might need to store some glucose?
Discuss this with your learners. The glucose is produced continuously during the day when the Sun is out and is not all used at once by the plant. The plant cannot have large amounts of glucose accumulating as this affects the water potential within the leaves, and so some is converted to starch to be stored until it is needed.
In addition to starch, plants also convert glucose into cellulose. Cellulose is used to support and strengthen plants. Animals do not have cellulose for support. Instead animals have something else to provide support and protect the body. Do you remember what this is?
A skeleton.
Glucose is also converted into other chemical compounds that enable processes in the plant such as reproduction and growth.
Plants use sugars (glucose) as a basic molecule from which to make hundreds of other compounds, such as proteins, oils, vitamins, colourful pigments in flowers, strong tasting chemicals (hot chilli plant), sweet tasting nectar and sweet smelling fragrances.
We have now learnt about how plants produce glucose and store it as starch, but how do we know for sure? As young scientists we also need to question whether this explanation of photosynthesis is accurate. Is there an investigation we can do to test for the presence of these compounds? Let's find out!
We have learnt that plants produce glucose during photosynthesis and store this in the form of starch. Therefore, to see if a plant photosynthesises, we can test to see if the plant produced starch.
Study the following properties of starch and glucose with your class. Think of possible tests that can be done to determine whether a plant has produced either starch or glucose. Record some of your discussion points.
Discuss this as a class in the lead up to the investigation.
Learners could suggest that they taste the substance to see if it is a starch or glucose. It is important that learners be made aware that we do not taste-test unknown substances due to the potential for poisoning. This specific point was included to allow teachers to reinforce this rule with learners and that we only ever do a taste test if we are sure that a substance is in fact edible.
Although this can be used as a fairly simple, physical test, it has several problems. For example, the temperature of the water will affect the rate at which it dissolves, as will the quantities used, etc. In discussing these points facilitate the discussion and lead learners to conclude it is not a very accurate test, although a simple physical one that can give a fairly good indication. This is a good opportunity to discuss kinetic energy and temperature of a solution.
This is included as an introduction to the subsequent investigation. Teachers should let learners explore the possible ways in which to use this to test for starch.
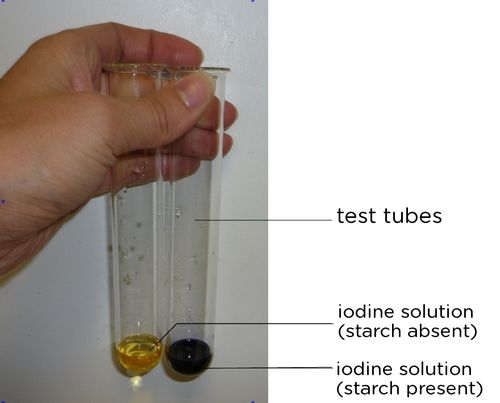
Please emphasise to learners that they should refer to iodine solution, and not just iodine (which is a bluish black solid).
A video on the starch test.
Now that we know that plants produce glucose and change this into starch, we can find out if all leaves produce the same amount of starch through photosynthesis.
You will need variegated and normal leaves for this investigation. Variegated leaves have white patterns (areas lacking chlorophyll) on them. There are many examples of South African plants that have variegated leaves, such as some geraniums, African violets, ivy, etc. You can also take a walk around your school property and surrounds to see if you can find any variegated leaves. Get learners to look at the leaves and discuss the investigation first. They can also do this in groups. This investigation can be done over 2 lessons. You should place one set of pot plants in the cupboard the day before you want to do part 1 of the investigation. After you have done part 1, you can do part 2 in the following lesson. In part 2, learners will need to write up an experimental report. If you do not have time to do both parts of the investigation, a suggestion is to get your learners to read through Part 1, and then to conduct Part 2 where they have to write up their own report.
There are two parts to this investigation. First, we want to find out which leaves are able to photosynthesise. We will place some pot plants in the light for a day, and some other pot plants in a dark cupboard for a day, and then perform the investigation on the leaves of plants from both groups.
In the second part of the investigation, we will use what we have learnt to investigate which parts of variegated leaves photosynthesise.
Part 1: Leaves in light and dark
AIM:
What do you wish to establish by conducting this investigation?
Learner-dependent answer
Possible answers include: 'To determine whether leaves photosynthesise in the dark or the light', or 'To investigate whether Light is necessary for Photosynthesis'.
HYPOTHESIS:
What do you think or predict will happen when you conduct this investigation?
Learner-dependent answer
The leaves in the light will test positive for starch as they photosynthesised, whereas the leaves in the dark will not photosynthesise and will test negative for starch.
MATERIALS AND APPARATUS:
METHOD:
Before starting this investigation, all plants must be placed in a dark cupboard for up to 48 hours prior to starting the investigation in order to ensure that the plants do not have starch in the leaves before the process begins.
Instead of a saucepan with water and a beaker with alcohol, teachers may use a beaker with water and a test tube with meths or alcohol. As long as the container holding the alcohol is safely contained within the water to prevent it from being directly heated or coming into contact with the flame. Teachers may also feel safer if they demonstrate this experiment.
Warning: The alcohol needs to be heated as well but it cannot be heated directly because it is extremely flammable. It therefore needs to be heated in a water bath.
The amount of iodine solution required to observe a result depends on the leaf tested. Some leaves may need to be flooded with iodine solution. Place the leave in a petri dish and cover the leaf with iodine.
A really good demonstration of the various experiments in this and subsequent sections is found at . It starts off with carbon dioxide through limewater test and then demonstrates the starch test.
RESULTS AND OBSERVATIONS:
Keep a record of your observations. Draw a table to record and compare your results.
Learners must draw their own tables to record their observations. This being the first investigation that they will perform in high school, this activity will allow teachers to gauge their level of proficiency and abilities in this regard.
The hot water removes the waxy cuticle and the alcohol dissolves the chlorophyll, releasing the green colour of the leaf. After the leaves are taken from the ethyl alcohol they should be white. The chlorophyll needs to be removed from the leaf so it does not mask the colour change we expect with the iodine solution. When iodine is dropped on the leaf it turns blue-black in the presence of starch.This is an indicator to show that the leaf was photosynthesizing and producing glucose that was turned into starch.
CONCLUSION:
What did you learn from doing this investigation?
Plants that were given sunlight were able to photosynthesise and therefore tested positive for starch (iodine solution turned blue-black). Those that did not receive radiant energy did not photosynthesise so they tested negative for starch presence (iodine solution remained yellow-brown). Therefore, light is necessary or required for photosynthesis to occur.
QUESTIONS:
Why were some plants placed in a well-lit area with direct sunlight and others in the dark?
This was done to allow some plants to photosynthesise and the others not. Thus those that were able to photosynthesise could produce starch and those that didn't only had small amounts of starch or no starch.
Explain what the results of the iodine test indicates.
If the iodine changes from brownish-orange to dark blue-black that indicates that the leaf or other part of the plant contains starch and must have photosynthesised. If the iodine solution does not change colour then the leaf or other part of the plant does not contain starch and did not photosynthesise.
Part 2 : Which parts of variegated leaves photosynthesise?
Learners need to apply what they have learnt in Part 1 to plan their own experiment in part 2 and write up an experimental report.
Have a look at the following photos of different plants. What do you notice about the leaves?
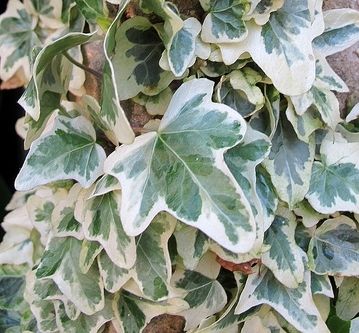
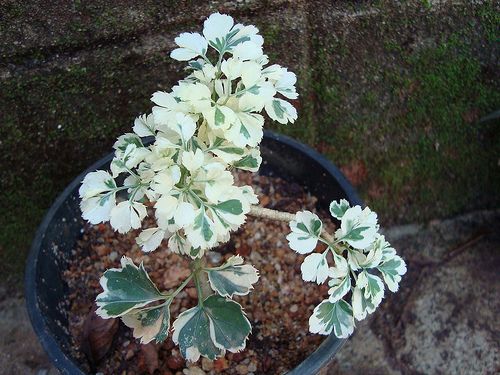
Geranium leaves are an excellent option for this investigation. The ivy has a very thick cuticle and the iodine can't penetrate the leaf easily. Variegated mint-leaf is also very good for this investigation, and is a common plant in Kwa-Zulu Natal.
We call these leaves variegated as they have green and white sections. We want to find out which parts of these leaves photosynthesise in this part of the investigation.
INSTRUCTIONS:
This activity may be done in groups or individually. Up until now learners have been provided with a framework in which to write up their results. For this investigation, they need to compile their own reports. Some examples of what learners might produce are included here:
Aim: To find out which parts of variegated leaves photosynthesise and store starch.
Hypothesis: The green parts of variegated leaves will turn blue-black in iodine solution indicating that they photosynthesise and store starch, whereas the white parts will not turn blue-black (will stay brown).
Materials and apparatus: This should be a similar list to what was used in Part 1. Learners must record the items in a bulleted list and take note of measurements.
Method: This should also be similar to Part 1. The steps in the method must be numbered. They must be written in full sentences. Learners must take note of what measurements they used.
Results: Learners should draw a table to record their results. They should provide headings for the columns and rows and also a heading for the table. Learners must make drawings of their leaves at the start of the experiment, indicating the different coloured regions as boiling in alcohol will remove the colour. They can then indicate the results on the drawings.
Discussion: Assess learners ability to explain their results. They should also make reference to the fact that the white parts of the leaves do not contain chlorophyll and therefore they do not photosynthesise. This also shows that chlorophyll is crucial for photosynthesis. Learners should explain anything that they might have improved on in their results.
Conclusion: This should be a short statement in which they answer their aim or investigative question.
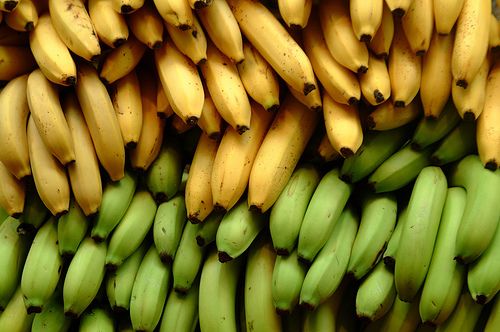
Leaves are not the only parts of plants that store starch. Starch is also stored in the stems, roots and fruit. Have you ever wondered why fruit becomes sweeter as it ripens? Think of an unripe green banana and a ripe yellow banana. Which one is sweeter? Let's find out why.
It is not crucial to do this investigation if you do not have time. This is an optional extension of the starch test.
In this investigation we will taste the bananas to determine if they have more glucose or more starch. We will also conduct a starch test on the ripe and unripe bananas to see which contain more starch.
AIM:
What do you wish to establish by conducting this investigation?
Learner-dependent answer
An example of a possible answer is: To investigate the presence of starch in ripe and unripe bananas; To investigate why bananas becomes sweeter as they ripen; etc.
HYPOTHESIS:
What do you think or predict will happen when you conduct this investigation?
If the unripe banana does not taste so sweet compared to the very sweet tasting ripe banana then perhaps it contains more starch, and less glucose. The starch test might show that the unripe banana contains more starch.
.
MATERIALS AND APPARATUS:
METHOD:
Work in groups of three or four. Take a piece of the ripe banana and a piece of the unripe banana and compare the tastes and textures of each. Record your observations in a table. Which banana do you think contains the most starch and the least glucose (a sugar) based on the taste test?
Learner-dependent answer
Learners should be able to describe the taste and texture of each banana: the ripe one being soft and sweet, and the unripe one being firm and not too sweet. Learners might say that the unripe banana contains more starch and less glucose as it is not as sweet as the ripe banana. But, this is not a very accurate test. The learners might also experience the tastes differently, making the results unreliable.
Learners should be able to quite easily see this based on the speed with which the iodine changes colour in the unripe banana.
OBSERVATIONS:
Draw a table to record your observations from the taste and iodine test for starch.
Learner-dependent answer
Allow learners the freedom to tabulate their results in any way they choose as long as it is easy to interpret and understand. Use this as a teaching opportunity to help those who cannot do this and when everyone is done compare the different methods used in the class.
QUESTIONS:
Compare your observations of ripe and unripe bananas with those of the other learners in the class. Did you all make the same observations?
Learner-dependent answer.
You should use this comparison to help learners understand that reliability of an experiment rests on the fact that although different people perform the same test they should all reach very similar results.
What do you conclude from these results? Which method of testing is better to use and why do you say so?
The conclusion is that unripe bananas contain more starch than ripe bananas. This question was specifically included to introduce learners to the concept of validity and teachers are encouraged to allow learners to debate this issue in the class.
Explain what you think happens to the starch as the bananas ripen.
As the bananas ripen, the starch is converted into glucose.
Now that we have looked at how green plants produce their own food, let's find out how all living things release the energy stored in food in order to perform the life processes.
The term respiration can refer to two distinct processes. In physiology, respiration refers to the transport of oxygen from the outside air to the cells and the transport of carbon dioxide out of the tissues and into the air. This is often confused with breathing, which is the movement of air in and out of the breathing organs, such as lungs or gills, and does not take place in all organisms, whereas respiration does. At a biochemical level, respiration refers to cellular respiration. This is the metabolic process in all organisms where oxygen is combined with glucose to release water and carbon dioxide and energy in the form of ATP (adenosine triphosphate). Cellular respiration takes place in individual cells within the organism whereas physiological respiration involves the bulk transport of gases and other compounds between the organism and the outside air.
In this section, we will be looking specifically at cellular respiration as we will be looking at the chemical reactions which release the energy in food. However, learners have not yet learnt about cells and so we will just refer to this as respiration. Should you wish to do so, you can make this distinction to your learners and introduce the term cellular respiration, however, it will only be clear once they have done cells in Gr. 9. They will study physiological respiration in Gr. 9 when they do body systems and also cover the circulatory and respiratory systems in detail.
An idea as introduction and/or conclusion to this section on Respiration is to let learners watch the YouTube video of a song about cell respiration: bit.ly/1eupZUz. The initial explanation is simple and appropriate for this grade level but it might show some of the more inquisitive learners what actually happens during the 3 stages of respiration.
We have now seen how plants produce food during photosynthesis. The energy from this food needs to be used by plants and by all the animals who eat those plants. In fact, all organisms need to break down food in order to release its chemical potential energy for life processes. So how does this happen? Let's find out.
Our bodies need energy to move and do work. Where do we get our energy from? The energy is obtained from the food that we and all other organisms eat.
If you think back to the work you did on fuel and energy in previous grades in Energy and Change, you will remember that fuels, such as wood, coal, and oil, contain chemical potential energy. When this fuel is burned in the presence of oxygen, the chemical potential energy is transferred into light and heat energy. In the same way, the glucose from the food that you eat is combined with oxygen in a series of chemical reactions to release the energy. The glucose is broken down and the energy is released. This energy is then used to drive all the other processes in your body. This process is called respiration. We can define respiration in all living organisms as the process by which energy is released from glucose in a series of chemical reactions.
We will learn more about chemical reactions next term in Matter and Materials. You will also learn more about respiration in later grades.
Respiration takes place in all organisms, even plants. However, plants do not need to eat any food as they make their own food during photosynthesis.
Photosynthesis requires sunlight and can only take place during daylight hours. Learners may get confused and think that because photosynthesis occurs during the day, that respiration only occurs during the night. Ensure that learners understand that respiration occurs constantly, during the day and night.
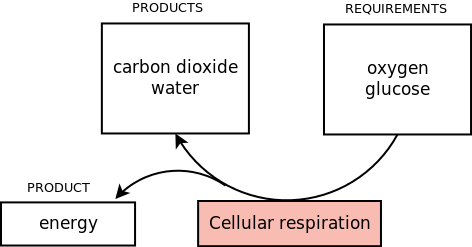
Do you remember how we represented photosynthesis as an equation to show what goes in and what comes out? We can represent respiration as an equation in the same way as we did for photosynthesis.
We know what is required for respiration to take place in all organisms. List the two ingredients for respiration.
They are glucose (food) and oxygen. Next term in Matter and Materials, we will look at chemical reactions and define the 'ingredients' as reactants. You can also link back to this example of a chemical reaction (actually a series of reactions), when introducing the topic next term.
We also know that respiration releases energy. This energy is contained in the chemical bonds of ATP molecules. ATP is not energy itself, but instead it stores energy. The ATP molecules have chemical potential energy in their bonds. When the ATP molecules are broken down they release the energy in order for other processes to take place.
However, respiration does not only produce energy. It also produces water and carbon dioxide as by-products. We can write an equation for respiration as follows:
glucose + oxygen → carbon dioxide + water + energy
Unlike photosynthesis, where we place sunlight energy above the arrow and not as one of the reactants in the equation, in respiration, we place energy here as a product. This is because the energy is actually contained within the molecules produced (ATP). However, at this level learners do not need to know this term, and we will only use the word energy in the equation. However, since this has the potential to cause misconceptions later, a note was included about the energy being contained within ATP molecules.
During photosynthesis in plants, oxygen is produced as a by-product. We call it a by-product as it is not the main product that is wanted from the process. In photosynthesis, the main product that is required from the process is glucose. What are the by-products in respiration?
Ask your learners this question to see if they understand the concept. The by-products are carbon dioxide and water.
A by-product is also sometimes referred to as a waste product.
The carbon dioxide that is produced in the body of an organism during respiration needs to be removed. In humans, we do this by breathing out carbon dioxide-rich air. We will learn more about the whole respiratory system next year in Gr. 9, and how breathing, our blood circulation system and respiration all work together as one system within our bodies.
Do not confuse breathing with respiration! Breathing is the act of inhaling and exhaling air into and out of the lungs. Respiration is the metabolic process that uses oxygen to release energy and releases carbon dioxide as a by-product.
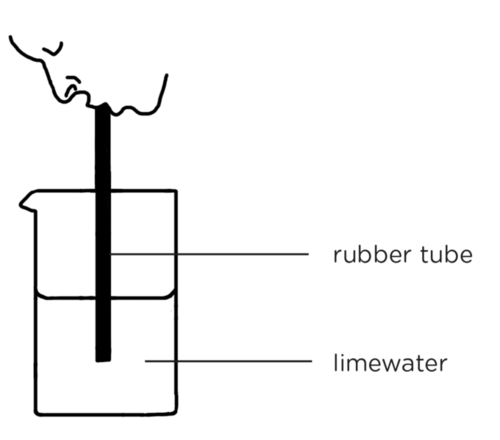
We can test for the products of respiration using our own breath. So how do we test that our breath contains carbon dioxide? It is a colourless gas, so we cannot see it directly.
There is a very well known test for detecting carbon dioxide using clear limewater. To test if a gas contains carbon dioxide, simply bubble the gas through limewater. If the clear limewater turns milky, then the gas contains carbon dioxide. Next term in Matter and Materials, we will look at this again and find out about the chemical reaction taking place in the test. For now, let's use this test to show that our breath contains carbon dioxide.
Watch a video of this activity.
You will need to prepare limewater prior to this activity. Here are instructions on how to do this:
MATERIALS:
For health reasons, there should be one straw or rubber tube per learner.
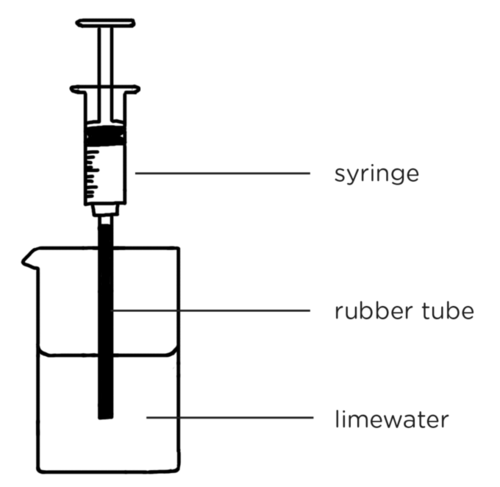
Pharmacies are generally quite helpful and will assist schools in purchasing low cost syringes. Technology teachers at your school might also have syringes for their syringe mechanics lessons. An alternative to a large syringe is to use a bicycle pump or balloon blower. Safety warning: remove the needles from the syringes, if there are any, before you hand out the syringes in class.
INSTRUCTIONS
QUESTIONS
Describe what you observed when you blew air from your lungs through the limewater. What does this mean?
The clear limewater turned cloudy white. This means our breath contains carbon dioxide from respiration.
Describe what you observed when you used the syringe to bubble air from the atmosphere through clear limewater.
The clear limewater did not change and remained clear. Some might notice a very slight change, which indicates that there is a small amount of carbon dioxide present in atmospheric air.
A very small percentage of atmospheric air is carbon dioxide gas (0.03). Why do you think you observed the result you did when you pushed air from the atmosphere through the limewater?
As air contains such a small percentage of carbon dioxide, there is not enough to cause a noticeable difference in the limewater. Discuss with your learners why they think that the limewater turned cloudy with your breath but not with the air, even though air does contain carbon dioxide. Point out that air from your lungs contains a much higher percentage of carbon dioxide from respiration and so this is able to turn the limewater cloudy in a shorter time than atmospheric air will.
Think about respiration.
INSTRUCTIONS:
This is what learners' diagrams should look like:
Have you noticed the VISIT boxes in the margins which contain links? You simply need to type this whole link into the address bar in your internet browser, either on your PC, tablet or mobile phone, and press enter, like this:

It will direct you to our website where you can watch the video or visit the webpage online. Be curious and discover more online at our website!
Concept map
Throughout this year, we are going to develop the skill of designing and makingconcept maps in Natural Sciences. The "Key concepts" listed above is a summary written out in full sentences. A concept map provides another way of representing information (ideas and concepts) in a more visual way. The benefits of a concept map are that it allows one to show the links between different concepts. Often a concept map has a "focus question" from which the other concepts radiate. In these books, the focus question will be the main topic for the chapter. The relationships between different concepts are shown using arrows with linking phrases, such as "results in", "includes", "can be", "used to", "depends on", etc.
As this year progresses, learners will have to start filling in more parts of the concept maps themselves, and then hopefully draw their own ones by the end of the year. This teacher's guide contains the full version of each concept map. Encourage your learners to study the concept maps and make sense of them at the end of each chapter before doing the revision questions. Help your learners to understand and "read" the concept maps by constructing sentences from them. For example in this case you could read: "Respiration takes place in all organisms, releases energy from food".
Learners need to learn how to learn! This is one skill which might help them later in their school career where they have a lot more information to ingest and learn and make sense of. Concept mapping is one tool for summarising information and understanding how different concepts link together. Real understanding and knowledge comes from grappling with the subject matter, and not just memorizing facts.
"Knowledge is real knowledge only when it is acquired by the efforts of your intellect, not by memory." - Henry David Thoreau
This year in Natural Sciences, we are going to learn more about how to make our own concept maps.
In the summary, we first have the "Key concepts" for this chapter. This is a written summary where the information from this chapter is summarised using words. We can also create a concept map of this chapter. This is a map of how all the concepts (ideas and topics) in this chapter fit together and are linked to each other. A concept map gives us a more visual way of summarizing information.
Different people like to learn and study in different ways; some people like to make written summaries, whilst others like to draw their own concept maps when studying and learning. Others like to make things even more visual, using pictures and diagrams to form their summaries. Figuring out the study method that works best for you, and developing these skills is very useful, especially for later in high school and after school!
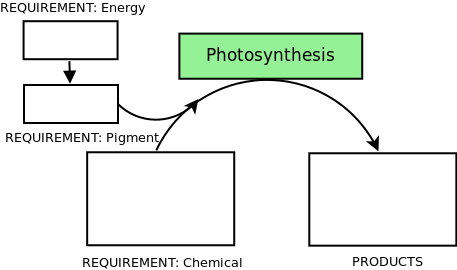
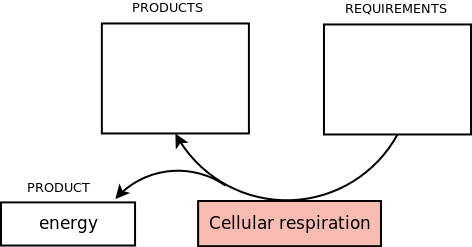
Have a look at the concept map below for 'Photosynthesis and Respiration'. Do you see that there are some empty spaces? You need to complete the concept map by filling these in. To do this you need read the map from top to bottom and have a look at the concepts which come before. For example, read the concept map as follows, "Respiration takes place in all organisms. All organisms release energy from food, called …........." What type of energy does food contain? Remember, food is the fuel for our bodies. You also need to fill in the three things that plants use to photosynthesise. You need to look at what concepts link from these in order to know where to put each one. Finally, what does photosynthesis release as a by-product? You also need to fill this in.
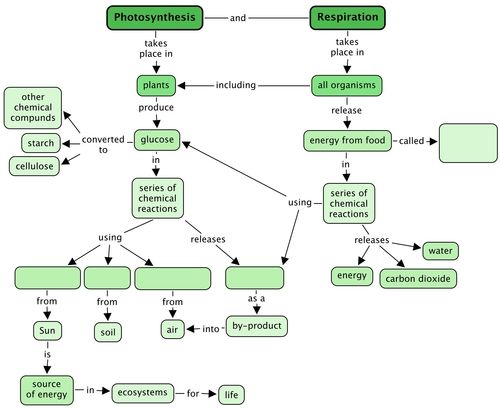
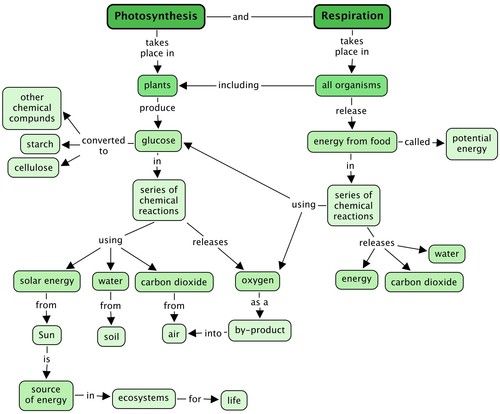
Teacher's version.
Below is the complete concept map with the answers filled in. Make sure your learners understand what a concept map is and that they have filled in the correct concepts into the empty spaces. Learners might battle to do this, especially to fill in "Potential energy" as the type of energy in food. Help them by reminding them of the two types of energy, namely kinetic energy and potential energy. You can ask them questions such as, "What do plants get from the Sun which is used for photosynthesis?" (Solar energy), "What do plants get from the soil that they use for photosynthesis?" (water), etc.
A Gr. 4 learner wanted to grow some beans and carefully planted them in a yoghurt tub and watered them. He was scared that his little brother would knock his tub over, so he hid the tub in his cupboard.
What are the requirements for photosynthesis to occur? [3 marks]
Carbon dioxide, sunlight and water.
A farmer is growing some tomatoes. He heard from his daughter that plants produce glucose during photosynthesis, so he decided to see for himself. However, when he tested the leaves, he did not find much glucose, but he did find a lot of starch present.
Do plants undergo photosynthesis and respiration all day and all night? Give reasons for your answer. [4 marks]
Plants only photosynthesise during the day, and not at night. This is because they need sunlight energy to photosynthesise. Plants respire all day and all night. All living organisms need to undergo respiration to release energy from chemical potential energy and perform the seven life processes.
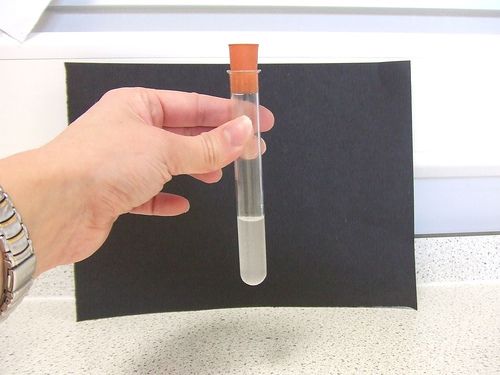
A group of Gr. 7 learners wanted to show that carbon dioxide is used to make bread rise because the yeast and sugar that is added to the bread mix produces the carbon dioxide. They set up the following two experiments. The gas that they collected from each test tube was run through limewater.
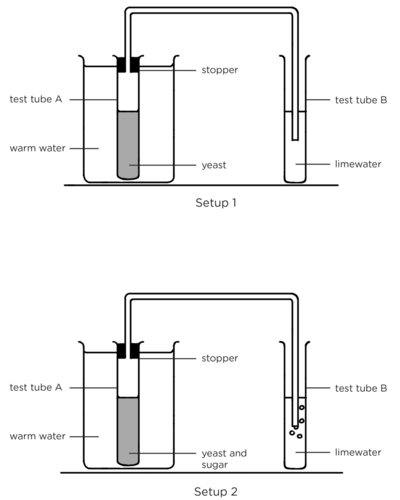
The following photo shows one of the test tubes after the experiment. Which test tube do you think it is and from which set-up. Give reasons for your answer. [2 marks]
Study the following diagram and fill in the missing information. [6 marks]

Draw a table in the following space to show the differences between the two processes, photosynthesis and respiration. You table should highlight the differences in requirements, the differences in the products, which organisms the processes takes place in, and when. [8 marks]
An example of a table is given here. (Take not that learners have not yet started to call the starting ingredients reactants)
Table of differences between photosynthesis and respiration
|
Characteristic |
Photosynthesis |
Respiration |
|
Starting ingredients/requirements (reactants) |
Carbon dioxide, sunlight energy and water |
Glucose and oxygen |
|
End products/what the process produces |
Glucose and oxygen |
Energy, carbon dioxide and water |
|
Organisms in which this process takes place |
Green plants |
All living organisms |
|
When this process takes place |
During the daytime/when there is sunlight |
All the time as organisms continuously respire |
Assessment Rubric 4 can be used to mark this table if you would like a more in depth assessment.
Total [44 marks]
| Table of Contents |
Next
Chapter 2: Interactions and interdependence within the environment
|