Looking carefully you should see that the Sun's image moves slowly across the white card. What causes this motion?
The spin of the Earth on its axis.
|
Previous
Chapter 13: Energy and Change Glossary
|
Next
Chapter 15: Beyond the solar system
|
Chapter overview
(3 weeks)
The ordering of the chapter in Gr 8 Planet Earth and Beyond in CAPS is as follows:
Although this is the order in CAPS and it is the way in which the content has been ordered here in these workbooks, we suggest starting with Chapter 3 on 'Looking into space' first, and then going on to the other two chapters. This makes more sense conceptually to first learn about how we see into space, and then go on to look at the objects that have been observed in our solar system and beyond, making use of a variety of telescopes.
In Grade 6 learners covered material regarding the solar system, and in Grade 7, they focused on the Sun, Earth, Moon system. Learners should be familiar with the fact that the Sun is a star located at the centre of the solar system and they should understand that the planets orbit around the Sun. They should also be aware that there are two types of planets: smaller rocky planets and larger gas giants. In this chapter, the solar system is introduced in more detail, and the physical explanation for the two types of planets is summarised. They will compare the properties of the different planets, information that they will then use to explain why the Earth is presently the only planet suitable for life in our solar system. The main aims of this chapter are to ensure that learners understand the following:
Section 1.1 covers the properties of the Sun, section 1.2 introduces all the other objects in the solar system and section 1.3 covers our special place in the solar system.
Concept maps: The concept maps in these workbooks were created at Siyavula using an open source programme called CMapTools. You can download the programme from this link if you would like to use it to create your own concept maps.[link] http://cmap.ihmc.us/download/
Do you think it is important to teach astronomy to learners at school? Read this interesting and informative article detailing the benefits and applications of astronomy. http://www.iau.org/public/themes/why_is_astronomy_important/
Citizen science offers you a free, easily accessible and inspiring opportunity to bring real science into the classroom. Find out more about incorporating real science into your classroom with Zooniverse citizen science projects at ZooTeach:[link] http://www.zooteach.org/.. ZooTeach is a website where teachers and educators can share high quality lesson plans and resources that complement the Zooniverse citizen science projects.
 Did you know that these workbooks were created at Siyavula with the input from many contributors and volunteers? Just turn to the front to see the long list. Read more about Siyavula at our website: www.siyavula.com. You can also sign up at our community page if you would like to stay in touch and get involved in our projects. Siyavula has also created a range of textbooks for other grades and subjects, and we are going to be producing more. These textbooks and workbooks are openly-licensed and freely available for you to use, download, copy, rework and redistribute. The Siyavula textbooks that are currently available are:
|
1.1 The Sun (1.5 hour)
|
Tasks |
Skills |
Recommendation |
|
Activity: Observing the Sun with a telescope |
observing, describing |
Suggested |
|
Activity: Observing the Sun with a pinhole camera |
observing |
Alternative to above activity |
|
Activity: Sunspots |
observing, identifying, analysing |
Optional, extension |
1.2 Objects around the Sun (6 hours)
|
Tasks |
Skills |
Recommendation |
|
Activity: The scale of the solar system |
simulating, visualising, taking measurements |
CAPS suggested |
|
Activity: Make a hanging solar system |
simulating, visualising, taking measurements |
CAPS suggested (also alternative to above activity) |
|
Activity: Planetary temperatures |
reading tables, labelling graphs |
CAPS suggested |
|
Activity: Comparing terrestrial planets and gas giants |
comparing, recalling |
Optional |
|
Activity: Comparing the inner and outer planets |
comparing, reading tables, analysing |
CAPS suggested |
|
Activity: Planetary holidays |
writing, researching |
CAPS suggested |
|
Activity: Planet factsheet |
writing, researching |
CAPS suggested (also alternative to above activity) |
|
Investigation: Impact craters |
investigating, observing, taking measurements, analysing |
Suggested |
|
Activity: A comet's ion tail |
observing |
Suggested |
1.3 Earth's position in the solar system (1.5 hours)
|
Tasks |
Skills |
Recommendation |
|
Activity: The Sun's habitable zone |
plotting graphs, interpreting graphs, analysing |
CAPS suggested |
Our solar system includes the Sun and all the objects that orbit around the Sun. As you will find out, a variety of objects are in orbit around the Sun: eight planets, many dwarf planets, asteroids, Kuiper Belt objects and comets.
It is very important that you do not look at the Sun directly! The Sun can damage your eyes permanently!
In this section students learn how the Sun produces its energy in its core and how this energy is transported to the surface and then into space. The effect that the Sun has on the Earth is also briefly mentioned. This section focuses on conducting observations of the Sun and looking at images of the Sun to study the surface features, including sunspots.
There are two activities in this section which involve observations of the Sun. It is very important that learners DO NOT LOOK DIRECTLY AT THE SUN, even with sunglasses on, as they may permanently damage their eyes.
The birth of the solar system (video)
Before we look at the Sun close up, let's summarise what you learned about the Sun in Grades 6 and 7:
Interact with this simulation to visualize the effects of gravity on orbital paths of the Sun, Earth and Moon. http://phet.colorado.edu/en/simulation/gravity-and-orbits
What do you think the Sun would look like if it was further away, like the other stars we see at night?
Although the Sun is the brightest object in our sky, this is only because it is so close to us. The Sun is actually a medium sized star of average brightness compared with other stars. If the sun were farther away, it would look like a small point of light like the other stars in the sky.
Let's look at the Sun in more detail.
Secrets of a dynamic Sun (video)
How the Sun works.
Do you know what the Sun is made of? The Sun is mostly made up of hydrogen gas (about 71%), and also helium gas (about 27%) with a tiny amount of other gases. The temperature at the Sun's surface is very high, around 5500 °C. However, that is nothing compared to deep inside the Sun. At the Sun's centre, or core, it is about 15 million °C. It is so hot at the Sun's centre that nuclear reactions can occur, which change atoms from one element to another. In the Sun's case, four hydrogen nuclei are squeezed or fused together to form a new helium nucleus. This process is called nuclear fusion.
At the temperatures encountered at the centre of the Sun the atoms are ionized and so nuclear fusion involves the merging of atomic nuclei rather than atoms.
Revise the model of the atom that you learned about in Matter and Materials if you are unsure of some of the terms used here, such as nucleus, which is at the centre of an atom, and consists of protons and neutrons.
This nuclear fusion reaction releases energy because the new helium nuclei produced have very slightly less mass than the four hydrogen nuclei used to make them. How can this be? Well, according to the famous scientist Albert Einstein, energy and mass are equivalent. Some of the mass in the hydrogen nuclei is converted and released as energy when the nuclei fuse to make helium. A very large amount of energy is released. This energy travels outwards from the Sun's core towards its surface. The energy eventually reaches the Sun's surface somewhere between 17,000 and 100,000 years later! The Sun's energy then spreads out into the solar system in the form of heat and light.
Albert Einstein explained the mass-energy equivalence with the famous equation E = mc2.
E = mc2 explained (video).
Different studies of the transport of photons within the Sun estimate different travel times to reach the surface. Much older studies reported times of order of millions of years, but these have now all been revised downwards to either tens or hundreds of thousands of years.
Although we often say that the Sun "burns" its hydrogen fuel into helium, the Sun does not burn in the same way that a fire does, because it is not on fire. The energy generated from the Sun comes from fusing atomic nuclei together to form a new atomic nucleus. As a result of the extreme temperatures throughout the Sun, its gas glows, giving off light. Our usual experience of burning (or fire) is actually a chemical reaction where atoms combine to form molecules, e.g. when oxygen combines with carbon to form carbon dioxide.
The word fuse means to join together, so nuclear fusion reactions occur when lighter atoms join together into heavier atoms.
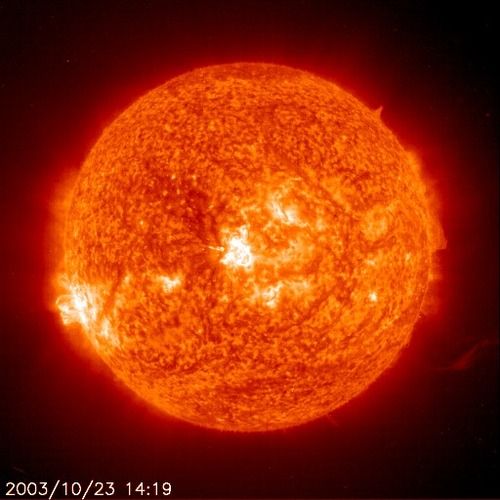
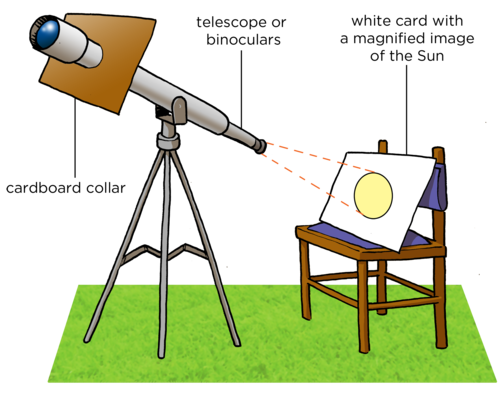
You are now going to observe the Sun to look at its surface features. Remember, you should never look directly at the Sun as it can permanently damage your eyes. You can use either a telescope with a filter on it or a pinhole to project an image of the Sun onto a screen to safely view the Sun's image.
This is an outdoors activity. You will need a telescope or binoculars for this activity. An alternative activity is included after this,which does not need a telescope or binoculars.You will be projecting an image of the Sun onto a white card or screen for your learners to observe.
If you do not have access to a telescope or binoculars it could be worth contacting a local amateur astronomy club as they are often keen to get involved in educational activities. It is vital that learners do not look directly at the Sun, with or without sunglasses. The projection method used in this activity is safe and also has the bonus that any sunspots on the Sun's surface can also be seen. Sunspots are regions of slightly lower temperature on the Sun's surface, and therefore appear darker. If you do not have access to a telescope, but do have internet access, then an image of the Sun is posted daily at http://sohowww.nascom.nasa.gov/data/realtime-images.html
It is assumed that this will be a teacher-led demonstration, however, there is no reason why learners cannot contribute by building the shade collar and setting up the white card. If you are using binoculars instead of a telescope, be sure to cover one of the lenses so that only one side of the binoculars is used. When trying to point the telescope at the Sun, a useful trick is to watch the shadow of the telescope tube: if pointed directly toward the Sun, then the sides of the tube will cast no shadows. Preparing for the activity can sometimes take a bit of fiddling, so it is a good idea for you to set your learners a short task to do while you set up if you have not had the opportunity to set up ahead of time.
Sunspots are sometimes (not always) visible on the Sun's surface. You are more likely to see sunspots when the Sun is most active during solar maximum. The Sun's activity varies over an 11 year cycle. Solar maximum is currently predicted to be in 2013. Solar minimum is currently predicted to be in 2019. As an extension you could repeat this activity over the course of several days to see if any sunspots or sunspot groups change shape, size, or position over time.
MATERIALS:
NEVER look directly at the Sun, even with sunglasses on as you can permanently damage your eyes.
INSTRUCTIONS:
Ask the learners to point out any interesting features they notice about the image. There may be sunspots (dark spots) visible. Also you should see that the image is brighter in the middle of the Sun's disc than at the edges. This is because when we look at the middle of the Sun's disc we can see deeper into the Sun than when we look towards the edge. The temperature of the Sun increases with increasing depth. At the centre of the Sun's disc we are seeing a hotter region. As the intensity of light is proportional to the temperature, the Sun looks brighter in the centre.
QUESTIONS:
Looking carefully you should see that the Sun's image moves slowly across the white card. What causes this motion?
The spin of the Earth on its axis.
Draw a picture of what the surface of the Sun looks like on the white card in the circle below.
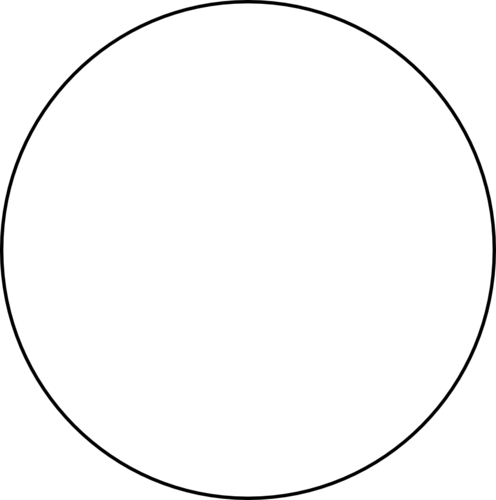
Learner-dependent answer.
Where does the Sun get its energy?
Three years of the Sun in three minutes.
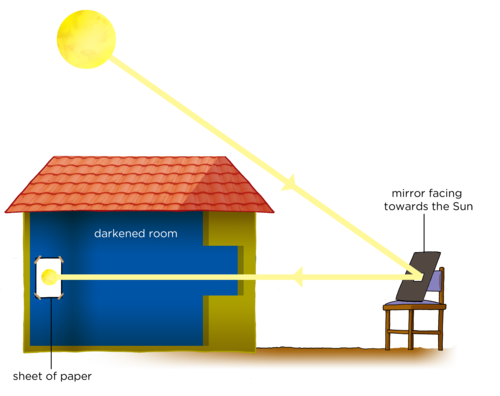
Alternatively, if you do not have access to a telescope or binoculars, you can perform the following activity to view the Sun.
In this activity you will reflect an image of the Sun onto a white card or screen for your learners to observe. This method has the advantage of not needing a telescope or binoculars, however, the solar image produced will be a bit fuzzy. However, it should be good enough to show large sunspots. This activity is designed as a teacher-led demonstration. If you have a sunlit window or door to your class you can do this activity in the classroom. If you do not have a classroom with a sunlit window, or if your class is very small, you can do the activity outdoors, reflecting the Sun's image onto a shaded wall or back into a darkened classroom.
As a rough guide, begin with a distance of around 8 m between the white card and the mirror. The further away you place the mirror from the white screen the fainter and larger the image will appear. At closer distances the image will be brighter but it may not be in very good focus.
As mentioned in the previous activity, sunspots are sometimes (not always) visible on the Sun's surface. Therefore, you could repeat this activity over the course of several days to see if any sunspots or sunspot groups change shape, size, or position over time.
MATERIALS:
METHOD:
QUESTIONS:
As you moved the white cardboard screen closer towards the mirror, what did you notice happened to the image of the Sun?
The image should get smaller and brighter.
Draw a picture of what the surface of the Sun looks like on the white card in the circle below.

Learner-dependent answer.
When the Sun reflects off the surface of the mirror, what can you say about the angle of incidence and the angle of reflection of the ray?
The angles are equal. This links back to what learners covered last term in Energy and Change.
Did you notice any features on the Sun's surface when you viewed it in class? Let's find out what some of these surface features could have been in the next activity.
Fiery looping rain on the Sun (video)
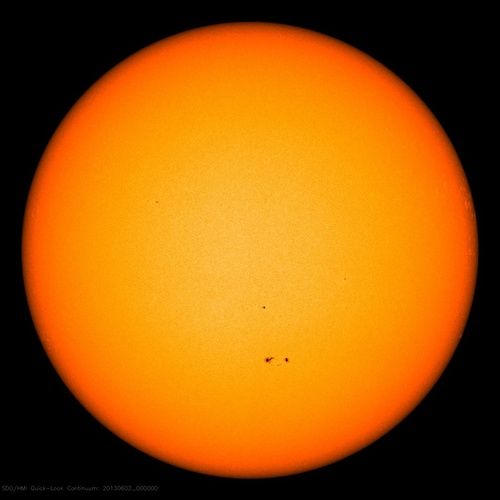
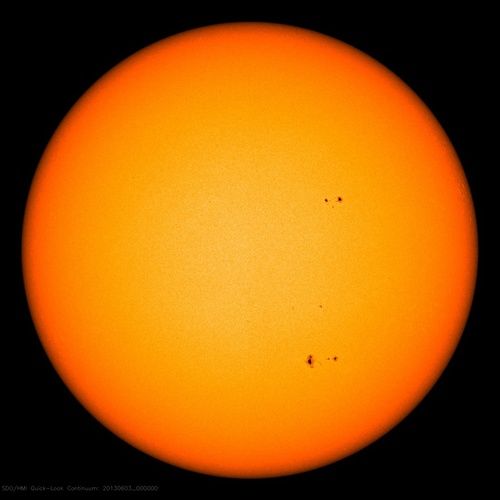
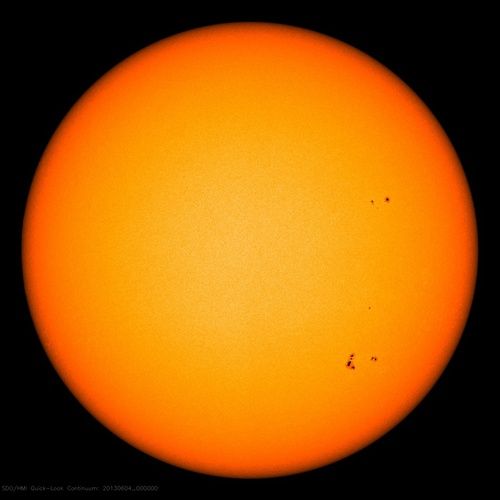
This is an additional, extension activity. In this activity learners will look at images taken over three consecutive days in 2013. The images were taken using the Helioseismic and Magnetic Imager instrument on board the Solar Dynamics Observatory space satellite. In the images two major sunspot groups are visible, one in the Sun's northern hemisphere and one in the Sun's southern hemisphere. Learners should identify the two groups and observe that they move across the Sun from left to right in each successive image. The sunspots move like this because the Sun is rotating on its axis.
You could begin this activity by asking learners if they noticed any features on the Sun's surface when they observed it in class, before asking them to look at the pictures below.
INSTRUCTIONS:
QUESTIONS:
How many groups of dark spots do you see in each image?
There are two main groups, one in the top half of the Sun and the other group in the bottom half.
What do you notice about the positions of the spots in each image?
They are moving across the Sun's disc from left to right.
Why do you think the spots have moved?
The Sun is rotating on its own axis (once roughly every 25 days).
What do you think these spots are?
They are called Sunspots and they are regions where the temperature is cooler than the rest of the Sun's surface.
This is enrichment material to extend learners' knowledge beyond what they have covered in previous grades about the Sun. Here is a link to a pdf download for an activity to track sunspots in real time, using data from SOHO: http://sohowww.nascom.nasa.gov/classroom/docs/Spotexerweb.pdf
Learn more about the research that NASA is doing about our Sun with the Solar and Heliospheric Observatory (SOHO). http://sohowww.nascom.nasa.gov/home.html
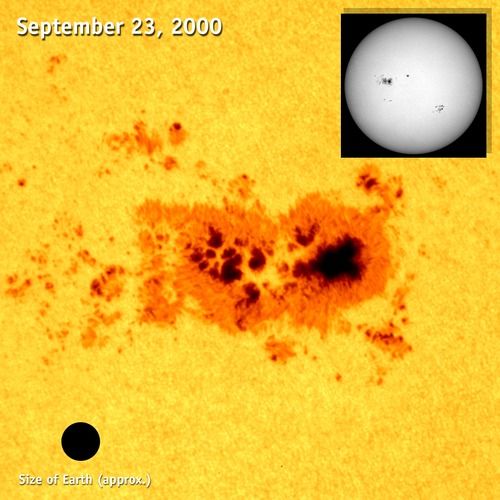
The Sun's surface often has little blemishes on it. These dark spots on the Sun are called sunspots. They are areas that are slightly cooler than the rest of the Sun's surface. The Sun's surface is typically about 5500 °C and a typical sunspot has a temperature about 3900 °C.
This information about the Sun's surface and sunspots is additional information for your interest. Be curious and discover more!
View real time images of the Sun and track sunspots. http://sohowww.nascom.nasa.gov/sunspots/
As the Sun is made up of gas, there is no solid surface like on Earth. So when one says that you are looking at the Sun's surface what are you actually looking at? Imagine that you are standing in thick fog (mist) with a friend. You can see things close to you, like your hand in front of you and your friend standing next to you. However, because the fog is so thick you cannot see far into the distance. Similarly, when we look at the Sun, we cannot see right into the centre of the Sun. As you go deeper and deeper in towards the centre of the Sun the gas begins to get thicker and thicker so that we cannot see through it. The deepest depth that we can see into the Sun's gas is what we call the Sun's surface.
Sunspots are areas that are slightly cooler, and therefore darker, than the rest of the Sun's surface. A typical sunspot only lasts a few days. When a sunspot lasts for several days you can observe it move across the Sun's disc. The sunspot appears to move across the Sun because the Sun is spinning slowly on its own axis.
The number of sunspots on the Sun increases and decreases in a regular pattern which repeats every 11 years. When there are more sunspots the Sun is more active and there are more solar storms and more of the Sun's energy reaches the Earth.
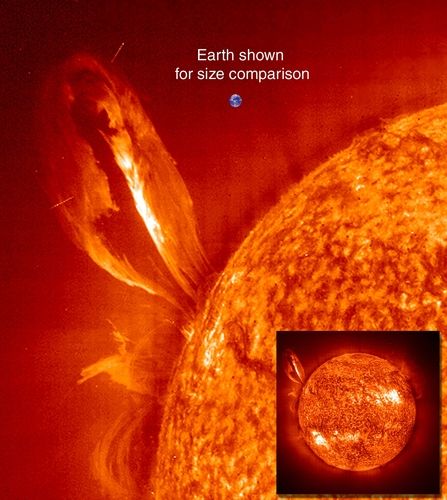
The outer atmosphere of the Sun is called the corona. Gas particles from the corona are constantly escaping into space, forming the solar wind. When the Sun is very active, violent eruptions called solar flares occur on its surface.
This section covers all the objects in orbit around the Sun including the eight planets, dwarf planets, asteroids, Kuiper Belt and Oort Cloud and comets. Learners should be familiar with the eight planets in the solar system, which were covered in Gr 6, however it is very likely that they are unfamiliar with the remaining components of the solar system. The first half of this section is intended as revision, to remind learners about the properties of the eight planets. The two types of planets, the terrestrial (rocky) planets and gas giants are compared and contrasted in detail. The second half of this section covers the smaller bodies in the solar system such as dwarf planets, comets and asteroids. It should be stressed to learners that new discoveries are made all the time and so the numbers of moons discovered around planets and the number of dwarf planets in the solar system will change over time.
Explore the solar system from your computer with this 3D environment http://eyes.nasa.gov/ and view any objects in the solar system with this interactive simulator http://space.jpl.nasa.gov/
The Sun is by far the largest and most massive object in our solar system making up 98\% of the total mass of the solar system. Due to the Sun's massive size, its large gravitational pull causes the planets and other objects in the solar system to orbit around it.
In orbit around the Sun are the eight planets along with their moons, dwarf planets and many much smaller objects like asteroids, Kuiper belt objects and comets. You will learn all about these objects later on in this chapter.
'terra' is the Latin word for land or earth.
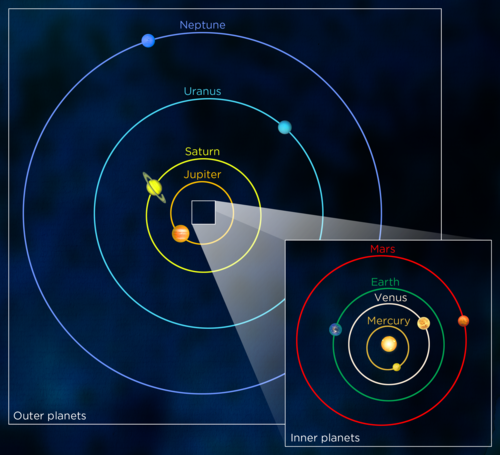
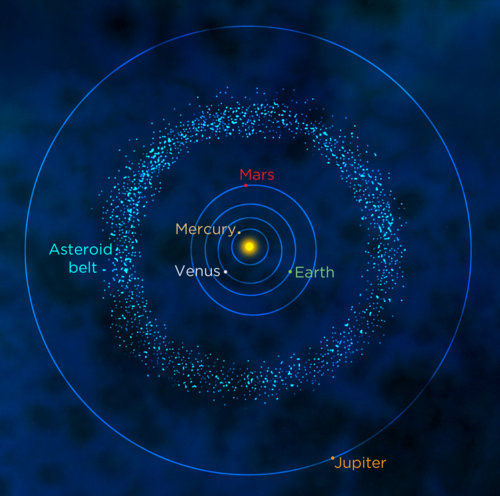
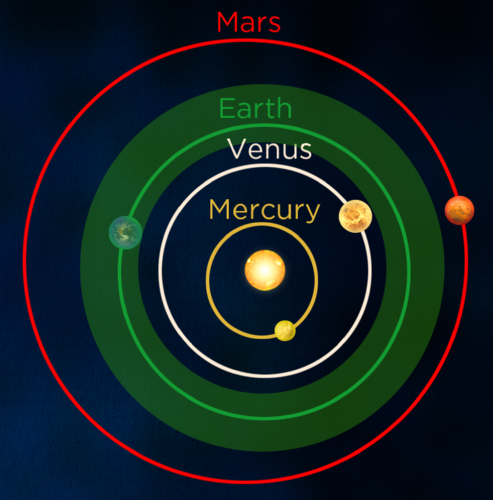
The four planets closest to the Sun are Mercury, Venus, Earth and Mars. These are called terrestrial planets because they have solid rocky surfaces. Further out, lie the gas giants Jupiter, Saturn, Uranus, and Neptune. These are much larger than the terrestrial planets and are mainly made of gas with small cores of rocky materials. In between the terrestrial planets and the gas giants lies the asteroid belt and out beyond the orbit of Neptune lies the Kuiper belt.
Is there gravity in space?
As you can see, there are lots of different types of objects orbiting the Sun, and not all of them are planets! To be classed as a planet, an object must:
Pluto was reclassified from planet to dwarf planet in 2006. Although Pluto orbits the Sun and is almost round, it has not cleared out other objects in its orbit, and so it cannot be classified as a planet. There are many more dwarf planets at similar distances from the Sun as Pluto.
Some older textbooks or websites that you visit may still refer to Pluto as a planet as they have not been updated.
You will learn about planets and the other objects orbiting the Sun in more detail later on in this chapter. Let's begin by learning more about the size and scale of the solar system.
Build your own solar system with this orbit simulator. http://phet.colorado.edu/en/simulation/my-solar-system
In this activity learners will get a sense of the scale of the solar system. Using a model where the Sun is scaled to the size of a grapefruit, the other planets are also scaled down and are placed in orbit around the grapefruit Sun at the correctly scaled distance. This activity needs a lot of space. The distance you need from the Sun to Neptune is 321 m. The scaling used in this activity is 14 billion to one. You can change the scaling to suit the space you have available.
A summary table is included here with the scaled sizes and distances for the planets for your reference. Learners can use a measuring tape to measure out the distances. If no measuring tape is available then the approximate distance in strides is also given.
|
Object |
Actual diameter (D) or distance from the Sun (d) (km) |
Measurements scaled to in model |
Model suggestion |
|
Sun |
D = 1.4 x 10⁶ |
10 cm |
Grapefruit |
|
Mercury |
D = 4.9 x 10³ d = 58 x 106 |
0.35 mm 4.2 m |
Salt grain 4 big strides |
|
Venus |
D = 12 x 103 d = 108 x 106 |
0.86 mm 7.7 m |
Poppy seed 8 big strides |
|
Earth |
D = 13 x 103 d = 150 x 106 |
0.91 mm 10.7 m |
Poppy seed 11 big strides |
|
Mars |
D = 6.8 x 10³ d = 228 x106 |
0.48 mm 16.3 m |
Salt grain 16 big strides |
|
Jupiter |
D = 143 x 103 d = 778 x 106 |
10.0 mm 55.6 m |
Small grape 55 big strides |
|
Saturn |
D = 128 x 103 d = 1426 x 106 |
8.57 mm 102 m |
Pea 100 big strides |
|
Uranus |
D = 51 x 103 d = 2868 x 106 |
3.65 mm 205 m |
Peppercorn 200 big strides About twice the length of a football pitch. |
|
Neptune |
D = 45 x 103 d= 4500 x 106 |
3.55 mm 321 m |
Peppercorn 320 big strides About three times the length of a football pitch. |
|
Alpha Centauri (nearest star) |
d = 4.0 x 10¹³ |
2900 km |
Cape Town to Lusaka! |
MATERIALS:
INSTRUCTIONS:
See the table provided.
Let's now make a smaller model of the solar system.
Compare the planets using this tool from NASA. http://solarsystem.nasa.gov/planets/compchart.cfm?Object1=Earth&Object2=Mars
In this activity learners will work individually to make a hanging model of the solar system.
MATERIALS:
INFORMATION TABLE:
|
Object |
Orbit radius (cm) |
Object radius (cm) |
|
Sun |
- |
5.0* - this is NOT to scale |
|
Mercury |
0.4 |
0.2 |
|
Venus |
0.7 |
0.8 |
|
Earth |
1.0 |
0.8 |
|
Mars |
1.5 |
0.4 |
|
Jupiter |
5.0 |
5.1 |
|
Saturn |
9.2 |
4.1 |
|
Uranus |
18.6 |
1.6 |
|
Neptune |
29.1 |
1.6 |
* Note that if the Sun were drawn at the same scale as the rest of the planets, its radius should be 50 cm rather than 5 cm!
The scale of the orbits differs from the scale of the object sizes in the table here. If they were on the same scale then the Sun and planets would be much much smaller.
INSTRUCTIONS:
QUESTION:
Why did you adjust the string lengths so that the Sun and all the planets hang at the same height?
The planets orbit the Sun in a flat plane that includes the Sun.
Read more about the current research taking place at NASA's Mars Science Laboratory. http://mars.nasa.gov/msl/
Now that you have an idea of the size and scale of the planets in our solar system, let's compare the two groups of planets, the inner worlds, Mercury, Venus, Earth and Mars with outer worlds, Jupiter, Saturn, Uranus and Neptune, in more detail. Look at the following pictures which compare the features of the two groups of planets.
The aim of this section is to remind learners about the two types of planets. They were introduced to the two planetary types, the inner rocky terrestrial planets and the outer gas giants in Grade 6. This section covers this information again and goes on to explain why there are two types of planets. For a summary of each planet's properties see http://nssdc.gsfc.nasa.gov/planetary/factsheet/
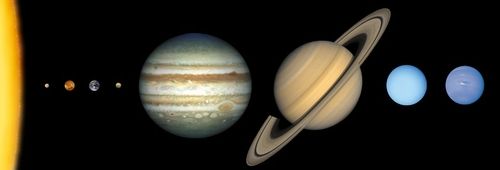
How do the sizes of the terrestrial planets and gas giants compare with each other?
The gas giants are much larger than the terrestrial planets.
Let's now look at the compositions of the two types of planets.
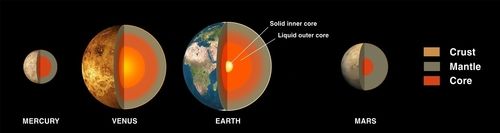
The above image shows the internal structure of the terrestrial planets. They all have a metal core, a rocky mantle and a thin outer crust. They also have a thin atmosphere (Mercury has an extremely thin atmosphere). The Earth's atmosphere is unique in the solar system in that it contains abundant oxygen, which is necessary to sustain life on Earth.
When it is winter on Mars you can see polar ice caps forming on the planet, like on Earth. However, unlike the Earth's polar ice caps which are made of frozen water, the ice caps on Mars are made of frozen carbon dioxide. This frozen carbon dioxide comes from Mars' atmosphere.
The image below shows the structure of the gas giants. They are mostly made of hydrogen and helium gases and are much less dense than the rocky terrestrial planets.
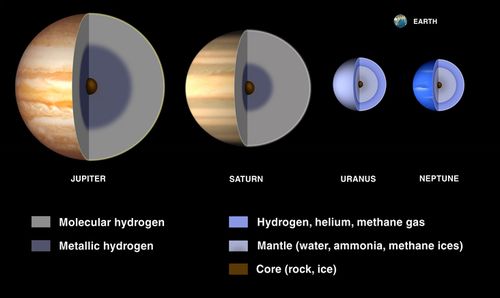
As you go deeper into the atmospheres of Saturn and Jupiter their atmospheres get denser and denser until they gradually become a liquid. This liquid hydrogen is called metallic hydrogen. Deeper down they have a solid core made of rocky materials.
Hydrogen is a liquid deep inside Jupiter and Saturn because the hydrogen molecules have been squeezed together due to the enormous pressure at those depths caused by the weight of the planet's atmosphere above.
Uranus and Neptune have thick atmospheres which have methane in addition to hydrogen and helium. The methane gives them their blue colour. Scientists think that below their atmospheres they have a slushy mantle made of water, ammonia and methane ices. At their centres they have a rocky-icy core.
Ice does not just refer to water ice, but other frozen elements and compounds too. Also, the rocky-ice materials do not resemble any rock or ice you would see on Earth, since the temperatures and pressures on these planets and gas giants are much, much higher.
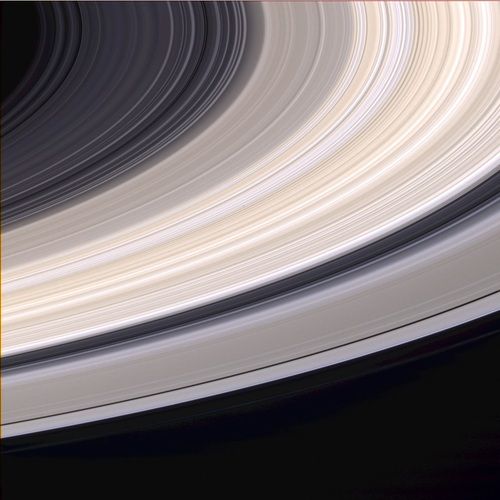
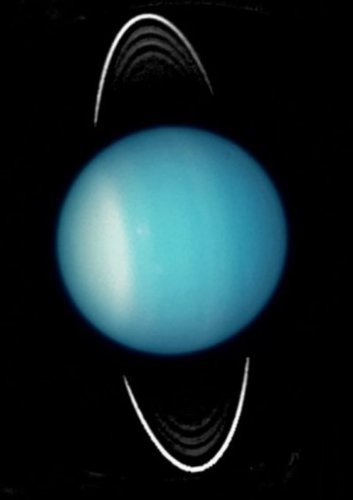
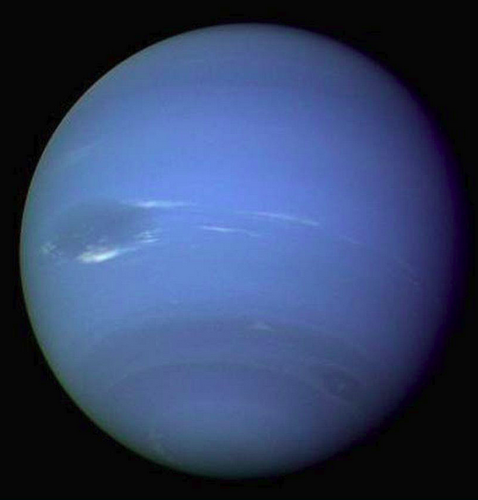
Look at the pictures below. They show images of the gas giants. What features do you see that the gas giants all have in common?
They all have rings.
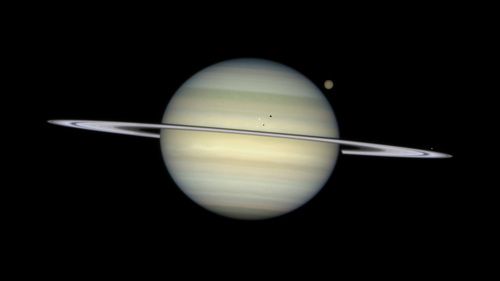
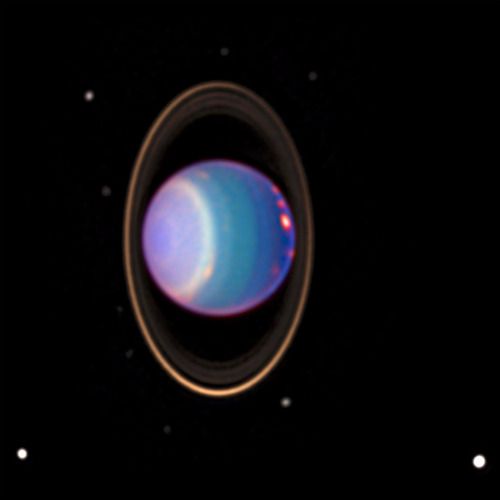
Uranus is on its side.

Discover more online at NASA's Solar System Exploration site. http://solarsystem.nasa.gov/index.cfm
You can see that all the gas giants have rings. None of the terrestrial planets have rings.
Another difference between the inner rocky and outer gas giant planets, are the number of moons orbiting each planet. Look at the table below which shows the number of moons each planet in our solar system has.
|
Planet |
Number of Moons |
|
Mercury |
0 |
|
Venus |
0 |
|
Earth |
1 |
|
Mars |
2 |
|
Jupiter |
67 |
|
Saturn |
62 |
|
Uranus |
27 |
|
Neptune |
13 |
New moons are discovered all the time, so these numbers may change over time.
What can you say in general about the number of moons that the two types of planet have?
The terrestrial planets have no or few moons whereas the gas giants have lots of moons.
The terrestrial planets are much closer to the Sun than the gas giants. Because of this, the terrestrial planets orbit the Sun in less time than the gas giants, because they have a shorter distance to cover.
Lets see how the distance from the Sun affects the planets' temperatures.
In this activity learners will compare the temperatures of the different planets. Using the table provided they must label each planet on the thermometer drawn below. This activity therefore requires that learners can read information from a table and also from a graph.
INSTRUCTIONS:
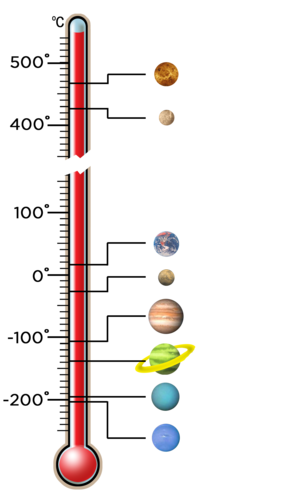
|
Planet |
Temperature (°C) |
|
Mercury |
167 |
|
Venus |
464 |
|
Earth |
15 |
|
Mars |
-65 |
|
Jupiter |
-110 |
|
Saturn |
-140 |
|
Uranus |
-195 |
|
Neptune |
-200 |
The labeled image:
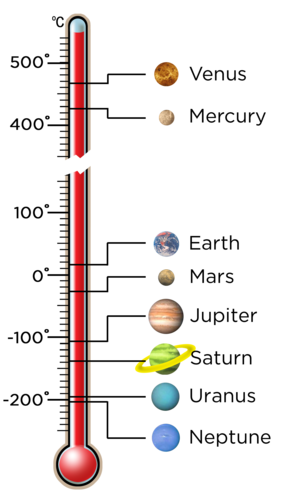
QUESTIONS:
Which planet has the lowest average temperature?
Neptune.
Why do you think this is?
It is the furthest planet from the Sun.
What do you notice about the average temperatures of the terrestrial planets compared with the gas giants?
The average temperatures of the terrestrial planets are much higher than the average temperatures of the gas giants.
If you exclude Venus, how does the ordering of the planets from the Sun compare with their average temperature?
In general, the further away from the Sun a planet is, the lower its temperature.
NOTE: Venus is the exception because it has a very thick atmosphere and is undergoing a runaway Greenhouse effect which learners will discover later on in this chapter.
Clearly the terrestrial planets and gas giants have very different properties. Let's compare them.
In this activity learners must compare and contrast the two types of planet using the information already provided in this section.
INSTRUCTIONS:
|
Terrestrial Planets |
Gas Giants |
|
close to the Sun |
__________ from the Sun |
|
closely spaced orbits |
widely spaced orbits |
|
small masses |
large masses |
|
small radii |
__________ radii |
|
mainly rocky |
mainly __________ |
|
solid surface |
__________ surface |
|
high density |
__________ density |
|
slower rotation |
faster rotation |
|
__________ moons |
many moons |
|
__________ rings |
many rings |
|
thin atmosphere |
__________ atmosphere |
|
warm |
__________ |
|
Terrestrial Planets |
Gas Giants |
|
close to the Sun |
far from the Sun |
|
closely spaced orbits |
widely spaced orbits |
|
small masses |
large masses |
|
small radii |
large radii |
|
mainly rocky |
mainly gaseous |
|
solid surface |
no solid surface |
|
high density |
low density |
|
slower rotation |
faster rotation |
|
few or no moons |
many moons |
|
no rings |
many rings |
|
thin atmosphere |
thick and dense atmosphere |
|
warm |
cold |
Why do you think the two types of planets are so different?
Learner-dependent answer. Answer in text below.
When the solar system was forming, the difference in temperature across the early solar system caused the inner planets to be rocky and the outer ones to be gaseous. Close to the Sun it was hot and only materials with very high melting points, such as metals, could remain solid and form planets. Further away from the Sun, where it was cold, compounds like water and methane were frozen. Astronomers call these frozen compounds ices. Therefore the cores of the gas giants contain rocky and icy compounds. As the abundance of metals in the universe is very small, the inner planets are much smaller than the gas giants. The gas giants could also attract large amounts of hydrogen and helium to their atmospheres due to their size.
Let's continue to compare the rocky planets and the gas giants.
In this activity learners will use the information provided in the table below to answer questions which compare the properties of the rocky planets and the gas giants. This is a good exercise to get learners to read information from tables and to look for patterns in data.
INSTRUCTIONS:
Use the information in the table below to answer the questions that follow.
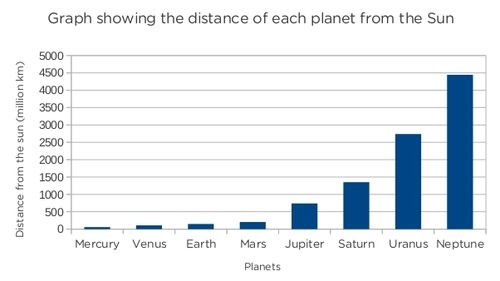
|
Planet |
Density (kg/m3 ) |
Diameter (km) |
Distance from the Sun (million km) |
Day length (hours) |
Year length (Earth days) |
|
Mercury |
5427 |
4879 |
57.9 |
4222.6 |
88 |
|
Venus |
5243 |
12104 |
108.2 |
2802.0 |
224.7 |
|
Earth |
5514 |
12756 |
149.6 |
24.0 |
365.25 |
|
Mars |
3933 |
6792 |
206.6 |
24.7 |
687.0 |
|
Jupiter |
1326 |
142984 |
740.5 |
9.9 |
4331 |
|
Saturn |
687 |
120536 |
1352.6 |
10.7 |
10747 |
|
Uranus |
1271 |
51118 |
2741.3 |
17.2 |
30589 |
|
Neptune |
1638 |
49528 |
4444.5 |
16.1 |
59800 |
The day length given here is the average time in hours for the Sun to move from the noon position in the sky at a point on the equator back to the same position. This is not the same as the time for the planet to complete one revolution on its axis with respect to the stars. For example the Earth completes one revolution on its axis with respect to the stars in 23.9 hours, however, because the Earth moves along in its orbit as it rotates, it actually takes 24 hours for the Sun to return to the same position in the sky again (which is how we conventionally define a day on Earth - from noon to noon).
QUESTIONS:
Given that the density of water is 1000 kg/m3, which of the planets would float on water? Explain your answer.
Saturn would float on water as its density is less than that of water.
NOTE: This links back to what learners covered in Term 2 in Matter and Materials on the Particle Model of Matter.
Compare the densities of the rocky planets and the gas giants. Which type of planet tends to be more dense? Explain why.
The inner rocky (terrestrial) planets are more dense than the outer gas giants, as the inner planets are made of solid rock, which is denser than gas.
Which planet has the shortest day?
Jupiter.
Compare the day length for the rocky planets and the gas giants. Which type of planet tends to have the shortest day? What does this tell you about how fast the two types of planet rotate on their axis?
The gas giants tend to have the shortest days which means that these planets must spin on their axes faster than the terrestrial planets.
Which planet orbits around the Sun the fastest? Why is this?
Mercury, because it is the closest planet to the Sun and has the least distance to cover.
Which planet's year is shorter than its day?
Mercury.
Plot a bar graph to show the distance each planet is from the Sun. Use the following space for your graph.
An example graph is given below. You can use Assessment Rubric 3 at the back of your teachers guide if you would like to assess this translation task.
Solar System 101: NASA's 'Homework helper' can show you where to look to find out more. http://solarsystem.nasa.gov/kids/index.cfm?Filename=homework&Target=SolarSys#
The following pages provide some interesting, extra information about the planets in our solar system.
Mercury has the most extreme temperatures in the solar system, reaching 426 °C during the day and -173 °C during the night.
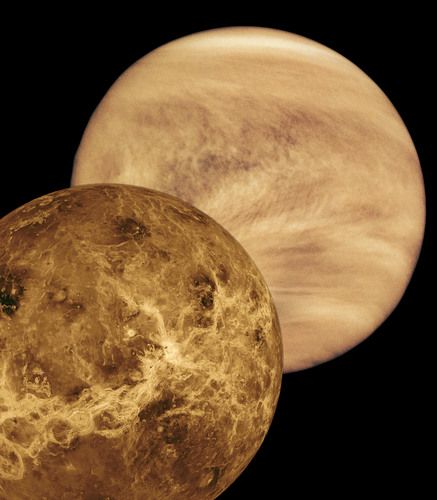
Venus has a thick dense atmosphere mostly made up of carbon dioxide which is an effective greenhouse gas. This is why Venus has the highest surface temperature, as you saw in the activity of Planetary Temperatures.
Venus has mountains, volcanoes and sand dunes just like Earth.
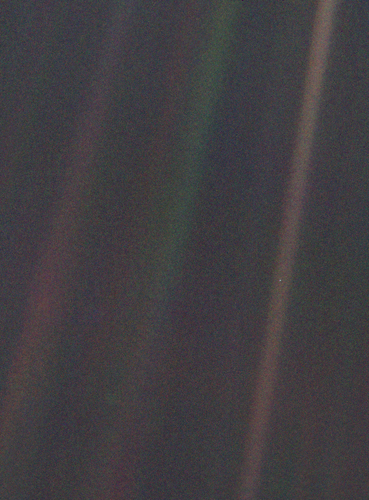
As voyager 1 was leaving the solar system, Carl Sagan, a famous astronomer, requested that they turn the camera around to take a photograph of Earth across a great expanse of space.
Carl Sagan - Pale Blue Dot (video)
A cartoon of Carl Sagan's famous speech about the Pale Blue Dot. http://zenpencils.com/comic/100-carl-sagan-pale-blue-dot/
The average distance between the Sun and Earth is called an astronomical unit (AU) and is equivalent to 150 million kilometres.

Mars is home to the deepest and longest valley in the solar system, Valles Marineris, which is almost as wide as Australia!
The largest volcano in the solar system, Olympus Mons, is on Mars and is three times taller than Mount Everest.
|
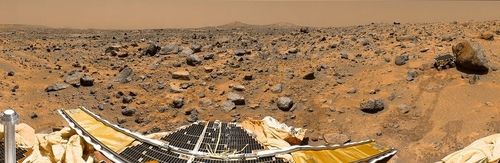
Mars and the Search for Life Scientists are interested in Mars because they think that Mars might have once had liquid water on its surface, and perhaps life. Channels, valleys, and gullies are found all over Mars, suggesting that liquid water might have once flowed through them. Although there is no liquid water on the planet's surface now, scientists think that there may still be some water in cracks and tiny holes in underground rock. Mars has been visited many times by robotic landers. The first lander, NASA's Viking 1, landed on Mars in 1976, a long time before you were born! It took the first close-up pictures of the Martian surface but found no evidence of life. Water ice has been discovered below the planet's surface, and minerals indicating that liquid water was once present have also been found by Mars landers. The latest lander currently exploring Mars is NASA's Mars Science Laboratory mission, with its rover named Curiosity. Curiosity landed on Mars in August 2012 and is busy investigating the planet's rocks near a giant crater called the Gale crater. One of the main aims of the Mars Science Laboratory is to determine whether Mars ever had an environment capable of supporting life. 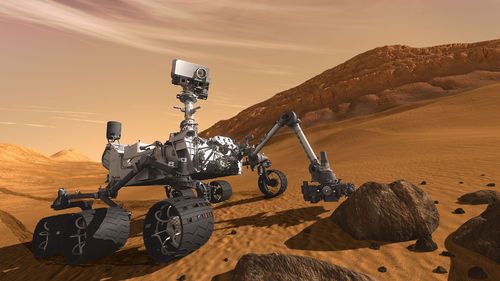
|
Watch the first 12 month's of Curiosity's explorations in 2 minutes.
NASA's curiosity finds water in Martian soil in 2013.

Saturn close-up (video).
Take a virtual ride with Voyager 1 and 2 past Jupiter, Saturn, Uranus, and Neptune.
This is a creative writing activity for learners to explore the solar system in an imaginative way. Learners will play the role of cosmic travel agents and will write a travel brochure for one of the planets in the solar system (not Earth!). This activity can be done as a team or individually. Encourage learners to research information about their chosen planet at the school or local library or on the internet. Alternatively, they can use the information provided in this chapter. You could also provide some examples of travel brochures for them to look at as a guide. These are available free at travel agents. You could also ask the learners to present their work in class.
In this activity you will write a travel brochure for a trip to your favourite planet.
MATERIALS:
INSTRUCTIONS:
In this activity learners must summarise all the information they know about a particular planet on a one page fact sheet. This activity is easier than the Planetary holidays activity as it requires less imagination, and can therefore be done as an alternative activity.
In this activity you will make a one page fact sheet about your chosen planet.
MATERIALS:
INSTRUCTIONS:
Let's now look at some of the other objects that we find in our solar system.
Asteroids are small rocky objects that are believed to be left over from the formation of our solar system 4.6 billion years ago. They range in size from tens of metres across to several hundred kilometres across and come in a variety of shapes. Most asteroids are found in the asteroid belt, which lies between the orbits of Mars and Jupiter. More than 100,000 asteroids lie in the asteroid belt and several thousand of the largest ones have been named.
A record close asteroid fly-by past Earth.
In the region of the asteroid belt closest to the Sun, the asteroids are mainly metallic objects. Those further away are rocky objects. Rocky asteroids appear darker than metallic asteroids.

Although science fiction movies give the impression that the asteroid belt is a tightly packed region of dangerous rocks, in reality the asteroids are separated from each other by millions of kilometres. However, very rarely, collisions between asteroids do occur which is why asteroids are covered with impact craters. We will look at impact craters more closely in the following activity.
Join NASA on an underwater mission, called NEEMO, which is actually about practicing exploration to an asteroid. Help the crew prepare by classifying the underwater images. http://neemo.zooniverse.org/
In this activity learners will investigate how craters are formed by dropping balls into a tray of sand. Although you can do this activity with flour, it works best with sand. There are two parts to this experiment. In the first part learners will investigate how the mass of an object affects the crater size formed. In the second part, learners will investigate how the height at which an object is dropped affects the size of the crater it leaves. You can use more objects in the investigation if you have time, and as an extension you can examine the effect of impact angle on the shape of the crater formed.
You will need to experiment beforehand with the type of sand that you are using. Before your class performs this investigation, drop marbles into the sand that you have, to observe what kinds of craters the marbles leave. Experiment with the best possible option, for example, you might need to add some moisture to the sand so that you are able to see the craters.
INVESTIGATIVE QUESTIONS: How does the mass of an object affect the size of the crater it leaves? How does the height at which an object is dropped affect the size of the crater it leaves?
HYPOTHESIS:
What do you think will happen?
Learner-dependent answer. Learners should give reasons for their answers.
IDENTIFY VARIABLES:
What are you keeping constant in this experiment?
While investigating the effect of object mass, the height that the objects are dropped from should remain constant.
While investigating the effect of dropping height, the mass of the object being dropped should be kept constant.
What are you changing in this experiment?
In the first case - the mass of the object being dropped.
In the second case - the height from which the object is dropped.
MATERIALS:
METHOD:
RESULTS AND OBSERVATIONS:
Record your results and observations in the following table.
|
Object |
Mass (kg) |
Drop Height (m) |
Crater diameter - reading 1 (cm) |
Crater diameter - reading 2 (cm) |
Average crater diameter (cm) |
|
marble |
1 |
||||
|
ball bearing |
1 |
||||
|
ball bearing |
2 |
||||
|
ball bearing |
1.5 |
||||
|
ball bearing |
0.5 |
||||
|
ball bearing |
0.25 |
EVALUATION:
How reliable was your experiment? How could it be improved?
Learner-dependent answer. Answers might include conducting more measurements.
CONCLUSIONS:
Write a conclusion for this investigation based on your results.
Learner dependent answer. Learners should summarise their results and provide a reason why they think they got the results they did.
QUESTIONS:
How did the mass of the object affect the size of the crater?
The larger the mass of the impacting object, the larger the diameter of the crater.
How did the height at which the object was dropped affect the size of the crater?
The greater the height at which the object was dropped, the larger the size of the crater.
Why do you think the drop height affected the size of the crater?
Objects dropped from greater heights hit the sand with a higher speed and therefore have greater energy (kinetic energy). As they have more energy they make a larger impact crater.
What does this investigation tell us about craters on the surfaces of planets?
It tells us that craters on the surfaces of other planets are formed due to impacts. The impacting objects must have been travelling very fast or have been very massive, because the craters we observe on other planets are much larger than the craters made in this experiment.
As Jupiter is more massive than all the other planets in the solar system, its large gravity attracts many asteroids and comets travelling in towards the inner solar system that would otherwise potentially crash into the Earth.
Gerard Kuiper (1905 - 1973) is regarded by many as the father of modern planetary science. He is well known for his many discoveries. Read more about them here. http://solarsystem.nasa.gov/people/profile.cfm?Code=KuiperG
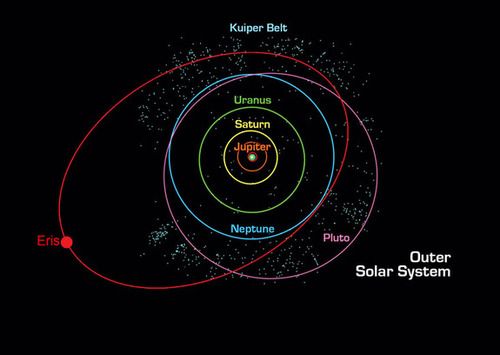
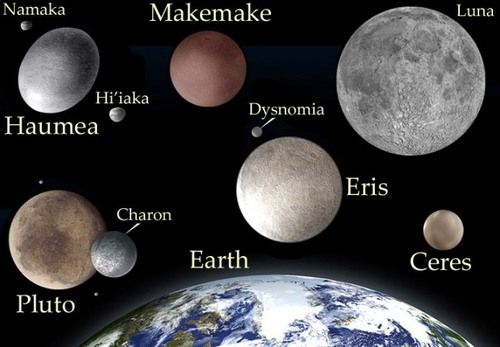
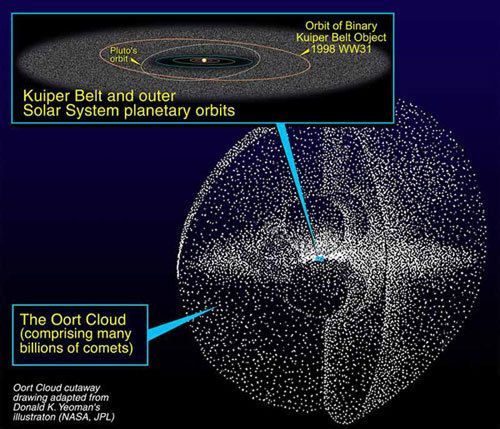
The Kuiper belt is a region of space filled with trillions of small objects that lies in the outer reaches of the solar system, past the orbit of Neptune. The Kuiper belt is a region between 30 and 50 times the Earth's distance from the Sun. This belt is similar to the closer asteroid belt, except that the objects are not made of rock, but rather of frozen ices. These icy objects can range in size from a fraction of a kilometre to more than a 1000 km across and are called Kuiper belt objects. The two largest known members of the Kuiper Belt are Eris and Pluto, both dwarf planets.
What keeps the objects in the Kuiper Belt in orbit around the Sun?
Gravity (the gravitational pull of the Sun).
NASA launched a space probe called New Horizons to study Pluto and other Kuiper Belt objects in more detail in 2006. It will arrive at Pluto in 2015.
Dwarf planets are objects that orbit the Sun, just like the planets. However, they are smaller than planets. Due to their small size, they are unable to meet the official definition of a planet. Can you remember what the three criteria are to be classed as a planet? List them below.
To be classed as a planet an object must:
Why Pluto is not a planet anymore (video).
Asteroids are clearly not planets as they have irregular shapes and they are not spherical. Some dwarf planets are spherical, but they do not meet the third criterion. With their weak gravities they are unable to clear out other objects from their orbits. Which famous ex-planet is now considered a dwarf planet because it failed to meet the third criterion?
Pluto.
For many years the object Pluto was considered to be a planet. However, since the 1990s many more objects very similar to Pluto have been discovered orbiting the Sun out past Neptune's orbit. This resulted in new criteria to be drawn up to be considered a planet and Pluto was demoted to dwarf planet status
Pluto was named by Venetia Burney, an 11 year old from Oxford, England, in 1930. She suggested that the planet be named after the Roman god of the underworld, Pluto.
Read more about dwarf planets. http://solarsystem.nasa.gov/planets/profile.cfm?Object=Dwarf
Scientists estimate that there might be 200 or more dwarf planets in the Kuiper Belt, and thousands more beyond the Kuiper Belt.
The Oort Cloud has not been observed. At this point, it is purely hypothetical although very likely. Its existence cannot be stated as fact since it has not yet been confirmed to exist. We therefore refer to the Oort Cloud as hypothetical or predicted.
Comets are icy, dusty objects, orbiting around the Sun at great distances. Comets are found in the Kuiper Belt and in the predicted Oort Cloud. The Oort Cloud is thought to be a huge cloud of icy objects surrounding the Sun at the very edge of our solar system at a distance between 5,000 and 100,000 times the Earth's distance from the Sun!
The word comet comes from the Greek wordkome, meaning 'hairy'!
In 2013, South African researchers found the first evidence of a comet hitting Earth. Read more about it. http://mg.co.za/article/2013-10-08-sa-researchers-find-first-evidence-of-comet-hitting-earth
A comet will remain in the Kuiper Belt or Oort Cloud unless it is disturbed by another comet. If this happens, then the comet's orbit changes and occasionally the comet will come into the inner solar system for us to see.
Comets that come from the Kuiper Belt tend to have orbits around the Sun of 200 years or less. Comets originating in the Oort Cloud take even longer to orbit the Sun.
We can only see comets directly when they come into the inner solar system because they are small and only visible by reflected sunlight. As a comet approaches the Sun, the Sun's heat evaporates the dust and ices it consists of, forming a bright dust tail which is visible from Earth. Some comet dust tails can be millions of kilometres long. The dust tail usually points back along the path of the comet.
Comets often have a second tail called an ion tail. The ion tail is made of ions that are pushed away from the comet's head by particles emitted from the Sun's atmosphere, called the solar wind. Let's find out more about this type of tail.
An ion is an atom with an electrical charge due to the gain or loss of electrons.
In this activity learners will discover that a comet's ion tail always points away from the Sun, no matter which way the comet is travelling! You can either get learners to make their own comet tails or if you do not have many materials you can make one comet yourself and pass it around for the learners to see.
In this activity you will make your own comet and explore how a comet's ion tail moves.
MATERIALS:
INSTRUCTIONS:
QUESTIONS:
Which direction did the ion tail move when you held up the comet in front of you and blew on the comet?
Directly away from you (as it is blown away by your breath).
Which direction did the ion tail move when you moved the ball left and right while still blowing?
It still moves directly away from you as it is blown away by your breath. It does not follow the direction of movement of the comet.
In a similar way, a comet's ion tail always points away from the Sun.
Learn more about comets with this interactive website. http://solarsystem.nasa.gov/cometinteractive/index.html

Halley's comet is visible from Earth every 75 to 76 years.
Comets that come into the inner solar system do not live forever. The Sun's heat melts comets, just like a snowman melts out in the Sun. After several thousand years the remains are so small that they no longer form a tail. Some comets completely melt away.
It is completely safe to fly through a comet's tail. The only thing that would hit your space ship would be microscopic pieces of dust.
At the time of producing these workbooks, comet ISON was approaching very near to the Sun. Astronomers did not know if it would break up or not. Read more about it here http://solarsystem.nasa.gov/news/display.cfm?News_ID=44309 and here http://solarsystem.nasa.gov/smallworlds/cometison.cfm
See if you can find out what happened to comet ISON in the beginning of 2014, and tell your learners about this, or set it as a fun, small homework task.
In this section learners will discover just how fortunate they are to be on Earth, which is currently the only planet known to harbour life. They will consider the conditions thought necessary for life and compare those with the conditions found on Earth and on Earth's neighbours. A nice way to introduce this topic is to have a class discussion about whether learners think aliens exist on other planets and, if so, what they might be like. This could then lead into a discussion about what conditions learners think are necessary for life. Talking about aliens usually excites learners!
As you discovered in the last section, the Earth, along with the other planets, orbits around the Sun. The Earth is the third most distant planet from the Sun, lying in between Venus and Mars. Let's compare the Earth and its two neighbours in more detail.
Citizen science: Help search for planets orbiting other stars. http://www.planethunters.org/
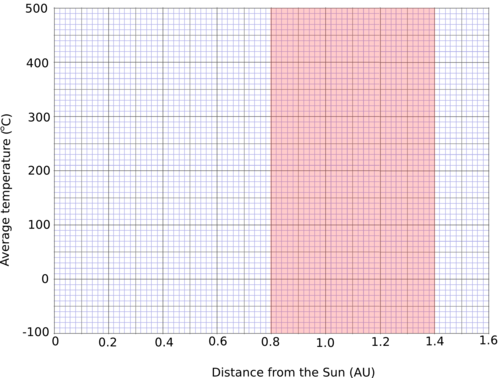
In this activity learners will plot a graph of distance versus temperature for the planets Venus, Earth and Mars. They will also be provided with information regarding the habitable zone around the Sun. Using this information learners will have to decide which of the three planets lie within the Sun's habitable zone.
|
Property |
Venus |
Earth |
Mars |
|
Distance from Sun (AU) |
0.7 |
1.0 |
1.5 |
|
Average Temperature (°C) |
464 |
15 |
-63 |
MATERIALS:
INSTRUCTIONS:
Graph showing the average temperature and the distance from the Sun of Venus, Earth and Mars.
Learners should plot the following points:
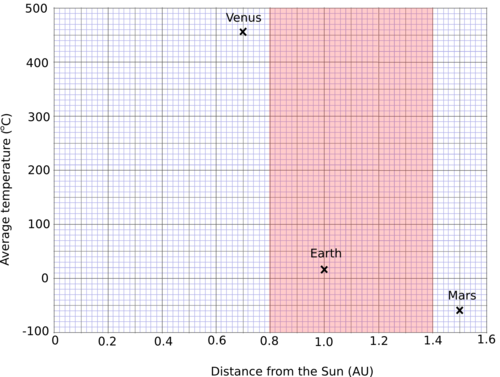
QUESTIONS:
What is the average temperature on Venus?
464 °C.
Can liquid water exist on Venus? Why?
No, it is too hot. Water boils at 100 °C.
What is the average temperature on Mars?
-63 °C.
Is liquid water likely to be found on Mars? Why?
No, it is too cold. Water freezes at 0 °C.
What is the average temperature on Earth?
15 °C.
Can liquid water exist on Earth? Why?
Yes, because the temperature on Earth is between water's melting and boiling points.
Which planet/s lie within the Sun's habitable zone (the red shaded region in the graph)?
Only Earth.
Our solar system's habitable zone (video)
The average temperature on Earth is a moderate 15 °C. Because of this, water can exist in liquid form on Earth. This is important because scientists think that liquid water is one of the key things needed for life. Venus has an average temperature of 464 °C and no liquid water exists on Venus because it is too hot. On Mars, the opposite is true. The average temperature on Mars is -63 °C and any water on Mars would be frozen. Earth is unique in our solar system as it is the only planet known to have liquid water on its surface and to harbour life.
If the Earth were too close to the Sun it would be too hot and all the water would evaporate from the oceans, like it has on Venus. If the Earth were too far from the Sun it would be too cold, and all the water would be frozen, like on Mars. Earth is at just the right distance from the Sun to have liquid water on its surface. The other planets in the solar system are either too close or too far from the Sun. The range of distances that a planet can lie from the Sun and still have liquid water on the planet's surface is called the habitable zone. Estimates for the habitable zone in our solar system range from 0.8 - 1.4 astronomical units (AU).
An astronomical unit corresponds to the average distance between the Earth and the Sun.
You will probably find different quoted ranges for the habitable zone from different sources. This is because different scientists have used slightly different criteria to define what "habitable" means. Many studies focus on how life on Earth would be affected if the Earth were closer to or farther from the Sun. However, the point at which life can no longer exist on Earth is uncertain.
The habitable zone is sometimes called the Goldilocks zone after the famous children's story where Goldilocks eats the porridge that is neither too hot nor too cold.
What other conditions do you think are necessary for life on Earth or other planets? List your answers in the space below.
Learner-dependent answer. This is also an ideal opportunity for a class discussion. Answers could include, sunlight for energy, oxygen, carbon (we are carbon based), liquid water. Note that other life forms might not be carbon based and that life comes in many forms like bacteria, animals and plants. Scientists are looking for more than just human-like beings and other forms of life that we find on Earth. Also, we are likely to be biased in what we think the conditions are that are needed for life, because we only know about life on Earth.
Other stars also have habitable zones. Scientists believe that planets orbiting other stars within the habitable zone could support life forms.
Kepler Mission: A search for habitable planets.
Scientists think that in order for life to arise and survive on a planet:
Which of the planets in the solar system receive light from the Sun?
All the planets in the solar system receive light from the Sun.
Which of the planets in the solar system have moderate temperatures and liquid water on their surface?
Only Earth.
Which of the planets in the solar system have significant amounts of oxygen in their atmosphere or oceans?
Only Earth.
As you can see the Earth is very fortunate, because it lies at just the right distance from the Sun to have moderate temperatures and abundant liquid water. The Sun provides the energy for plants to grow. There is plenty of oxygen in Earth's present day atmosphere and oceans, which means that life can survive on land and in the Earth's oceans. The Earth is unique in that it is the only planet we know of that has life.
The moons Europa (orbiting Jupiter) and Titan (orbiting Saturn) are considered to be places where life may exist. Europa's surface is covered in smooth water ice and scientists think that there might be a water ocean beneath the icy surface. Titan has liquid lakes and seas on its surface, although they are not made of water, but rather liquid methane and ethane. Some scientists think that life may be able to survive in these lakes.
You may have heard a lot about global warming and the greenhouse effect in the news and in our studies in Energy and Change.
During the day, the Sun shines through the atmosphere heating the Earth's surface. At night, the Earth's surface cools, releasing the heat back into space. Some of the heat is trapped by greenhouse gases in the air like carbon dioxide, which causes the Earth to remain warmer than it would have otherwise. This is called the greenhouse effect.
Scientists think that due to human activities, like cutting down forests and burning fossil fuels, the greenhouse effect is now too strong. Scientists are more than 90 % certain that the increase in greenhouse gases has caused the average temperature on Earth to rise. This is known as global warming.
Global warming: How humans are affecting our planet.
Average temperatures on Earth have increased by 0.8°C around the world since 1880, with the biggest increase in the last few decades. The rate of warming is also increasing.
Venus provides us with a clue as to what might happen to the Earth if global warming continues. Venus' thick atmosphere has led to a runaway greenhouse effect on the planet, heating it to 462 °C. Venus's oceans have boiled away leaving behind a hot, inhospitable planet. We should therefore try our best to look after our precious planet!
Scientists do not know how life began on Earth, but they estimate that the early ancestor of modern bacteria was alive on Earth 3.5 billion years ago. The early Earth's atmosphere had almost no oxygen. Instead, it was composed mainly of carbon dioxide, nitrogen and water vapour with some methane and ammonia. Carbon dioxide and water vapour were pumped into the atmosphere during volcanic eruptions, which caused the atmosphere to change over time. Eventually the water vapour in the atmosphere condensed to form rain, forming the first oceans. Eventually living organisms (bacteria) appeared in the oceans. These simple organisms used sunlight, water and carbon dioxide in the oceans to produce sugars and oxygen. What is this process called?
This process is called photosynthesis.
This is where the first oxygen in the ocean and atmosphere came from. That oxygen made it possible for other organisms to develop and flourish and is the reason that you are here today.
Do you enjoy English and Science? Read more about a career as a science writer. http://solarsystem.nasa.gov/people/profile.cfm?Code=HarveyS
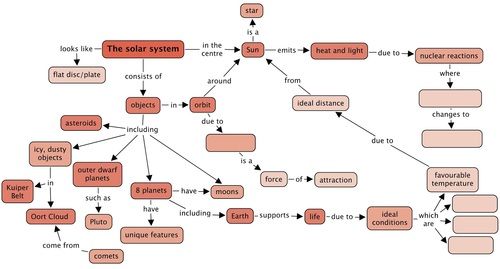
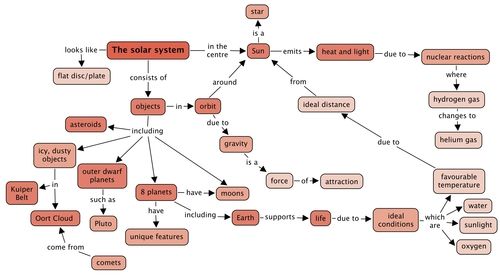
Concept Map
Complete the concept map which summarises the key concepts from this chapter about our solar system.
Teacher's version
How does the Sun produce its energy? [2 marks]
By nuclear fusion reactions, where hydrogen is converted to helium.
Why do sunspots look darker than the rest of the surface of the sun? [2 marks]
They are much cooler than the rest of the surface. A typical sunspot temperature is around 3900 °C whereas the rest of the surface is around 5500 °C. (Intensity is proportional to temperature).
What keeps the planets and other bodies in our solar system in orbit? [1 mark]
The gravity between these objects and the sun.
Name the terrestrial planets. [4 marks]
Mercury, Venus, Earth and Mars.
Name the gas giants. [4 marks]
Jupiter, Saturn, Uranus, Neptune.
Where is the asteroid belt located? [1 mark]
In between the orbits of Mars and Jupiter.
Where is the Kuiper belt located? [1 mark]
Out beyond the orbit of Neptune.
Why are the gas giants so much larger than the terrestrial planets? [2 marks]
They are mostly made of hydrogen and helium which are the most abundant elements in the universe.
List the planets in increasing distance from the Sun. [4 marks]
Mercury, Venus, Earth, Mars, Jupiter, Saturn, Uranus, Neptune.
Which planets have rings? [4 marks]
Jupiter, Saturn, Uranus, Neptune.
Why is Venus so hot? [2 marks]
Its atmosphere is so thick, there is a runaway greenhouse effect on the planet heating the planet to high temperatures.
On which planet have landers found frozen water in the rocks under the planet's surface? [1 mark]
Mars.
The following diagram shows the solar system at the centre.
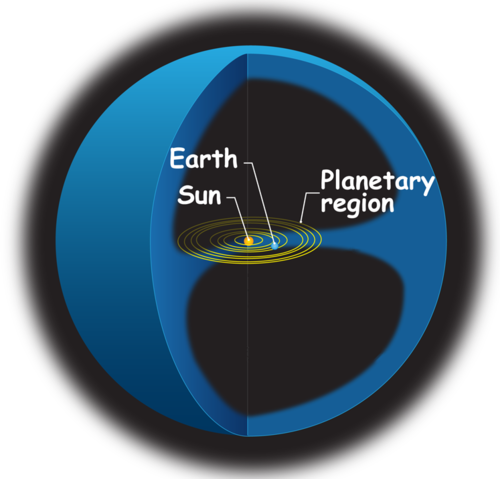
What does the blue space represent? [1 mark]
What is mostly found in this space? [1 mark]
The hypothetical Oort Cloud.
Comets and icy objects.
Why can we only see comets as they come close to the Sun? [3 marks]
As comets come close to the Sun, the Sun's heat evaporates their surface, resulting in long bright tails which we can see. Far from the Sun it is too cold for the tails to form, so we have to wait until the comet is close enough to the Sun for it to form a tail before we can see it.
What is the official definition of a planet and why was Pluto downgraded to a dwarf planet? [4 marks]
The official definition of a planet states that a planet must orbit the Sun, be large enough so that its own gravity squashes it into a spherical shape and that it has cleared out other objects from its orbital path. Pluto has not swept out other objects from its orbit and so it was downgraded from planet to dwarf planet status.
Why can the Earth support life? [4 marks]
Earth has a moderate temperature, with liquid water on its surface. There is also abundant oxygen for respiration and plenty of sunlight (energy) for plants to grow.
What would happen to the Earth if it warmed significantly, like Venus has in the past? [2 marks]
It would eventually lose all its liquid water and therefore would not be able to sustain life.
The following diagram shows the system of planets around the star Gliese 667C.
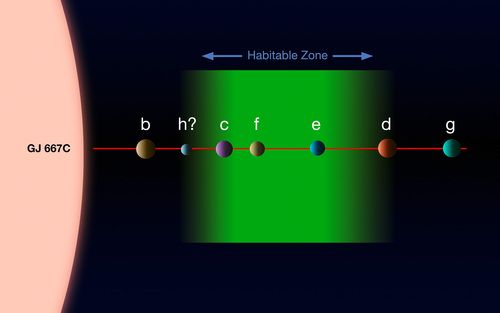
Which of these planets are possible candidates for life? [1 mark]
Explain your answer above. [2 marks]
Planets c, f and e.
The orbits of these three planets lie within the habitable zone around the star. This is the zone which is the right distance from the star for water to exist as a liquid, making these planets possible candidates to support life.
Total [46 marks]
|
Previous
Chapter 13: Energy and Change Glossary
|
Table of Contents |
Next
Chapter 15: Beyond the solar system
|