Learners should show the following in a cycle: Rib muscles contract \(\rightarrow\) rib cage moves up and out \(\rightarrow\) diaphragm contracts \(\rightarrow\) diaphragm moves downwards (flattens) \(\rightarrow\) rib cage volume increases \(\rightarrow\) lungs expand \(\rightarrow\) take in more oxygen \(\rightarrow\) rib muscles relax \(\rightarrow\) rib cage moves downwards and inwards \(\rightarrow\) diaphragm relaxes \(\rightarrow\) rib cage volume decreases \(\rightarrow\) this pushes out the air from the lungs.
Circulatory and respiratory systems
Chapter overview
1.5 weeks
Learners would have already had an overview of the circulatory and respiratory systems in chapter 2. However, the overview introduced them in isolation, whereas these two systems are very tightly integrated. This chapter will look at these processes and associated organs in more detail and how the two systems are linked.
4.1 Breathing (1 hour)
|
Tasks |
Skills |
Recommendation |
|
Activity: Main components in the circulatory and respiratory systems |
Identifying |
CAPS suggested |
|
Activity: Summarise breathing using a flow chart |
Summarising, explaining |
Suggested |
4.2 Gaseous exchange (1.5 hours)
|
Tasks |
Skills |
Recommendation |
|
Activity: Lung dissection |
Dissecting, observing, describing, interpreting, explaining |
CAPS suggested |
|
Activity: Drawing gaseous exchange in the alveoli |
Drawing, summarising |
Suggested |
4.3 Circulation and Respiration (2 hours)
|
Tasks |
Skills |
Recommendation |
|
Activity: Heart dissection |
Dissecting, observing, describing, interpreting, explaining |
CAPS suggested |
|
Activity: Feel your blood rushing through your body! |
Measuring, calculating |
Suggested |
|
Activity: Tabulating differences between the blood vessels |
Comparing, describing, summarising, interpreting, |
CAPS suggested |
|
Activity: A circulation simulation! |
Working in groups |
Optional |
|
Activity: Homework activity to measure your resting heart rate |
Measuring, calculating |
Suggested |
|
Investigation: Measuring and comparing heart rates before and after exercise |
Planning, investigating, predicting, measuring, comparing, tabulating, constructing graphs, summarising, interpreting, writing |
CAPS suggested |
- Why do we have to breathe?
- Are our lungs like big balloons in our chest, or what do they look like?
- How does the oxygen in the air that we breathe in pass from our lungs into our blood?
- How does blood move around our bodies and get to each cell to deliver oxygen?
- We know that carbon dioxide is produced as a waste product in cellular respiration, so how is it removed from our bodies?
- How are the circulatory and respiratory systems linked?
- blood
- blood vessels
- (heart) chamber
- diffuse
- heart
- pulse
- respiration
If we do not get oxygen for a few minutes, humans get permanent brain damage and may die. Cell respiration needs a constant oxygen supply to provide us with enough energy, so we constantly need to breath and keep blood circulation going to deliver this oxygen and remove the carbon dioxide. The respiratory and circulatory systems need to work together. Let's briefly revise the main components involved.
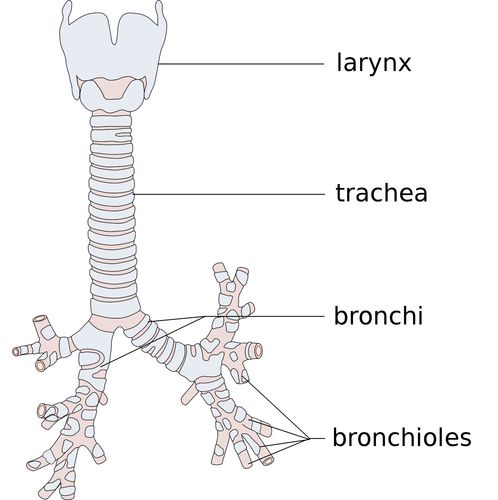
Main components in the circulatory and respiratory systems
INSTRUCTIONS:
- Study the diagrams below.
- Label the different components that form part of the respiratory and circulatory system.
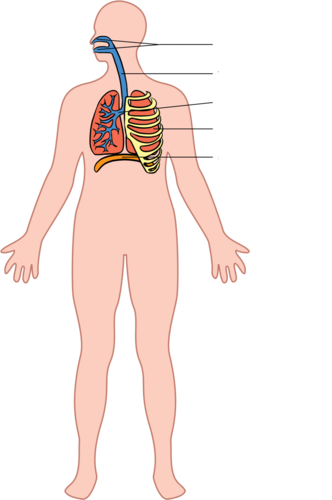
The labels for the diagrams should be as follows:
We will now look at these two systems under the following processes:
- breathing
- gaseous exchange
- circulation and respiration
Breathing
- bronchi
- bronchioles
- diaphragm
- exhale
- inhale
- lungs
- pharynx
- trachea
We already learnt in Chapter 2 that breathing consists of two processes:
- inhalation
- exhalation
When we inhale we take in air with a high concentration of oxygen and when we exhale we breathe out air that has more carbon dioxide in it. These processes take place in a continuous cycle.

Teachers should try and make sure the learners understand the concept that the volume of the chest cavity changes the air pressure in the lungs and results in inhalation and exhalation. During inhalation, the chest cavity expands (gets bigger). When this happens the air pressure inside the lung decreases (because there is the same amount of air in a bigger space). In order to equalize with the air outside, air rushes in to the lungs. Similarly, when the chest cavity contracts (becomes smaller) during exhalation, the air pressure inside increases, and the air is pushed out to equalize with the atmosphere.
In order to explain this concept to learners you can use the example of a syringe. (NB: Remove the needles from the syringes beforehand.) Air acts like the liquid in this case. If you pull back on a syringe you increase the volume in the syringe, and liquid moves into the syringe. If you push back on the syringe to decrease the volume, you will push the liquid out. The syringe example may help learners to understand that air is "sucked in" and "pushed out" by the changes in volume.
During inhalation the following takes place:
- The rib cage moves upwards and outwards.
- The diaphragm contracts and flattens causing it to move downwards.
- This causes the chest volume to increase and the pressure decreases.
- As a result the lungs are also pulled to become bigger.
- This allows the air to be pulled into the extra space inside the lungs.
During exhalation the following takes place:
- The rib cage moves downwards and inwards.
- The diaphragm also relaxes, causing it to become more dome-shaped
- This causes the chest volume to decrease and the pressure increases.
- As a result the lungs are squeezed smaller
- This forces the air out of the lungs.
Summarise breathing using a flow chart
A flow chart allows us to write short summaries of processes that take place. When you study for a test or exam you can picture the flow chart in your head, which often helps to trigger memories of what you learnt.
Use a flowchart to show how breathing (inhalation and exhalation) takes place. You may chose your own design for the flow chart but it needs to show that inhalation and exhalation occur in a cycle.
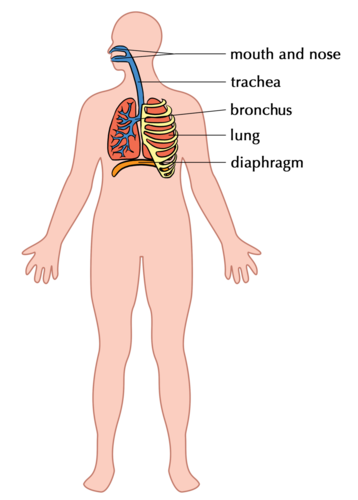
The two tubes that branch from the trachea are called bronchi (plural) or a bronchus (singular).
During inhalation, air travels to the two bronchi - tubes that lead to each lung. The bronchi are themselves branched (divided) into thousands of tiny bronchioles. During exhalation, the reverse takes place as air leaves the lungs and body.
What happens to the air within the lungs?
Gaseous exchange in the lungs
- alveoli
- capillaries
- cartilage
- diffusion
- haemoglobin
- red blood cells
Gaseous exchange takes place in the lungs and in the cells of the body. The structure of the lung is adapted to fulfil the function of gaseous exchange.
A video on gaseous exchange.
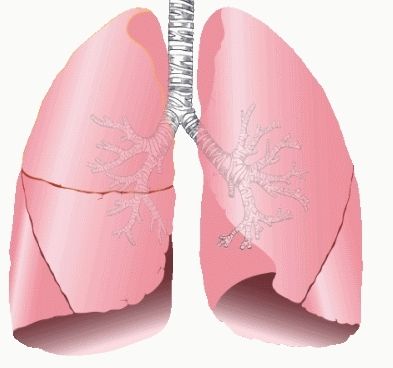
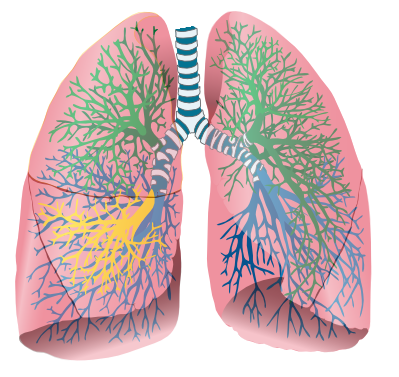
Structure of the lung
Although the lungs inflate during inhalation and deflate during exhalation, they are not hollow. The lungs in a healthy individual are soft, pink and spongy.
The colours of the different bronchioles in the diagram indicate air travelling to different parts of the lungs.
|
External structure of the lungs |
Internal structure of the lungs |
 |
 |
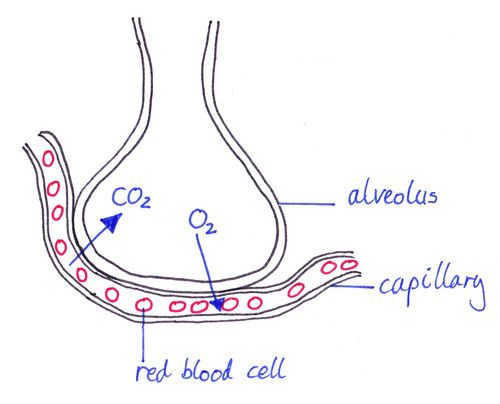
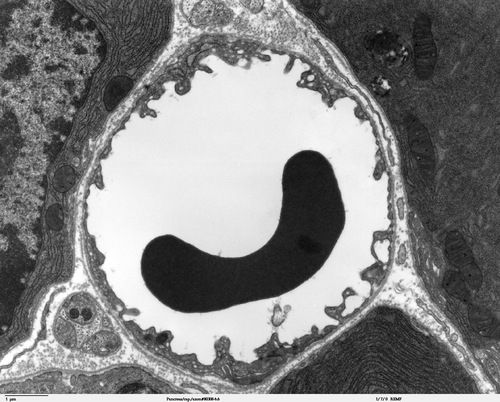
The alveoli look like small grape-like structures made up of many individual air sacs. An big network of capillaries surrounds each alveolus. Have a look at the following image showing this.
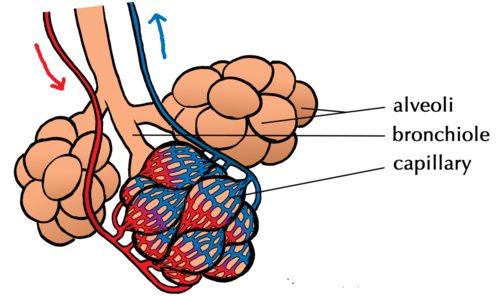
An alveolus is one air sac but a group together (plural) is called alveoli.
Visit this animation that shows how air is taken into the lungs and then gases are exchanged at the alveoli http://teachhealthk-12.uthscsa.edu/studentresources/AnatomyofBreathing3.swf
Lung dissection
If you are not able to do this in class, you can watch some of the videos showing a lung dissection.
Watch this video that shows the structure of the lungs
It is possible to learn about the function of lungs from the diagrams and pictures supplied in the workbook. However, dissecting the real organ is hugely beneficial to the learners and will help them to understand the structure of the lungs and how this relates to their function. If however, you are not able to do the dissection, you can watch some of the videos supplied.
MATERIALS:
This will depend on how many lungs you are able to obtain and how many learners are willing to do the dissecting. A suggestion is to break learners up into groups, or else do the dissection as a demonstration in front of the class, especially if you have a big class or many Gr. 8 classes. The following materials are required for each dissection, whether in a group or to be done as a demonstration.
- lung
- tray
- scalpel
- dissecting scissors
- rubber tubing (for example the Bunsen burner tubing) or hose pipe
- ruler
- beaker of water
- water and soap for washing hands
- disinfectant
Sometimes the main sections of lung tissue are cut into at the abattoir (as part of the inspection process). You can approach the butcher well in advance and discuss what you need so that they can limit damage to the material and provide lungs as whole as possible. Butchers often refer to it as 'pluck' which contains the lungs and part of the heart.
Health and safety tips:
- The lungs may carry some bacteria. It is not necessary to wear gloves, as we do not wear gloves when preparing meat in a kitchen, but you must wash your hands thoroughly.
- Clean all equipment and your work surface with disinfectant after the dissection.
- Be careful when handling sharp equipment, such as the scalpel.
- Decide how you are going to dispose of the lungs.
Ethical issues
Before starting this lesson, find out if any learners are sensitive to the use of animal products in this way, or even to the fact that animals are farmed for human consumption. Some learners may also have religious or cultural objections to the dissection and handling of animal parts, especially cows and pigs. You need to be aware of these issues and be sensitive to them.
INSTRUCTIONS:
Part 1: Preparation:
- Place the lung on the tray on your workbench.
- Make sure all your dissecting instruments have been disinfected and are sharp. Lay them out next to your tray.
- Make sure you have access to a first aid kit if necessary.
Part 2: External structure
- Take note of the external structure of the lung. Look at the general shape, colour and texture.
- If you have access to a scale, measure the mass of the lung.
- Use your ruler to measure the length of the lung.
- Identify the following parts of the lung
- The trachea (wind pipe) which is the main tube bringing air into and out of the lungs
- The hard rings in the trachea. What do you think these rings are for?
These hard rings are are made of cartilage and keep the trachea open so air can move freely. Encourage learners to make notes of their observations throughout the dissection.
- The bronchi. There are two bronchi that branch off from the trachea - one to each lung.
- See if you can identify the first bronchioles branching off from the bronchi.
- Are there any blood vessels visible that are attached to your lung? If so, feel these vessels and describe what you feel.
- Use the rubber tubing or straw or hose pipe and insert this into the tube leading into the lung and hold the trachea tightly closed around the pipe. Blow on the end of this tube to see if you can inflate the lung. Do not breathe the air back into your own lungs!
Part 3: Internal structure
- Using the scalpel and dissecting scissors, cut down into the lung.
- Observe the inner tissue of the lung and think how you would describe it. Discuss this with your group.
- Cut out a piece of the lung tissue and feel for tiny bronchioles (they feel like little hard lumps in the soft lung tissue). Place this piece of lung tissue into a beaker of water. Observe the piece of lung tissue. Does it float or sink?
QUESTIONS:
Write a description of the look, feel and colour of the lung you observed. If you were able to measure the mass, write it down, and include the length of the lung in centimeters.
Learner-dependent answer.
What structures made the trachea stay open, but still able to bend?
The semicircular rings of cartilage.
When you cut the lung open, was it like a hollow balloon or bag, or was it spongy inside? What else did you observe when you cut the lung open and observed the inside?
The lung tissue is spongy. Learners might also observe other blood vessels within the lung tissue and notice some of the bigger tubes running through the tissue.
When you placed a piece of the lung tissue into water, why do you think it floated?
Learners should see that the piece of tissue floats. This is because the lung tissue, even after an animal has died, contains a large amount of air within all the alveoli, which makes it float in water.
When you blew air into the lung, what did it look and feel like? Did you have to squeeze the lung to force the air out again?
When learners blew into the lungs, they should note that they expand, but they are still soft to touch. Once inflated and left to lie on the table, some of the air will escape as the tissue relaxes down, but not completely, and learners might have to squeeze the lung to deflate it. Inflated lungs are paler/more cream coloured (as blood vessels on the surface are squashed flat and blood moves further into the lungs).
In a human, what is responsible for pushing the air out of the lungs?
In humans, the diaphragm relaxes and therefore moves upwards and the rib cage also moves down and in. This reduces the volume of the chest cavity, increasing the pressure on the lungs and therefore forces the air out of the lungs.
The process by which gaseous exchange occurs is called diffusion.
How does diffusion work?
The movement of particles from an area where there is a high concentration to where there is a low concentration is called diffusion.
In the lung, each alveolus is surrounded by a network of capillaries. The two gases which diffuse between the alveoli and the blood in the capillaries are oxygen and carbon dioxide.
- oxygen diffuses into the cells of the alveolus and then into the blood in capillaries
- carbon dioxide diffuses out of the blood and into the cells of the alveolus, then into the air
Watch an interesting clip about the amazing molecule haemoglobin which transports oxygen around the body!
Watch a video that shows how gases are exchanged at the alveoli and
Drawing gaseous exchange in the alveoli
INSTRUCTIONS:
- Draw a diagram to show alveoli surrounded by a capillary.
- On this diagram, name the gases and indicate the direction in which the gases diffuse.
- Indicate whether the blood is oxygenated or deoxygenated in the capillaries that travel towards and away from the alveolus.
Give your diagram a heading.
Learner-dependent answer
The following diagram gives an example of something the learners might produce. You can also draw this up on the board when describing oxygen and carbon dioxide diffusion.
Possible headings that learners might write are:
- Gaseous exchange within the lungs
- Diffusion of carbon dioxide and oxygen within the lungs
- Diffusion of CO2 and O2 between the alveolus and capillary
- etc
Circulation and respiration
- arteries
- atrium
- blood pressure
- veins
- ventricles
Blood is continually circulated to support cell respiration. Let's have a look at how this takes place.
An amazing summary video on respiration.
The video link in the visit box on respiration is quite long (about 25 minutes), but it could be a very good summary lesson.
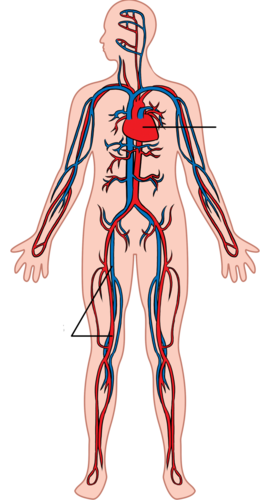
Blood circulation from the lungs to the heart
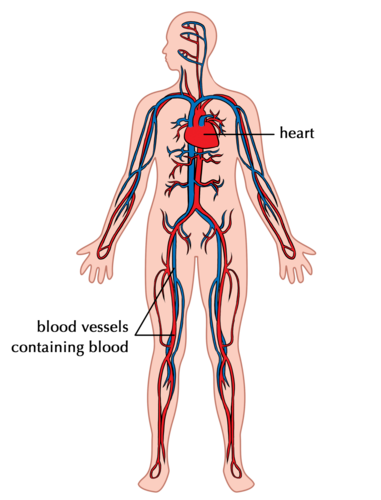
The heart pumps the blood around your body by rhythmic, repeated contractions. This is felt as your heart beat.
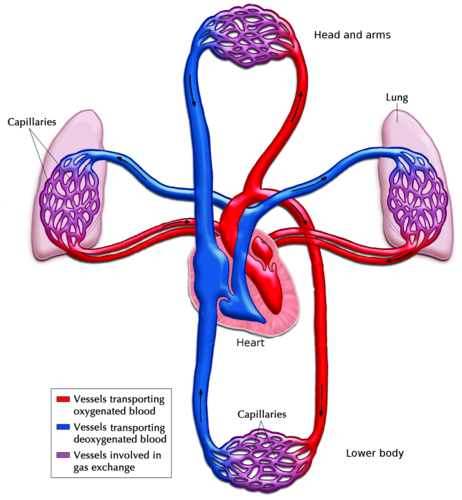
The oxygenated blood flows from the lungs to the left side of the heart. The left side then contracts to pump the blood out of the heart and into the aorta. The aorta is the main artery leaving the heart.
Have a look at the following diagram which shows how the blood flows from the lungs to the heart and then to the rest of the body.
Watch this video to see how blood is pumped through the four chambers of the heart
In the video in the visit box showing how blood is circulated through the heart, learners do not need to know about the heart valves and electrical control at this stage - this is for interest only.
The average human heart, beating at 72 beats per minute, will beat approximately 2.5 billion times during an average 66 year lifespan.
Let's take a closer look at the structure of this vital organ in the circulatory system.
Heart dissection
Learners will look at the heart in much more detail in Gr. 10 Life Sciences where the detailed structure of the heart will be studied, including the the valves. This activity is meant as an introduction to the structure of the heart and for learners to experience a dissection. We suggest doing this as a demonstration as learners will do this practical in Gr. 10 Life Sciences again.
Watch a video showing the structure of the heart
MATERIALS:
It is important to be tolerant of learners religious, cultural or personal beliefs which may prevent them from participating in this dissection, particularly if pig is used. A suggestion is to break learners up into groups, or else do the dissection as a demonstration in front of the class. The following materials are required for each dissection, whether in a group or when done as a demonstration. The number of groups will depend on how many hearts you are able to obtain and how many learners are willing to do the dissecting. For learners who are unwilling to handle the hearts, but still want to be involved, they could take photographs of the heart at different stages of the dissection using a digital camera or their mobile phone cameras.
- heart (sheep or pig)
- tray
- scalpel
- dissecting scissors
- rubber tubing (for example the Bunsen burner tubing) or straw
- ruler
- beaker of water
- water and soap for washing hands
- disinfectant
Sometimes butchers will cut the blood vessels off the top of the heart, and may also remove the atria and cut into the ventricles at the abattoir. Discuss your needs with the butcher beforehand so that they can preserve the heart as much as possible. You can sometimes even obtain the heart and lungs together (usually referred to as a 'pluck'), which is useful to see how the blood vessels connect the organs. If you obtain hearts with long blood vessels, attached, cut off some of these sections to keep for studies of veins and arteries. As with the lung dissection, be sensitive to ethical issues and learners' concerns around the use of animal products in this way.
Health and safety tips
As with the lung dissection, the same health and safety tips apply to the heart dissection.
INSTRUCTIONS:
Part 1: Preparation:
- Place the heart on the tray on your workbench.
- Make sure all your dissecting instruments have been disinfected and are sharp. Lay them out next to your tray.
- Make sure you have access to a first aid kit if necessary.
Part 2: External structure
- Take note of the external structure of the heart. Look at the general shape, colour and texture.
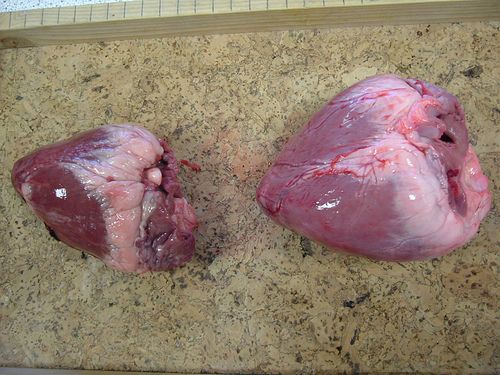
- If you have access to a scale, measure the mass of the heart.
- Use your ruler to measure the length of the heart.
- Identify the following parts of the heart:
- There are blood vessels entering and leaving the heart (arteries and veins). Arteries have much thicker, more rubbery walls than veins which have thin walls. See if you can identify the difference.
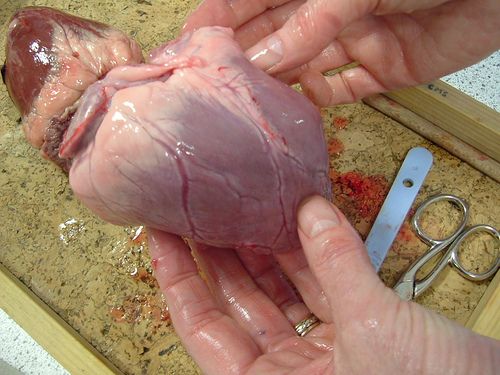
- Place your fingers inside the blood vessels to feel their texture and strength. Look inside the main arteries and veins as well and describe what you see to your group. Place your one finger down the aorta and see if you can feel any structures. The following photo shows the aorta opening.
Learners should be able to feel the valves at the base of the aorta. These will become visible later when viewing the internal structure of the heart.
- Examine the surface of the heart for blood vessels. Why do you think the surface of the heart also has blood vessels attached to it?
The heart muscle also needs a supply of blood and oxygen in order to function. This is supplied by the coronary arteries. Learners should be encouraged to take notes in their workbooks or a separate notebook throughout the dissection.
- Locate the atria and ventricles.
- Locate which is the right and which is the left hand side of the heart.
To locate which side is which in the heart, learners must hold the heart so that the coronary artery runs diagonally across the heart - this will be the the front. Then the left / right ventricles are on either side of the coronary arteries.
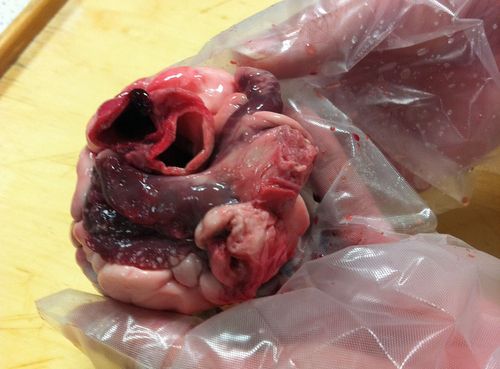
Part 3: Internal structure
- We are now going to cut into the heart to view the internal structure. Use the following diagrams to help you orientate the heart before cutting.
- Make a cut down the aorta and then through the left ventricle to the tip of the heart. A tip is to first cut through the aorta using scissors, and then to cut through the left ventricle using the scalpel.
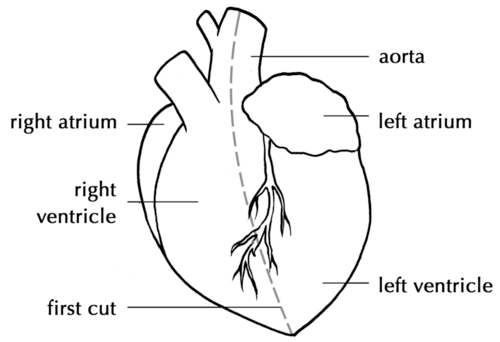
- Once you have made the cut, pull the ventricle walls apart so that you can view the inside. Can you see the structures at the base of the aorta that you felt in Part 1 (step b)? What do you think these structures do?
The aortic valve prevents the backflow of blood into the heart once it has been pumped out and into the aorta to travel to the rest of the body.
- Look at the following diagram to make the second cut upwards into the left atrium.
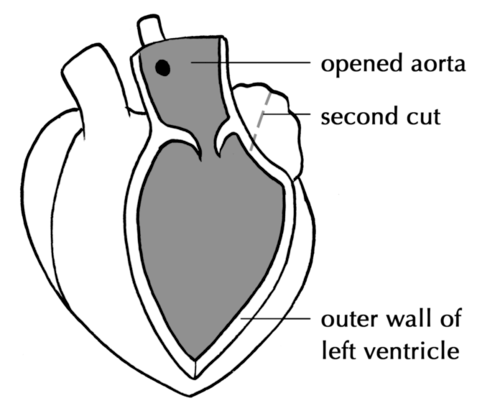
- Using your ruler, measure the thickness of the left atrium wall and the left ventricle wall. Write these measurements down.
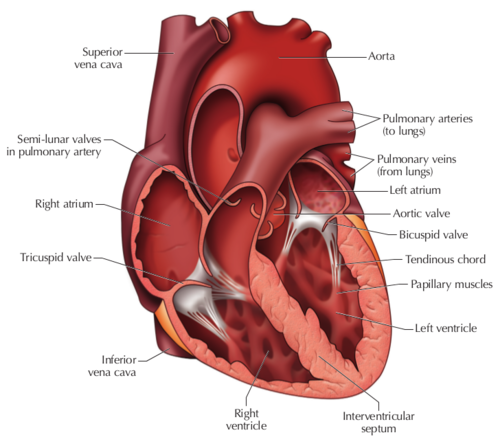
- You can now cut open the right side of the heart in the same way. Measure the thickness of the right ventricle wall. The following diagram provides a detailed overview of the internal structure of the heart. We have not discussed all of these structures and you are not required to know all of these. However, for this dissection, use this diagram to see how many of these parts you can identify in your dissected heart. If you are able to locate them in the actual heart, draw a ring around the label in the following diagram.
At this stage, you can also point out some of the other valves to the learners. This detail is not necessary to know, but it is very interesting when thinking about how the heart functions as a very efficient pump. Look at the areas where the atria and ventricles join to locate the bicuspid valve between the left atrium and ventricle, and the tricuspid valve between the right atrium and ventricle. They should be visible as thin flaps of tissue with tough "threads" or cords attached to the base of the flaps. The tricuspid valve on the right should have 3 flaps and the bicuspid valve on the left should have 2.
QUESTIONS:
Write a description of the look, feel and colour of the heart you observed. If you were able to measure the mass, write this down, and include the length of the heart in centimeters.
Learner-dependent answer.
Write down the thickness that you measured for the left ventricle and atrium walls. Why do you think there is a difference in the thickness of these walls? Hint: Think back to where the atria have to pump the blood and where the ventricles have to pump blood.
The ventricles have much thicker walls than the atria. This is because the ventricles need to pump the blood much further and with more force to the rest of the body, compared to the atria, which only pump blood into the ventricles.
Write down the thickness that you measured for the right ventricle wall. Mention possible reasons for the difference in thickness between the left and right ventricle walls. Once again, think about where each ventricle is pumping blood to.
The left ventricle should be thicker than the right ventricle. The left ventricle has to pump blood to the whole body (systemic circuit), while the right ventricle only has to pump blood to the lungs (pulmonary circuit).
Once the blood is pumped out of the heart, it enters the circulatory system in the body.
Blood circulation from the heart to the rest of the body
Once blood leaves the heart in the aorta, this main artery branches into smaller arteries which form a network throughout the body.
Remember that arteries carry blood AWAY from the heart and veins carry blood towards the heart.
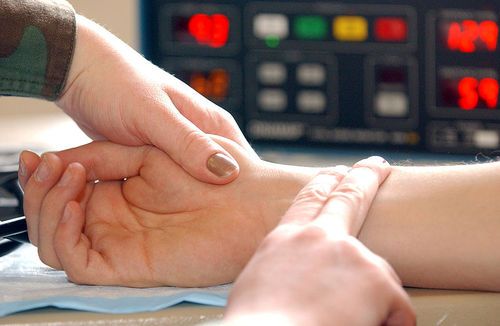
Feel your blood rushing through your body!
Later in this chapter learners are going do an investigation into their heart rate at rest and after exercise and they will then need to be quite skilled in taking their pulse and determining their heart rate. This activity is therefore included in preparation for this. You can get learners to all find their pulse in the way they find easiest. Once they have done this, get them to count their heart rate while you time for 30 seconds, indicating "Stop" and "Start". To obtain their heart rate at beats per minute, learners then multiply by 2.
INSTRUCTIONS:
- Put your index (pointer) and middle fingers against your neck in the hollow between your trachea (windpipe) and the large neck muscles. Use your finger tips as these are more sensitive. You should feel the throbbing of your blood.
- Can you find your pulse in your wrist? Place your middle and index fingers just below the creases in the skin of your wrist - on the side of your thumb. Press lightly until you feel the pulse which means the blood is pushing under your skin.
- You can also try and find your pulse behind your knee, on the inside of your elbow or near the ankle joint.
- Each throb of your pulse is when your heart pumps the blood from the left side of your heart into the arteries of your body, causing the pressure in the arteries to rise.
Count how many times your heart beats in one minute. Alternatively, count your heart beats for 30 seconds while a friend or your teacher times you, and write the number on the line below.
Learner-dependent answer
Now, calculate your heart rate in beats per minute and write your answer on the line below.
Learner-dependent answer. Learners have to multiply the number of heart beats in 30 seconds by two to calculate beats per minute.
A rate always measures something over time. In this activity we are calculating heart rate as beats per minute, as this is the most standard measurement used for heart rate. Can you think of some other units of measurements which indicate a rate?
Other units of measurement which indicate a rate are for example: km/h (kilometers per hour), m/s (meters per second), flow rate of a river in l/s (litres per second), etc.
Arteries then subdivide to form capillaries. Capillaries are in close contact with the body cells. Capillaries are much smaller than arteries. They form a fine network throughout the body's cells to make sure that all cells get a supply of blood and oxygen.
The capillaries leaving the cells with deoxygenated blood then combine to form form veins. Veins from the body carry deoxygenated blood back to the heart.
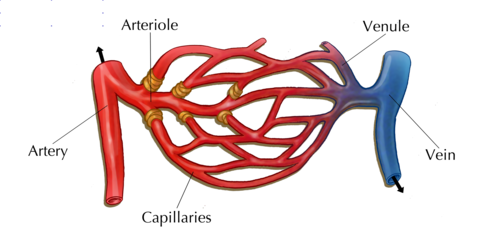
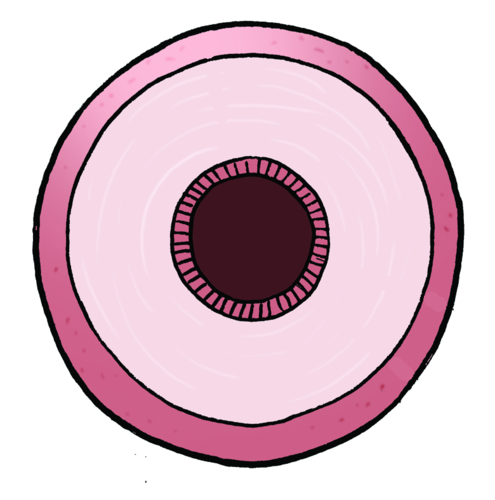
Arteries
- Arteries transport blood away from the heart.
- Arteries transport oxygenated blood (except for the pulmonary arteries).
- Arteries need to have strong muscular walls because they carry blood away from the heart under high pressure.
An exception to the rule of arteries carrying oxygenated blood, are the pulmonary arteries which carry deoxygenated blood away from the heart to the lungs to become oxygenated.
Veins
- Veins transport blood towards the heart.
- Veins transport deoxygenated blood (except for the pulmonary veins).
- The blood is flowing back to the heart and therefore the blood pressure in the veins is much lower.
An exception to the rule of veins carrying deoxygenated blood, are the pulmonary veins which carry oxygenated blood from the lungs to the heart to be pumped to the rest of the body.
Capillaries
- Capillaries form webs or networks around each cell to ensure that all cells receive nutrients and oxygen.
- Capillaries are much smaller than veins and arteries.
If you put TEN capillaries next to each other, together they would only be as thick as ONE human hair!
Tabulating differences between the blood vessels
INSTRUCTIONS:
- Compare arteries, veins and capillaries.
- Use the following table in which to do this comparison.
|
Blood vessel type |
Artery  |
Vein  |
Capillary  |
|
Function |
|||
|
Type of blood |
|||
|
Exceptions |
|
Blood vessel type |
 |
Vein 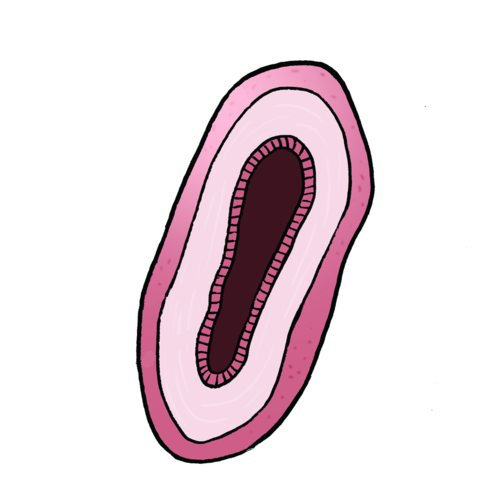 |
Capillary  |
|
Function |
Transport blood to the rest of the body |
Transport blood from the body to the lungs |
Transport blood from arteries to veins |
|
Type of blood transported |
Oxygenated |
Deoxygenated |
Mixed |
|
Exceptions |
Pulmonary arteries transport deoxygenated blood |
Pulmonary veins transport oxygenated blood |
NA |
Respiration within the cells
Page back to Chapter 1 of Life and Living to refresh your memory about the structure of mitochondria.
Within the cells, the mitochondria use oxygen to respire. This is called cellular respiration.
- The mitochondria combine oxygen with food particles, such as glucose.
- Energy from the food particles is released and can be used by the cell to perform various processes.
- During cellular respiration, carbon dioxide is released as a by-product.
The carbon dioxide diffuses from the cells back into the blood in the capillaries. This blood therefore becomes deoxygenated as oxygen has been removed and carbon dioxide is added.
Blood circulation from the body back to the heart and lungs
The deoxygenated blood in the body then returns to the right side of the heart through the veins in the circulatory system.
The right side of the heart pumps the deoxygenated blood to the lungs through the pulmonary arteries.
A circulation simulation!
Where possible teachers should set up the following activity in advance of the class arriving. It is aimed specifically at 'kinetic' learners to make them 'walk the circulatory system' in order to remember how it works.
Materials needed:
- 3 hula hoops, or something similar
- white A4 sheets
- coloured paper
- red and blue string
- prestik
Preparation for the lesson:
- Cut up coloured paper into blocks - you will need two different colours
- there should be enough blocks for each learner in the class to have at least one of each colour.
- one colour will represent oxygen and the other colour will represent carbon dioxide.
- Make the following signs on the back of recycled A4 pages - write in a clear, neat font so everyone can see it.
- Left side of heart
- Right side of heart
- Lungs
- Arms and hands
- Legs and feet
- Brain
- Stomach
- Kidneys
- Face
[There are many other body parts that could be included and teachers are welcome to add to this list. For the purposes of this activity though time constraints were considered and it was decided to add only those listed here.]
- Obtain the use of a large, open space, either in your classroom, a hall, or outside on the grass. Imagine a huge person is lying out on the space.
- Lay out 2 hula hoops to represent the left and right side of the heart.
- Place one more hula hoop above this to represent the lungs.
- Lay out the signs on the A4 pages to illustrate where each of the body parts will be in relation to the heart and lungs.
- Stick red wool (for oxygen carrying vessels) and blue wool (for carbon dioxide carrying vessels) with prestik or sellotape to the A4 posters (and between them) forming a large circulatory system as in the diagram in the activity.
- Leave a pile of red and blue blocks of paper at each body part - it works well if you put these in ice-cream or yoghurt tubs
- Learners start off in the lungs and will walk along the red lines to their different body parts as if they are traveling in the blood vessel to deliver oxygen. When they have delivered their oxygen (by dropping off the red blocks and picking up blue blocks) they will then travel along the blue lines to deliver carbon dioxide to the lungs and to get more oxygen.
- As one learner leaves the lungs, send another one off so that you have several learners walking through the system at any one point.
- If you have a large class, let a couple of learners walk through at a time. If you make the layout really big, then the whole class can form a long line of individual blood cells and move through in a line.
We are going to create a simulation of our circulation!
INSTRUCTIONS:
- Imagine that you are a red blood cell and you will be carrying oxygen around the body.
- Your teacher will help your class to lay out the huge body in an open space using A4 sheets with labels and hula hoops as in the following diagram.
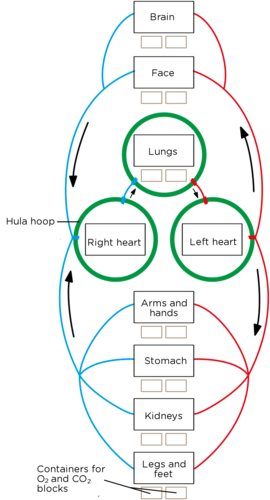
- There are two colours of paper blocks at each organ or body part and in the lungs. One colour will represent oxygen (preferably red) and the other colour will represent carbon dioxide (preferably blue).
- Start off by standing in the lungs and pick up oxygen. You now represent oxygenated blood.
- Walk to the left side of the heart.
- The heart now pumps you out to the body in the circulatory system. Leave the left heart hula hoop and walk to the organ or body part you are going to supply with oxygen.
- When you reach the body part, drop off your oxygen block into the container and now pick up a coloured block representing carbon dioxide. You now represent deoxygenated blood.
- Walk to the right side of the heart.
- From here, the heart pumps you to the lungs. Walk to the lungs.
- At the lungs, gaseous exchange takes place and you drop off the carbon dioxide you were carrying and pick up oxygen again.
- You can now repeat the cycle and walk to a different body part.
Make sure learners are able to visualise that they are forming a complete cycle or system which repeats. If they are battling, you can walk through it with them first to explain. The first time you could even demonstrate the activity by starting in the lungs and getting learners to instruct you on where to walk to next.
Heart rate
Your resting heart rate is often used as an indicator of how fit you are or whether there are possible health concerns that you should pay attention to.
Homework activity to measure your resting heart rate
Get learners to do this activity in the 3 days leading up to the lesson where you will investigate the effect of exercise on heart rate.
INSTRUCTIONS:
- Take your resting heart rate first thing when you wake up in the morning. Record how many times per minute your heart beats.
- Repeat this over 3 days to get an average - this is more reliable than a once-off reading.
- Record your resting heart rates in the table.
|
Heart rate (beats per minute) |
|
|
Day 1 |
|
|
Day 2 |
|
|
Day 3 |
|
|
Average |
We have now had a look at our heart rate when we are resting. But what happens when we do some kind of physical activity? Will your heart rate increase or decrease? Do you think you could use your heart rate as a measure of how fit you are? Let's investigate!
Measuring and comparing heart rates before and after exercise
For this investigation, the basic instructions are given below, and then learners will have to design the investigation themselves. A suggestion is to break your class up into big groups of at least 10 learners. They can then discuss how they are going to do the investigation. Each learner must write down their own method and design after they have discussed how they are going to do the recordings within their group. The only materials that learners will need are timing devices - you can either provide some stopwatches, or learners can use the stopwatch on their mobile phones. If learners opt to run for example, suggest running on the spot, as it will be difficult otherwise to control how far or fast individual learners will run in 2 minutes. In general, fitter people have a slower resting heart rate and return to their resting heart rate faster than unfit people after a bout of exercise, but the focus for this activity should be that learners take objective measurements and analyse the data that they collect appropriately. Therefore if the findings of the investigation do not agree with the expected results, full credit should still be given for an accurate interpretation.
This is the first investigation that learners will be conducting in Gr. 9. An interesting video to watch beforehand about the scientific method is given in the visit box and titled "The times and troubles of the Scientific Method". It could be an interesting class exercise to watch this video first and then have a class discussion about learners' understanding of the scientific method. At school level, the scientific method is taught in specific steps, but it is very important for learners to also understand how science discoveries often take place at university level and that they often happen by chance or as a side result of another experiment.
A video on the scientific method
INSTRUCTIONS:
Measure the heart rate of at least 10 learners in your class after they have done 2 minutes of skipping or running on the spot. Discuss in your group how you are going to do this and write down your method. Record your measurements and use a graph to display your findings. Make deductions about your class' fitness levels based on their heart rates after completing the graphs and discuss the benefits of exercise for the circulatory and respiratory system (also known as the cardiovascular system).
AIM:
What is the aim of your investigation?
Learner-dependent answer
The aim could vary slightly from one group to the next, but in general the aim is to see what the effect is of exercise on heart rate and to make deductions about class fitness.
A possible extension:
Investigate how quickly a learner's heart rate returns to resting heart rate after physical activity. This will indicate how much their heart rate increased during the exercise as you will measure before and after activity. But then you can also measure the heart rate at 1 minute intervals after the exercise to see how quickly the heart rate decreases to resting rate again. This gives a more rounded measure of fitness level as the faster a person is able to recover, the more fit they are. This should only be done as an extension if you feel your learners are capable and have time to do it within the lesson. This graph would be a line graph.
HYPOTHESIS:
What is your hypothesis for your investigation?
Learner-dependent answer
A possible hypothesis which learners might propose is: "Heart rate increases after exercise."
VARIABLES:
In any scientific investigation, it is crucial to identify the variables at the start.
- When you do an investigation you are going to change or vary one factor to answer your question. This is called the independent variable.
- The factor that you are measuring or observing is the dependent variable.
- Normally, you will have a third variable, the control variable. These are the factors that you want to keep the same (unvaried) during your test so they cannot affect your results.
What are the variables involved in this investigation?
The independent variable is the type of activity - exercise or resting.
The dependent variable is the heart rate as this will depend on whether the learner is at rest or has done physical activity (and how vigorous the physical activity was).
There are several controlled variables: Learners of the same age, about the same mass, all girls / boys, all about the same fitness level, all doing the same type of exercise, all doing it for 2 minutes.
MATERIALS:
Write a list of the materials you will need for this investigation.
Possible materials to be listed are:
- stopwatch
- skipping rope (if learners are to skip, otherwise they may just run on the spot)
- recording sheet and pen
METHOD:
Write down the method below. The steps must be numbered.
Learner-dependent answer
Make sure learners discuss all aspects of the investigation. You can help learners with this part of their discussion in their groups by pointing out questions that they should answer when writing their method. For example, how will we do the recording? This will depend on how many skipping ropes are available if they are to be used. Will one learner skip at a time while the others watch and record the time? Or if the learners are to jog on the spot for 2 minutes, then perhaps 5 learners can jog at once while the other 5 do the recordings. Learners must specify how they will record heart rate and where. Will it be on the wrist or the neck? Is it best to record heart rate for 10 (or 15) seconds and multiply 6 (or 4) to get the beats per minute? This is because if they record the heart rate for a whole minute after exercise, the rate might have started to slow down already by the end of the minute and therefore not be an accurate reflection of the heart rate immediately after exercise.
RESULTS:
Design a table that will record the heart rate of the 10 learners when at rest and after 2 minutes of physical activity (skipping or jogging on the spot). Remember to give your table a heading.
Learner-dependent answer
A possible table that learners might produce could look as follows:
Table showing the heart rate of 10 learners before and after 2 minutes of skipping
|
Learner name |
Heart rate before (beats/min) |
Heart rate after (beats/min) |
|
Megan |
||
|
Thembile |
||
|
etc |
Learners may also come up with additional columns, for example they may add a column to calculate the change in heart rate from before exercise to immediately after exercise.
ANALYSIS:
In order to analyse your results, it is helpful to plot a graph as this helps you to see the relationship between the dependent and independent variables and to make comparisons. Below is a description of different types of graphs and when they are used.
- Line graph: A line graph is used if the data you have is numerical and changes continuously, often over time. A line graph is useful for visualising a trend in the data over time.
- Bar graph: A bar graph is used to compare different categories or groups, normally when the categories are words. There are spaces between the bars in a bar graph. A double bar graph can compare two sets of data. In a double bar graph, two of the bars touch and are shown in different colours, and are separated by a space from the next two bars.
Learners may not understand how a double bar graph is different from a bar graph, and may not understand what is meant by two sets of data. An example of a double bar graph would be the minimum and maximum temperatures on different days of the week. In this example, the day of the week is the independent variable, and we are looking at two dependent variables (two sets of data) - namely the maximum and minimum temperatures. For a graph like this, one would indicate "days of the week" on the x-axis, and you would have two bars next to each other for each day. One would show the minimum temperature and one would show the maximum temperature. The bars showing the two temperatures would touch, and the days of the week would be separated by a space.
- Histogram: A histogram is used when the data for the independent variable is numerical and can be grouped into categories which are continuous. The bars in a histogram touch each other.
- Pie graphs: Pie graphs (or sector diagrams) are used to show the relative proportions or percentages of the categories when they make up a whole.
- Which type of graph will you use to represent the data in this investigation? Give a reason for your answer.
Learners might find this difficult to answer, but it is crucial that they understand the types of graphs and when each one should be used. In this investigation, we want to show the data for each learner along the independent axis (x-axis). The learners are not related in any way, nor are they numerical values - they are discrete categories described by words (ie. the name of the learner). We will therefore use a bar graph. In this investigation we will actually be using a double bar graph. There will be two bars for each learner - the first bar being the heart rate before exercise and the second bar being the heart rate after exercise.
- How will you differentiate on your graph between the two sets of measurements for each learner (ie. heart rate before and after exercise)?
Learners can distinguish between the before and after readings by creating a key where the one set of data is in one colour or pattern and the other set is in another colour or pattern.
Tips for drawing your graph:
- Start by giving your graph a title, something that shows which dependent and independent variables you were studying.
- Use the appropriate axes for each variable: x-axis = independent variable (along the bottom of the graph) and y-axis = dependent variable (along the side).
- Label your x-axis and y-axis.
- Use an appropriate scale and use the space that you have been given to draw the graph wisely.
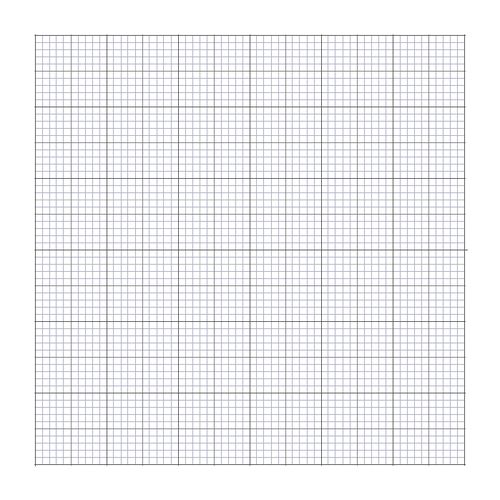
Draw your graph on the graph paper provided.
When looking at learners' graphs or helping them to draw them, make sure they have the heart rate in beats/min on the dependent y-axis and the learners names on the independent x-axis. Each learner will have two bars, one for heart rate before exercise and one for heart rate after exercise. For each learner, these two bars should be touching, but there should be a space between the sets of bars for each learner. As a suggestion, if using the graph paper provided here, in order to fit 10 learners along the x-axis it is best to make each bar 2 blocks wide (the smallest blocks), with 1 or 2 blocks in between each learner. If you have graph paper available, perhaps provide learners with a sheet to practice on and once they know how to draw their graph, they can copy it into the workbook here.
Which learner in your group had the smallest increase in heart rate from before to after physical activity?
Learner-dependent answer
Which learner in your group had the largest increase in heart rate from before to after physical activity?
Learner-dependent answer
Rank the learners in your group from the smallest increase to the largest increase.
Learner-dependent answer
What deductions can you make about the fitness level of the learners in your group based on their heart rates before and after the physical activity? When you make deductions, ask yourself these questions:
- What do you see is happening?
- What do you notice that is different?
-
What does this imply?
Learners should deduce that the fitter an individual is, the smaller the increase in the heart rate from before to after physical activity. Learners that are unfit will sometimes show a bigger increase in heart rate after the physical activity (provided that the activity was carried out to the same level of effort).
It is vitally important that learners report their actual findings. If they do not come up with results that agree with what they are expecting to find, it is FAR better that they report what they found than that they "tweak" their results or try to alter their discussion or hypothesis to fit in with what is expected. Full credit and praise should be given to an investigation that was carried out well and truthfully reported, rather than one in which certain information or findings are made up or changed. If students know what they were expecting, and think that there is something wrong with their results they should be encouraged to make suggestions about why they didn't see what they were expecting to see in the discussion section that follows.
DISCUSSION AND EVALUATION:
An important part of an investigation is to discuss your results and observations and evaluate them. At this point you get to talk about your results and explain them.
The learners may also notice a trend in the resting heart rates of the members of their group that were recorded in the three days prior to this activity, and they are welcome to hypothesize and make observations. They are likely to notice for example, that the fittest members had the lowest resting heart rates.
You also point out any shortcomings of the investigation. What could you have done to improve the investigation? You can also point out any unexpected results in your investigation and try to explain these using your science background. You should do some background research into the benefits of exercise for the cardiovascular system and write some points in your discussion.
Assess whether learners have adequately discussed their results. As previously mentioned, their actual results may not agree with what they should find. In this case they still deserve full credit for their observations. However they also need to show that they know what should have happened, based on their research around the topic. They should point out that fitter individuals have a stronger heart compared to unfit individuals. Like all muscles, the heart becomes stronger as a result of exercise, therefore, it can pump more blood through the body with every beat. As a result, during exercise, a fit heart does not need to pump as fast to deliver the same amount of blood that an unfit heart would, and it does so with less strain. Assess whether learners have pointed out any shortcomings in their investigation and if they have made suggestions. Learners should also discuss some of the benefits of exercise for the cardiovascular system, such as decreasing the risk of heart attack and other heart diseases.
CONCLUSION:
Write a conclusion for your investigation. In a conclusion, you need to refer back to your hypothesis to see whether your results support or reject the hypothesis.
Learner-dependent answer
REFERENCES:
If you researched any additional information to support your discussion, you need to reference these sources in the following way:
- Books: Surname of author, Name of book, Year published, Name of publisher, Page numbers you used.
- Internet: Give the full URL for the website.
- Person: Personal communication with "Name, Surname, Occupation."
Learner-dependent answer
Simply listing Google or Wikipedia as your source is not recognised as a reference for your work.
Watch this video that summarises the respiratory and circulatory systems
Summary
- Oxygen is inhaled in a process called breathing.
- In the lungs, gaseous exchange occurs by diffusion.
- Oxygenated blood is transported in pulmonary veins from the lungs to the left side of the heart.
- The oxygenated blood is pumped through the aorta and arteries to the different parts of the body.
- Arteries divide into capillary networks between the cells, where oxygen and food diffuse from blood to cells.
- The cells carry out cell respiration, forming carbon dioxide, which diffuses back to the capillaries.
- Capillaries flow into veins that carry the deoxygenated blood to the right side of the heart.
- At the heart the deoxygenated blood is transported to the lungs by the pulmonary artery where gaseous exchange takes place once more.
- The carbon dioxide from cellular respiration diffuses out of the blood into the lungs and is exhaled.
Concept map
From what we have learnt in this chapter, we can say that the circulatory and respiratory systems consist of 4 processes which occur in a cycle. Two of these processes are named in the concept map, and there are spaces to write the other two. During breathing, what is the gas which is inhaled for respiration, and which is the gas which is exhaled from respiration? Fill these in too. What is the name for the process by which these gases move across the cell membranes?
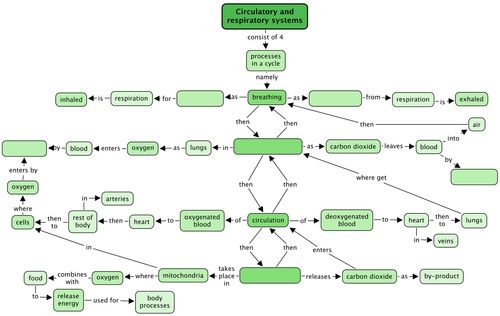
Teacher's version

Revision Questions
Draw a flow diagram to show how the different components of the respiratory and circulatory systems function in a cycle. [6 marks]
learner-dependent
Complete these sentences. Write just the word on the line below. [13 marks]
- Oxygen diffuses into the blood from the air in the _____.
alveoli
The blood vessels that carry blood away from the heart are called _____.
arteries
Tiny blood vessels called _____ come into close contact with _____.
capillaries, cells
Carbon dioxide _____ out of the cells into the _____.
diffuses, capillaries/bloodstream
_____ carry the _____ blood to the heart from where it is sent to the _____ to be oxygenated.
Veins, deoxygenated, lungs
The chemical reaction that takes place in the _____ of the cell when oxygen and glucose combine to release _____ is called _____.
mitochondria, energy, respiration
Complete this table to describe what happens in the chest during breathing.. [6 marks]
|
Inhaling |
Exhaling |
|
|
Chest volume |
||
|
Pressure on lungs |
||
|
Air movement |
|
Inhaling |
Exhaling |
|
|
Chest volume |
Expands |
Becomes smaller |
|
Pressure on lungs |
Decreases |
Increases |
|
Air movement |
Moves into lungs |
Moves out of lungs |
Match the word on the left to its correct meaning on the right. Write only the letter next to the word to indicate the correct meaning. Use each letter only once. [13 marks]
|
breathing |
a |
arteries, veins and capillaries |
|
|
diaphragm |
b |
the type of tissue that keeps keeps the trachea open |
|
|
alveoli |
c |
small grape-like bunches at the ends of the bronchiole |
|
|
trachea |
d |
the movement of particles through a permeable membrane from a high to a low concentration |
|
|
heart |
e |
the tube that carries air to from the mouth to the bronchi |
|
|
veins |
f |
blood vessels that transport blood away from the heart |
|
|
respiration |
h |
blood vessels that carry blood towards the heart |
|
|
cartilage |
i |
tubes leading from the trachea into the lungs |
|
|
bronchi |
j |
the process takes place in mitochondria to release energy for the cell to use |
|
|
capillaries |
k |
the organ responsible for pumping blood throughout the body |
|
|
types of blood vessels |
l |
inhaling and exhaling |
|
|
diffusion |
m |
these blood vessels surround alveoli to allow for gaseous exchange |
|
|
arteries |
n |
a large dome shaped muscle across the bottom of the rib cage |
|
l |
breathing |
a |
arteries, veins and capillaries |
|
n |
diaphragm |
b |
the type of tissue that keeps keeps the trachea open |
|
i |
alveoli |
c |
tubes leading from the trachea into the lungs |
|
e |
trachea |
d |
the movement of particles from a high to a low concentration through a semi-permeable membrane |
|
k |
heart |
e |
the tube that carries air to from the mouth to the bronchi |
|
h |
veins |
f |
blood vessels that transport blood away from the heart |
|
j |
respiration |
h |
blood vessels that carry blood towards the heart |
|
b |
cartilage |
i |
small grape-like bunches at the ends of the bronchiole |
|
c |
bronchi |
j |
the process takes place in mitochondria to release energy for cells to use |
|
m |
capillaries |
k |
the organ responsible for pumping blood throughout the body |
|
a |
types of blood vessels |
l |
inhaling and exhaling |
|
d |
diffusion |
m |
blood vessels surround cells to allow for diffusion |
|
f |
arteries |
n |
a large dome shaped muscle across the bottom of the rib cage |
The following image is an artist's drawing of one of the structures you learnt about in this chapter. What does it represent? Give three reasons for your answer. [3 marks]
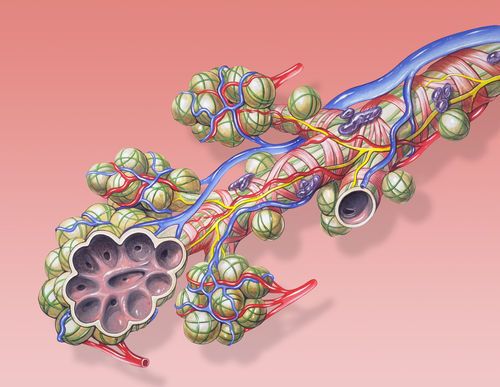
This is showing a bronchiole and alveoli. This is evident as there is one main tube which is the bronchiole. There are several alveoli present, which are the sac-like structures within the lungs. You can also see that these are tiny sacs as in the bottom left, the sacs have been shown as open. You can also see the network of capillaries which surround the alveoli bringing deoxygenated blood to the lungs to become oxygenated.
Describe how capillaries are suited to their function of allowing gaseous exchange within the lungs and at the cellular level in the body. [3 marks]
The capillaries are very small and thin-walled so that they can branch between the cells of the tissues and come into close contact with the cells to allow for diffusion. This also allows the capillaries to reach all the cells within the body to deliver oxygen and nutrients and remove waste products.
Total [44 marks]